🧶 Beautiful ✨ Detailed 💝 Adorable

The Magic of Autumn - The Pine Cone Amigurumi Pattern

The Magic of Autumn - The Pine Cone Amigurumi Pattern
4.0★ Rating
5-7 Hours Time Needed
3.6K Made This
✂️

Intermediate Level

Ideal for those with basic crochet experience, featuring slightly more advanced stitches and techniques to expand your skills.

⏱️

Weekend Treat

Takes 5-7 hours, making it an enjoyable project to finish over a couple of days.

🧸

Cute Companion

An adorable friend to cherish, handcrafted with love to bring comfort and joy for years to come.

About This The Magic of Autumn - The Pine Cone Amigurumi Pattern

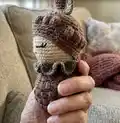
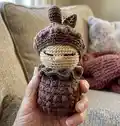
This pattern makes a small pine cone amigurumi complete with a hat, collar, stalk and embroidered leaf veins. It uses bobble stitch texture for the body to recreate pine cone scales and includes a step-by-step bobble stitch tutorial. The finished toy measures about 14 cm and uses fine cotton yarn for neat stitches.

The Magic of Autumn - The Pine Cone Amigurumi Pattern crochet pattern - detailed view of completed project

Follow the rounds exactly for consistent shaping and use the assembly guide and photos to place features accurately. A fun intermediate project ideal for autumn decor or a tiny handmade gift.

Why You'll Love This The Magic of Autumn - The Pine Cone Amigurumi Pattern

I absolutely love this pattern because it turns simple stitches into a very textured, characterful pine cone amigurumi that feels magical. The bobble stitch creates such a lovely tactile surface that I find irresistibly cozy. I enjoy the little finishing touches — the embroidered leaf veins and ruffled collar make each piece unique. This design is compact but full of personality, and I always smile when I see the finished friends on my shelf.

The Magic of Autumn - The Pine Cone Amigurumi Pattern step 1 - construction progress The Magic of Autumn - The Pine Cone Amigurumi Pattern step 2 - assembly progress The Magic of Autumn - The Pine Cone Amigurumi Pattern step 3 - details and accessories The Magic of Autumn - The Pine Cone Amigurumi Pattern step 4 - final assembly and finishing

Switch Things Up

I love how easy it is to customize this design by changing colors; try pastel shades for a spring-themed pine cone or deep plums for a jewel-toned version.

Want a mini keychain? Use thinner yarn and a smaller hook to make a palm-sized version perfect for bags.

To make it chunkier and more cuddly, switch to a bulky yarn and a larger hook for a bigger, tactile pine cone companion.

I often add embroidered freckles or different eye shapes to change the expression — small changes in eyes give each toy a new personality.

Try adding a tiny scarf or crocheted outfit pieces to create seasonal characters; a small felt badge or button can personalize gifts.

If you like more texture, increase the number of loops in the bobble stitch as described in the bobble tutorial to make puffier scales.

I sometimes use metallic embroidery thread for the leaf veins to add a subtle sparkle and make the details pop.

For a poseable version, insert a short length of craft wire into the stalk before stuffing so the top can be angled slightly.

Combine colors in the body rows by changing yarn color every few rounds to create ombre or striped pine cones that look very modern.

If you plan to sell finished toys, try different color combinations and offer matching sets — a hat and collar in contrasting shades are always popular.

Finally, I recommend testing one small part first (like the collar) when changing stitch counts so you can adjust the length and fit before assembling the whole toy.

Common Mistakes & How to Fix Them

✗ Skipping the stitch marker when working continuous rounds leads to losing the start of round; place a stitch marker at the first stitch of every round to keep accurate counts. ✗ Not stuffing gradually causes lumps and uneven shape; stuff little by little and shape as you go to maintain smooth contours. ✗ Forgetting to embroider facial placement before sewing the head will make sizing hard; mark the eye and nose positions while the head is still flexible, then embroider before final attachment. ✗ Pulling the bobble stitch loops too tightly flattens the texture; keep even tension and gently pull through all loops to create puffy bobbles without distorting surrounding stitches.

The Magic of Autumn - The Pine Cone Amigurumi Pattern

Create a tiny, handmade pine cone amigurumi inspired by autumn forests. This pattern guides you through bobble stitches and charming details like a ruffled collar, hat, leaf and stalk. You will enjoy clear rounds and assembly photos to help you finish a sweet decor piece or baby toy. Perfect for gifting or seasonal displays—make one in cozy neutral shades.

Intermediate 5-7 Hours

Materials Needed for The Magic of Autumn - The Pine Cone Amigurumi Pattern

— Main Fabric

  • 01
    Scheepjes Catona n° 404 - 1 x 25 grams (skin/cream small amounts)
  • 02
    Scheepjes Catona n° 507 - 1 x 50 grams (main brown color)
  • 03
    Scheepjes Catona n° 387 - 1 x 25 grams (green for leaf accents)
  • 04
    Scheepjes Stone Washed n° 804 - 1 x 50 grams (alternative main color option)
  • 05
    Scheepjes Catona n° 157 - 1 x 50 grams (alternative brown tone)
  • 06
    Scheepjes Catona n° 504 - 1 x 25 grams (alternative accent color)

— Tools Required

  • 01
    Crochet hook size 2.5mm
  • 02
    Yarn needle
  • 03
    Cotton yarn (see color chart for specific colors and amounts)
  • 04
    Yarn for embroidering (for eyes, lashes and leaf veins)
  • 05
    Fiberfill (polyester stuffing)
  • 06
    Scissors
  • 07
    Stitch marker(s)

Progress Tracker

0% Complete

— How to make a bobble stitch :

Info :

Yarn over, insert the hook into stitch, pull up a loop, yarn over and pull through 2 loops only (like the beginning of one double crochet stitch): we have 2 loops on the hook;

Info :

Yarn over, insert the hook into the same stitch as before, pull up a loop, yarn over and pull through 2 loops only: we have 3 loops on the hook;

Info :

Yarn over, insert the hook into the same stitch as before, pull up a loop, yarn over and pull through 2 loops only: we have 4 loops on the hook;

Info :

Yarn over, insert the hook into the same stitch as before, pull up a loop, yarn over and pull through 2 loops only: we have 5 loops on the hook;

Info :

Yarn over, pull through all 5 loops at once;

Info :

Single crochet in next stitch;

Info :

Repeat the number of times indicated. It is possible to vary the thickness of the bobble stitch. For example, to obtain more relief, we can repeat the work 5 times instead of 4 to have 6 loops on the hook.

— Head :

Info :

Work with white yarn:

Round 1 :

6sc in a magic ring (6)

Round 2 :

inc x 6 (12)

Round 3 :

(1sc, inc) x 6 (18)

Round 4 :

(2sc, inc) x 6 (24)

Round 5 :

(3sc, inc) x 6 (30)

Round 6 :

(4sc, inc) x 6 (36)

Round 7 :

(5sc, inc) x 6 (42)

Round 8 :

(6sc, inc) x 6 (48)

Round 9-15 :

Sc in all st [7 rounds] (48)

Round 16 :

(6sc, dec) x 6 (42)

Round 17 :

(5sc, dec) x 6 (36)

Round 18 :

(4sc, dec) x 6 (30)

Round 19 :

(3sc, dec) x 6 (24)

Info :

Fasten off and leaving enough yarn for sewing. Stuff firmly.

— Leaf :

Info :

Work with green yarn:

Round 1 :

4sc in a magic ring (4)

Round 2 :

(1sc, inc) x 2 (6)

Round 3 :

(2sc, inc) x 2 (8)

Round 4 :

(3sc, inc) x 2 (10)

Round 5 :

(4sc, inc) x 2 (12)

Round 6-8 :

Sc in all st [3 rounds] (12)

Round 9 :

(2sc, dec) x 3 (9)

Round 10 :

(1sc, dec) x 3 (6)

Info :

Fasten off and leaving enough yarn for sewing. Do not stuff.

— Collar :

Info :

Work in rows with green yarn: Ch27, start in the 2nd ch from the hook.

Round 1 :

26sc, ch2, turn (26)

Round 2 :

3Dc in all st, ch1, turn (78)

Round 3 :

1Hdc in all st (78)

Info :

Fasten off and leaving enough yarn for sewing.

— Body :

Info :

Work with brown yarn:

Round 1 :

6sc in a magic ring (6)

Round 2 :

inc x 6 (12)

Round 3 :

inc x 12 (24)

Round 4 :

(BS, 1sc) x 12 (24)

Round 5 :

(1sc, inc) x 12 (36)

Round 6 :

(BS, 1sc) x 18 (36)

Round 7 :

(2sc, inc) x 12 (48)

Round 8 :

(BS, 1sc) x 24 (48)

Round 9 :

Sc in the back loop of all st (48)

Round 10 :

(BS, 1sc) x 24 (48)

Round 11 :

(2sc, dec) x 12 (36)

Round 12 :

(BS, 1sc) x 18 (36)

Round 13 :

Sc in all st (36)

Round 14 :

(BS, 1sc) x 18 (36)

Round 15 :

(4sc, dec) x 6 (30)

Round 16 :

(BS, 1sc) x 15 (30)

Round 17 :

(3sc, dec) x 6 (24)

Round 18 :

(BS, 1sc) x 12 (24)

Round 19 :

Sc in all st (24)

Info :

Fasten off and hide the yarn. Stuff firmly.

— Stalk :

Info :

Work with brown yarn :

Round 1 :

6sc in a magic ring (6)

Round 2 :

inc x 6 (12)

Round 3 :

(3sc, inc) x 3 (15)

Round 4 :

Sc in the back loop of all st (15)

Round 5 :

Sc in all st (15)

Round 6 :

(3sc, dec) x 3 (12)

Round 7 :

Sc in all st (12)

Round 8 :

(2sc, dec) x 3 (9)

Round 9-11 :

Sc in all st [3 rounds] (9)

Info :

Fasten off and leaving enough yarn for sewing. Stuff firmly.

— Hat :

Info :

Work with brown yarn:

Round 1 :

6sc in a magic ring (6)

Round 2 :

inc x 6 (12)

Round 3 :

inc x 12 (24)

Round 4 :

(BS, 1sc) x 12 (24)

Round 5 :

(1sc, inc) x 12 (36)

Round 6 :

(BS, 1sc) x 18 (36)

Round 7 :

(2sc, inc) x 12 (48)

Round 8 :

(BS, 1sc) x 24 (48)

Round 9 :

(3sc, inc) x 12 (60)

Round 10 :

(BS, 1sc) x 30 (60)

Round 11 :

(3sc, dec) x 12 (48)

Round 12 :

(6sc, dec) x 6 (42)

Round 13 :

(5sc, dec) x 6 (36)

Round 14 :

(4sc, dec) x 6 (30)

Info :

Fasten off and hide the yarn.

— Assembling :

Info :

With golden thread, embroider the veins of the leaf.

Info :

Sew the stalk to the top of the hat.

Info :

Sew the leaf between the stalk and the hat.

Info :

Sew the head and body together.

Info :

Embroider the nose between round 14 and round 15, 3 sts long. Embroider the base of the eyes between round 13 and round 14, 3 sts long. Embroider the lashes one row above.

Info :

You can use blush to color the cheeks.

Info :

Attach the collar around the neck and put the hat on the head.

Assembly Instructions

  • With golden thread, embroider the veins of the leaf to give a realistic finish and subtle detail.
  • Sew the stalk to the top of the hat securely so the stalk stands upright when the hat is placed on the head.
  • Sew the leaf between the stalk and the hat, aligning the leaf veins toward the front for a natural look.
  • Sew the head and body together, matching the neck opening and hiding the joining stitches for a neat finish.
  • Embroider the nose between round 14 and round 15 (3 sts long), embroider the base of the eyes between round 13 and round 14 (3 sts long) and place the lashes one row above.
  • Attach the collar around the neck, pinning it evenly before sewing, then place the hat on the head and adjust position as desired.

Important Notes

  • 💡Each part is worked in continuous rounds (do not join rounds with a slip stitch) unless instructed otherwise in the pattern.
  • 💡Use a stitch marker to mark the beginning of each round; this helps you when counting your stitches to compare with the pattern.
  • 💡The color of the round/row will be indicated with a square just before the round/row instructions in the pattern.
  • 💡Stuff firmly but gradually for best shape; overstuffing can distort the textured bobble stitch.

This adorable Pine Cone amigurumi is made to bring a touch of autumn warmth to your home and heart. Handmade details like the bobble stitch body and embroidered leaf make each one special and cozy. 🍂🧶 Make one to gift or display — they make sweet seasonal companions and tiny keepsakes. 🧵✨

You ask,

we answer.

FAQs

What size will the finished piece be?

The finished amigurumi measures about 14 cm tall when using the recommended yarn and 2.5mm hook.

Can I use different yarn weights for this pattern?

Yes, but changing yarn weight will change the finished size; use an appropriate hook and expect different stitch counts for a perfect fit.

Do I need prior crochet experience for this pattern?

This pattern is rated intermediate and assumes you know basic amigurumi techniques, bobble stitches and how to work in continuous rounds.

How long does this project typically take to complete?

Most crocheters finish this project in 5-7 hours, depending on experience, speed and how many details you embroider.