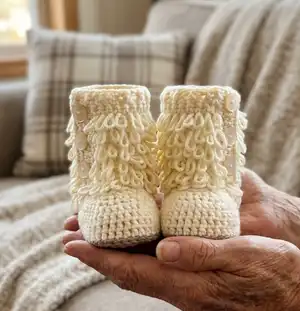
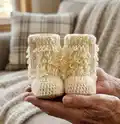
Make adorable, textured baby boots with a delightful loop-stitch fur trim that looks handmade and cozy. This pattern guides you through two sizes (0-6 months and 6-12 months) with clear step-by-step rounds and helpful photos. You will enjoy creating a unique gift that combines classic shaping with a playful furry finish. Perfect for crocheters who want a charming baby accessory with personality.
Progress Tracker
0% Complete
— Materials :
Info :
Sole - Color A - 1oz worsted weight yarn. Color B - 3.5oz worsted weight yarn. Size F or 3.75mm Hook. 6 - 1/2 inch buttons. Featured yarn is "Shine" worsted weight cotton by Knit Picks.
— Abbreviations :
Infos :
Ch Chain. Sc Single crochet. 2tog Single crochet decrease. Hdc Half double Crochet. Sl st Slip stitch. Lp st Loop stitch. Fp dc Front post double crochet. Bp dc Back post double crochet.
— Notes :
Info :
1. Chain stitch does not count as a stitch. 2. When joining at end of round, always join to the top of the first stitch of the round. 3. This pattern is written with all rounds starting from the center back of the heel. When starting a new round make sure your first stitch is in the center of the heel. *If your join is in the center: Start round in the first stitch which is the same stitch that the chain stitch is in. *If your join has strayed to the side by one stitch: Skip over the first stitch and start the round in the next stitch over. The last stitch of the round will then be placed in the stitch you skipped at the beginning.
— Example round :
Info :
Ch 1 , 2 sc in each of the first two stitches, 4 sc, 4 hdc, [2 hdc in next stitch] 4 times, 4 hdc, 4 sc, 2 sc in each of the last two stitches. Join with sl st. 32 total stitches in round.
Round 1 :
Ch1(does not count as stitch)
Round 2 :
2 sc in each of the first two stitches.
Round 3 :
1 sc in each of the next 4 stitches.
Round 4 :
1 hdc in each of the next 4 stitches.
Round 5 :
2 hdc in the next stitch.
Round 6 :
Repeat step 5, 3 more times.
Round 7 :
1 hdc in each of the next 4 stitches.
Round 8 :
1 sc in each of the next 4 stitches.
Round 9 :
2 sc in each of the last two stitches.
Info :
Gauge: 5 sc stitches to 1 inch using F 3.75mm hook and worsted weight yarn. Change hook size if necessary to obtain gauge.
— How to make loop stitch :
Info :
There are different ways to make the loop stitch. This way I think lays down the best loop and looks best with this pattern. 1. Insert hook into next stitch and form loop of yarn around first finger (See picture A). 2. Draw both sides or strands of this looped yarn through stitch, There should be three strands on hook now. (See pictures B & C). 3. Slip finger out of loop, (See picture D) 4. Yarn over and draw through all three loops on hook. (See picture E). After finishing boot you can straighten and tighten rows of loops by sticking a hook through rows of loops and pulling.
— How to read pattern :
Infos :
A. When there is a number followed by a stitch, that stitch needs to be worked over that number of stitches. B. When you see Brackets [] in the pattern that means that you work everything in them as a set or together.
— 0-6 Months :
Info :
Please read notes before starting. Measuring 3.75 inches in length. For 6-12 months see page 4.
— Sole (Make 2) :
Round 1 :
With color A ch 13, 2 hdc in 3rd ch from hook, 9 hdc, 4 hdc in last ch, Now working down the other side of beginning chain work 9 hdc, 2 hdc in last ch that already has 2 hdc in it. Join with sl st to top of first stitch. 26 total stitches in round.
Round 2 :
Ch 1, 2 sc in each of the first two stitches, 4 sc, 5 hdc, 2 hdc in each of the next 4 stitches, 5 hdc, 4 sc, 2 sc in each of the next two stitches. Join with sl st. 34 total stitches in round.
Round 3 :
Ch 1, 2 sc, 2 sc in next stitch, 9 sc, 3 hdc, 2 hdc in next two stitches, 2 hdc, 2 hdc in each of the next two stitches, 3 hdc, 9 sc, 2 sc in next stitch. Join with sl st and bind off! 40 total stitches in round. (See picture F)
Round 4 :
With color B and wrong side of sole facing you, attach yarn at center back of heel. Sl st all the way around sole. Join with sl st. 40 total stitches in round. It should look like this when you are done with slip stiches. (see picture G)
— Upper Shoe (0-6 months) :
Round 5 :
Ch 1, sc in all slip stitches. Insert hook only through slip stitch on top not through sc below. (See picture H) Join with sl st. 40 total stitches in round.
Round 6 :
Ch 1, sc all the way around. Join with sl st. 40 total stitches in round.
Round 7 :
Ch 1 sc all the way around. Join with sl st. 40 total stitches in round.
Round 8 :
Ch 1, sc2tog, 14 sc, [sc2tog, 2 sc] two times. sc2tog, 14 sc. Join with sl st. 36 total stitches in round.
Round 9 :
Ch1, 12 sc, sc2tog, 1 sc, sc2tog, 2 sc, sc2tog, 1 sc, sc2tog, 12 sc. Join with sl st. 32 total stitches in round.
Round 10 :
Ch 1, 6 Lp st. (See notes on page 1) 4 sc, sc2tog, 1 sc, sc2tog, 2 sc, sc2tog, 1 sc, sc2tog, 4 sc, 6 lp st. Join with sl st. 28 total stitches in round. Bind off! (See picture I)
— First Boot (0-6) Upper leg :
Row 11 :
Count 9 sc over from center back of heel. Mark this stitch! Now Attach yarn in the next stitch so that you will be working towards toe of boot. (See picture I) Starting in same stitch you attached to and with hook inserted from the inside of boot to the outside [sc2tog] 5 times. (These 5 stitches should be worked over the 10 stitches centered in the front of boot) 5 total stitches in row. Turn!
Round 12 :
Now you will be working back over the five stitches just made. Ch 1, 1 sc in same st (mark that stitch), sc2tog, 2 sc, (You should be back where you attached in round 12 now) Now for the next stitch you will have to take a little jump down to the rest of the boot, but no worries! Just pull a little tighter and crochet on!:o) Starting in the stitch you marked, 18 sc, You should have to take a little jump up now but just do the same as other side. Starting in marked stitch place 5 more sc across front of boot. That should bring you back to the first marked stitch. Turn (See Picture J)
Round 13 :
Ch 1, 1 lp st in same as chain 1, lp st all the way around. (The loop stitch should be on the outside of the shoe.) 22 total stitches in round. Turn.
Row 14 :
Ch 1, 11 sc, 2 sc in next stitch, sc to the end. 23 stitches total in row. Turn.
Row 15 :
Ch1, lp st all the way around until last two stitches. 2 sc. 23 total stitches in row. Turn.
Row 16 :
Ch 1, 11 sc, 2 sc in next stitch, sc to the end. 24 total stitches in row. Turn.
Row 17 :
Ch 1, lp st all the way around until the last two, 2 sc. 24 Total stitches in row. Turn.
Row 18 :
Ch 1, sc all the way around. 24 total stitches in row. Turn.
Row 19 :
Ch 1, lp st all the way around until last two, 2 sc. 24 total stitches in row. Turn.
Row 20 :
Ch 1, sc all the way around. 24 total stitches in row. Turn.
Row 21 :
Ch 1, lp st all the way around until last two stitches, 2 sc. 24 total stitches in row. Turn.
Row 22 :
Ch 2, 2 dc, [1 fp dc, 1 bp dc] repeat until end of row. Do not turn.
— Button Hole area on side of boot (0-6 months) :
Row 1 :
Now going down side of shoe. (See picture K) Start in side of last dc, ch 1, 12 sc down side of shoe. Turn.
Row 2 :
Ch 1, (Going back up side) 1 sc, ch 2, skip 2 stitches, 2 sc, ch 2, skip 2 stitches, 2 sc, ch 2, skip 2 stitches, 1 sc. Turn to go back down.
Row 3 :
Ch 1, 12 sc. Bind off. (See picture L)
Info :
For button flap work down side of boot as pictured (see picture K). Button holes formed. Attach button flap and sew on buttons. Weave in ends and finish.
— Second boot (0-6) Upper leg :
Info :
Do rounds 1-10 same as first boot.
Row 11 :
Count 9 sc over from center back of sole. (See Picture II) Mark this stitch. Now attach yarn in the next stitch closer to toe of boot. Starting with the stitch you attached to and hook inserting from the outside of the boot [sc2tog] 5 times. Mark the next stitch. 5 total stitches in row. These stitches should be worked over the 10 stitches centered in the front of boot. Turn.
Round 12 :
Now you will be working back over the five stitches just made. Ch 1, 1 sc in same st, sc2tog, 2 sc, (At this point you will have a little jump down to rest of boot, but no worries just pull a little tighter and crochet on.) 1 more sc in marked stitch. Turn! Ch 1, starting in same stitch, 5 sc across front of boot. Take a little jump down again and put 1 sc in marked stitch, 16 more sc around boot. (This should take you all the way around shoe to meet up with where you turned.) Turn again!
Round 13 :
Ch 1, 1 lp st in same as chain 1, lp st all the way around. (The loop stitch should be on the outside of the shoe.) 22 stitches total in row. Turn.
Row 14 :
Ch 1, 12 sc, 2 sc in next stitch, sc to the end. 23 stitches total in row. Turn.
Row 15 :
Ch 1, lp st all the way around until last two stitches, 2 sc. 23 total stitches in row. Turn.
Row 16 :
Ch 1, 12 sc, 2 sc in next stitch, sc to the end. 24 total stitches in row. Turn.
Row 17 :
Ch 1, lp st all the way around until last two, 2 sc. 24 total stitches in row. Turn.
Row 18 :
Ch 1, sc all the way around. 24 total stitches in row. Turn.
Row 19 :
Ch 1, 2 sc, lp st the rest of the way around. 24 total stitches in row. Turn.
Row 20 :
Ch 1, sc all the way around. 24 total stitches in row. Turn.
Row 21 :
Ch 1, 2 sc, lp st the rest of the way around. 24 total stitches in row. Turn.
Row 22 :
Ch 2, [1 fp dc, 1 bp dc] repeat until last two, 2 dc. Bind off.
Info :
Button Hole area on side of boot: Reattach yarn at beginning of Rnd 22 at top of first dc to start button hole area.
— Button Hole area on side of boot (second boot) :
Row 1 :
Going down side of shoe. Starting in side of first dc ch 1, 12 sc down side of shoe. Turn.
Row 2 :
Ch 1, Going back up side 1 sc, ch 2, skip 2, 2 sc, ch 2, skip 2, 2 sc, ch 2, skip 2, 1 sc. Turn to go back down.
Row 3 :
Ch 1, 12 sc. Bind off.
Info :
Finishing: Sew on buttons, weave in ends and you're done!
— 6-12 Months :
Info :
Please read notes before starting. Measuring 4.5 inches in length.
— Sole (Make 2) :
Round 1 :
With color A ch 16, 2 hdc in 3rd ch from hook, 12 hdc, 4 hdc in last ch, 12 hdc down the other side of beginning ch, 2 hdc in last ch that already has 2 hdc in it. Join with sl st to top of first stitch. 32 total stitches in round.
Round 2 :
Ch 1, 2 sc in each of the first two stitches, 5 sc, 7 hdc, 2 hdc in each of the next 4 stitches, 7 hdc, 5 sc, 2 sc in each of the last two stitches. Join with sl st. 40 total stitches in round.
Round 3 :
Ch 2, 2 hdc, 2 hdc in next stitch, 15 hdc, 2 hdc in each of the next two stitches, 2 hdc, 2 hdc in each of the next two stitches, 15 hdc, 2 hdc in next stitch. Join with sl st and Bind Off! 46 total stitches in round. (See Pict. F)
Round 4 :
With color B and wrong side of sole facing you, attach yarn at center back of heel. Sl st all the way around sole. Join with sl st. 46 total stitches in round. (see picture G)
— Upper Shoe (6-12 months) :
Round 5 :
Ch 1, sc in all slip stitches. Insert hook only through slip stitch on top not through sc below. (See picture H) Join with sl st. 46 total stitches in round.
Round 6 :
Ch 1, sc all the way around. Join with sl st. 46 total stitches in round.
Round 7 :
Ch 1 sc all the way around. Join with sl st. 46 total stitches in round.
Round 8 :
Ch 1 sc all the way around. Join with sl st. 46 total stitches in round.
Round 9 :
Ch 1, sc2tog, 17 sc, [sc2tog, 2 sc] two times, sc2tog, 17 sc. Join with sl st. 42 total stitches in round.
Round 10 :
Ch1, 15 sc, sc2tog, 1 sc, sc2tog, 2 sc, sc2tog, 1 sc, sc2tog, 15 sc. Join with sl st. 38 total stitches in round.
Round 11 :
Ch 1, 8 Lp st. (See note on page 1 and picture A) 5 sc, sc2tog, 1 sc, sc2tog, 2 sc, sc2tog, 1 sc, sc2tog, 5 sc, 8 lp st. Join with sl st. 34 total stitches in round. Bind off! (See picture I)
— First boot (6-12) Upper leg :
Row 12 :
Count 12 sc over from center back of heel. (See picture I) Mark this stitch! Now Attach yarn in the next stitch closer to toe of boot. Starting with the stitch you attached to and with hook inserted from inside of boot to the outside, sc2tog, [hdc2tog] 3 times, sc2tog, (These 5 stitches should be worked over the 10 stitches centered in the front of boot). Turn.
Round 13 :
Now you will be working back over the five stitches just made. Ch 1, 1 sc in same st (Mark stitch just made), hdc2tog, 1 hdc, 1 sc, (You should be back where you attached in round 12 now) Now for the next stitch you will have to take a little jump down to the rest of the boot, but no worries! Just pull a little tighter and crochet on!:o) Starting in marked stitch, 24 sc. You should have to take a little jump up now but just do the same as other side. Starting in marked chain stitch place 5 more sc across front of boot. That should bring you back to the first marked stitch. Turn (See Picture J)
Round 14 :
Ch 1, 1 lp st in same as chain 1, lp st all the way around. (The loop stitch should be on the outside of the shoe.) 28 total stitches in row. Turn.
Row 14 :
Ch 1, 1 lp st in same as chain 1, lp st all the way around. (The loop stitch should be on the outside of the shoe.) 28 total stitches in row. Turn.
Row 15 :
Ch 1, 1 sc in same stitch and all the way around. 28 total stitches in row. Turn.
Row 16 :
Ch 1, lp st all the way around until last two, 1 sc in each of last 2 stitches. 28 total stitches in row. Turn.
Row 17 :
Ch 1, 2 sc, 2 sc in next stitch, sc to the end. 29 stitches total in row. Turn.
Row 18 :
Ch 1, 2 sc, lp st the rest of the way around. 29 total stitches in row. Turn.
Row 19 :
Ch 1, 15 sc, 2 sc in next stitch, sc to the end. 30 total stitches in row. Turn.
Row 20 :
Ch 1, lp st all the way around until the last two, 2 sc. 30 total stitches in row. Turn.
Row 21 :
Ch 1, sc all the way around. 30 total stitches in row. Turn.
Row 22 :
Ch 1, 2 sc, lp st the rest of the way around. 30 total stitches in row. Turn.
Row 23 :
Ch 1, sc all the way around. 30 total stitches in row. Turn.
Row 24 :
Ch 1, lp st all the way around until last two stitches, 2 sc. 30 total stitches in row. Turn.
Row 25 :
Ch 2, 2 dc, [1 fp dc, 1 bp dc] repeat until last two, 2 dc. Bind off.
— Button Hole area on side of boot (6-12 months) :
Row 1 :
Worked down side of shoe as seen in picture K. Starting in side of last dc ch 1, 14 sc worked down side of boot. Turn. (See Picture K)
Row 2 :
Ch 1, (Going back up side) 1 sc, ch 2, skip 2 stitches, 3 sc, ch 2, skip 2, 3 sc, ch 2, skip 2, 1 sc. Turn to go back up.
Row 3 :
Ch 1, 14 sc. Bind off. (See picture L)
Info :
Second boot (6-12) - Upper leg: Do rounds 1-11 same as first boot. Row 12 Count 12 sc over from center back of sole. Mark this stitch! Now attach yarn in the next stitch closer to toe of boot. Proceed as done for first boot. Turn. Continue rows 13-25 same as first boot for second boot. Sew on buttons, weave in ends and you're done!
These sweet Furrylicious boots add personality and warmth to any baby outfit with their playful loop-fur cuff and classic button closure. Thank you for choosing this pattern—each pair is a handmade hug for tiny feet. Happy crocheting and enjoy gifting your cozy creation! 🧶👶