🧶 Beautiful ✨ Detailed 💝 Adorable

By Your Side Basket Bag Pattern

By Your Side Basket Bag Pattern
4.4★ Rating
5-7 Hours Time Needed
3.5K Made This
✂️

Intermediate Level

Ideal for those with basic crochet experience, featuring slightly more advanced stitches and techniques to expand your skills.

⏱️

Weekend Treat

Takes 5-7 hours, making it an enjoyable project to finish over a couple of days.

Stylish Touch

An elegant detail to elevate any look, combining traditional techniques with contemporary design sensibilities.

About This By Your Side Basket Bag Pattern

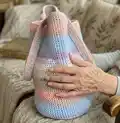
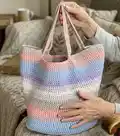
This pattern creates a roomy basket-style side bag worked in single (double) crochet rounds with a reinforced base and comfortable handles. It is written using US terminology with UK equivalents in brackets for clarity. The design uses Paintbox Yarns Recycled Crafty Pots for a soft, striped finish. Clear step-by-step instructions guide you through shaping and handle construction.

By Your Side Basket Bag Pattern crochet pattern - detailed view of completed project

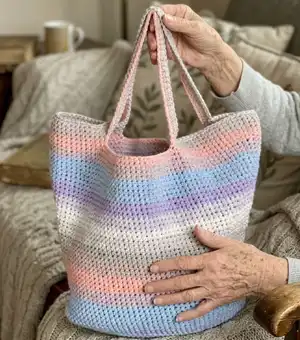
Ideal for everyday use, the bag is durable and easy to customize with color changes. The finished size is approximately 12½in/32cm high and 17¾in/45cm wide at the widest point.

Why You'll Love This By Your Side Basket Bag Pattern

I absolutely love this pattern because it turns recycled yarn into a beautiful, functional accessory that youll be proud to use. I love the simple construction — working in rounds gives the bag a clean, professional look with minimal finishing. The handle shaping is satisfying to make and creates a comfortable carry that fits over the shoulder. I also enjoy how easy it is to customize the striping or scale the size by changing yarn weight or hook size.

By Your Side Basket Bag Pattern step 1 - construction progress By Your Side Basket Bag Pattern step 2 - assembly progress By Your Side Basket Bag Pattern step 3 - details and accessories By Your Side Basket Bag Pattern step 4 - final assembly and finishing

Switch Things Up

I love changing the striping sequence to make each bag unique; try alternating wider and narrower stripe bands for a different look.

I often swap the recommended yarn for a textured cotton or cotton-blend for a firmer bag that holds its shape well.

If you want a larger bag, I increase the starting chain and add more increase rounds at the base while keeping the handle placement proportionate.

To make a smaller, keychain-sized version, use a lighter weight yarn and a smaller hook and reduce the number of increase rounds.

I sometimes add a fabric lining for extra strength and a neater interior finish; sew the lining in before weaving in ends.

Try adding a button-and-loop closure or magnetic snap to the top opening for added security if you prefer a closeable bag.

I like to embroider initials or a small motif on one side for personalization — simple surface stitches work beautifully on the finished fabric.

For a sturdier handle, consider folding a long crocheted strap and whipstitching it closed, or insert thin webbing inside for reinforcement.

If you want more structure in the base, you can insert a circular piece of plastic canvas cut to the base size and cover it with felt before inserting it into the bag.

Experiment with contrasting handles by working them in a bold accent color to frame the bag and add visual interest.

Common Mistakes & How to Fix Them

✗ Skipping stitch markers during the increase rounds will make your seam and shape uneven; place markers as instructed and move them up each round to keep shaping accurate. ✗ Not counting stitches after increases will lead to incorrect stitch totals and distorted shaping; count your stitches after each increase round to confirm the stated total. ✗ Working with inconsistent tension will produce an uneven fabric and poor shaping; maintain steady, moderate tension and check your gauge before starting. ✗ Failing to remove or reposition markers when instructed can cause mistakes when forming handles; follow the pattern to remove markers when told and keep track of marker placement carefully. ✗ Finishing handles without checking fit will cause asymmetry or uncomfortable placement; when creating the handle turn and slip stitch section, lay the handle flat and check length before joining to ensure correct placement.

By Your Side Basket Bag Pattern

Make a stylish, roomy market tote with this intermediate crochet pattern designed for everyday use. Youll work in rounds to form a sturdy base and body, then create comfortable handles and finish with neat seams. The pattern uses Paintbox Yarns Recycled Crafty Pots for a soft, recycled finish that looks great in stripes. Perfect for shopping, beach days, or as a handmade gift.

Intermediate 5-7 Hours

Materials Needed for By Your Side Basket Bag Pattern

— Main Fabric

  • 01
    Paintbox Yarns Recycled Crafty Pots - 8¾oz/250g balls: 2 balls in Neapolitan (main yarn and stripes)

— Tools Required

  • 01
    H-8 (5mm) crochet hook
  • 02
    Darning needle
  • 03
    2 lockable stitch markers
  • 04
    3 buttons size ½in/1.5cm (listed in materials)

Progress Tracker

0% Complete

— Sizes :

Info :

Height 12½in/32cm. Width at widest point 17¾in/45cm.

— You Will Need :

Infos :

Paintbox Yarns is exclusively available at lovecrafts.com. 8¾oz/250g balls of Paintbox Yarns Recycled Crafty Pots: 2 balls in Neapolitan. 3 buttons size ½in/1.5cm. H-8 (5mm) crochet hook. Darning needle. 2 lockable stitch markers.

— Gauge (Tension) :

Info :

14 sts and 15 rows to 4in/10cm in single (double) crochet stitch using H-8 (5mm) crochet hook.

— Good To Know :

Infos :

Paintbox Yarns cannot accept responsibility for the finished item if any yarn other than the recommended yarn is used. Yarn quantities are based on average requirements and are therefore approximate. Instructions are written using US terminology with UK terminology given in italics in round brackets () afterwards. Where the figure 0 appears, no stitches, times or rows are worked for this size. Stripes may vary from those shown.

— Abbreviations :

Infos :

cm centimetres. ch chain. flo front loop only. g grams. in inches. mm millimetres. oz ounces. PM place marker. rep repeat. sc(dc) single (double) crochet. sl st slip stitch. st/s stitche/s.

— Base :

Info :

Using H-8 (5mm) hook ch 13.

Round 1 :

1 sc(dc) in second ch from hook, and in each ch to last ch, 3 sc(dc) in last ch (PM in second of these 3 sts), turn, work back along other side of foundation chain, working 11 sc(dc), 3 sc(dc) in last ch (PM in second of these 3 sts), sl st to join. | 26 sts.

Round 2 :

Ch 1 (does not count as a st), *1 sc(dc) in every st to 1 st before marker, 2 sc(dc) in next st, 3 sc(dc) in marked st, 2 sc(dc) in next st, PM in centre st of three-st increase; rep from * to complete the increases, 1 sc(dc) in each st to end of round seam, sl st to join. | 34 sts.

Round 3 :

Rep 2nd round a further 7 times, increasing 8 sts per round. | 90 sts.

Round 10 :

Ch 1, 1 sc(dc) flo in each st around, keeping markers in place, sl st to join.

Rounds 11-18 :

Ch 1, sc(dc) around, move markers up in place each round, sl st to join.

Round 19 :

Ch 1, *sc(dc) to 1 st before marker, 2 sc(dc) in this st, 1 sc(dc) in marked st, PM in new st, 2 sc(dc) in st after marker; rep from * once more, sc(dc) to end of round seam, sl st to join. | 94 sts.

Rounds 20-22 :

Ch 1, sc(dc) around, move markers up in place each round, sl st to join.

Round 23 :

Rep 19th-22nd rounds 7 more times, increasing 4 sts in every repeat. | 122 sts.

Round 24 :

Next round Ch 1, *sc(dc) to 1 st before marker, 2 sc(dc) in this st, 1 sc(dc) in marked st, PM in this new st, 2 sc(dc) in st after marker; rep from * once more, sc(dc) to end of round seam, sl st to join. | 126 sts.

Round 25 :

Next round Ch 1, sc(dc) around, move markers up in place each round, sl st to join.

Info :

"Seam" should now be 26 sts away from closest marker.

Round 26 :

Turn, sl st in next 10 sts, turn, ch 50, skip next 29 sts, 1 sc(dc) in following st and all sts to marker, remove marker, 18 sc(dc), ch 50, skip next 29 sts, 1 sc(dc) in following st and next 34 sts, removing markers as you go, sl st at bottom of original handle to join. | 168 sts.

Rounds 27-30 :

Next 4 rounds Ch 1, sc(dc) around, sl st to join at seam. Break yarn and secure.

— To Finish :

Info :

Weave in all loose ends and block bag to shape to finish.

Assembly Instructions

  • Move and place lockable stitch markers as you work to mark increases and seam positions, advancing them each round to keep shaping accurate.
  • When instructed to form the handles (Turn, sl st in next 10 sts, ch 50, skip next 29 sts...), follow the sequence exactly and check handle length before joining to ensure symmetry.
  • After joining the handle sections, work the next 4 rounds evenly around the bag, slipping to join at the seam and fastening off securely.
  • Break yarn and secure after the final handled rounds, then weave in all loose ends neatly using a darning needle to hide tails.
  • Block the bag to shape by dampening and shaping the base and sides; pin if necessary and allow to dry flat for a professional finish.

Important Notes

  • 💡Use lockable stitch markers to mark increases and seam placement and move them up each round to maintain the bag shape.
  • 💡Keep consistent tension throughout to achieve the stated gauge of 14 sts and 15 rows to 4in/10cm for best sizing results.
  • 💡Yarn quantities are approximate and based on average requirements; purchase a little extra to allow for tension differences or variations in striping.
  • 💡Follow US terminology used in the pattern; UK equivalents are provided in brackets in round text where applicable.
  • 💡Where the figure 0 appears in pattern notes, no stitches, times or rows are worked for that size; check each instruction carefully before proceeding.

This stylish basket bag is designed to be practical and beautiful, turning recycled yarn into a chic everyday tote. 🧶 The roomy interior and comfortable handles make it perfect for shopping, beach days, or as a thoughtful handmade gift. 🎁 Have fun customizing the stripes and making this bag your own — happy crocheting! ✨

You ask,

we answer.

FAQs

What size will the finished piece be?

The finished bag measures approximately 12½in/32cm high and 17¾in/45cm wide at the widest point when using the recommended yarn and hook size.

Can I use different yarn weights for this pattern?

Yes, you can use different yarn weights, but this will affect the final size and drape; adjust your hook size accordingly and check your gauge to achieve the desired dimensions.

Do I need prior crochet experience for this pattern?

This pattern is rated intermediate, so basic experience with single crochet, increasing, working in rounds, and reading stitch markers is recommended for best results.

How long does this project typically take to complete?

Most crocheters complete this project in 5-7 hours, though time may vary depending on experience level, yarn choice, and how much time you spend customizing stripes.