🧢 Beautiful ✨ Detailed πŸ’ Adorable

Among Us Amigurumi Pattern

Among Us Amigurumi Pattern
4.4β˜… Rating
2-4 Hours Time Needed
3.6K Made This
βœ‚οΈ

Intermediate Level

Ideal for those with basic crochet experience, featuring slightly more advanced stitches and techniques to expand your skills.

⏱️

Bite-Sized Project

Finishes in 2-4 hoursβ€”perfect for an afternoon of creative relaxation.

🧸

Cute Companion

An adorable friend to cherish, handcrafted with love to bring comfort and joy for years to come.

About This Among Us Amigurumi Pattern

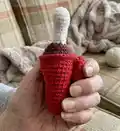
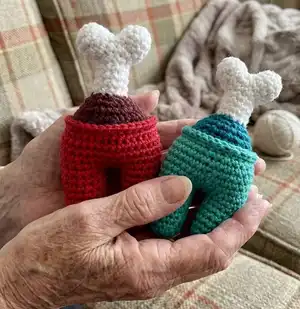
This pattern creates a small Among Us style crewmate amigurumi with a detachable bone top detail. Youll work two leg pieces joined together to form the body, then add a bone top and decorative trim. The instructions include rounds for shaping and clear assembly photos to help you finish neatly.

Among Us Amigurumi Pattern crochet pattern - detailed view of completed project

The pattern uses worsted weight yarn and a 3.25 mm hook for a tight fabric that hides stuffing well. Great for makers who enjoy small sewn-together amigurumi projects and quick, satisfying finishes.

Why You'll Love This Among Us Amigurumi Pattern

I absolutely love this pattern because it captures a fun character in a small, satisfying project that doesnt take forever to finish. I enjoy how the split-leg construction creates a recognizable crewmate shape with very little sewing. The removable bone top is such a playful detail that lets you customize each figure easily. Working this pattern always brightens my day because the results are cute, quick, and perfect for gifting.

Among Us Amigurumi Pattern step 1 - construction progress Among Us Amigurumi Pattern step 2 - assembly progress Among Us Amigurumi Pattern step 3 - details and accessories Among Us Amigurumi Pattern step 4 - final assembly and finishing

Switch Things Up

I love how easily this pattern adapts to different colors; try neon or pastel yarns to change the whole vibe.

I sometimes make a tiny keychain version by using sport weight yarn and a 2.5 mm hook for a miniature result.

I often embroider a tiny mouth or add felt patches to personalize each crewmate for gifts or decorations.

Swap the bone top color to contrast with the body for a bolder look, or keep it white for the classic style.

To make the toy larger, use bulky yarn and a larger hook, and add extra stuffing for a cuddly version.

I like adding safety eyes or French knot eyes depending on the recipient; just adjust placement for proportion.

Try making a whole set in different colors for a themed display or party favors; they make fun collector sets.

You can also add tiny accessories like a crocheted hat or backpack to change personality and play options.

If you want posable limbs, consider inserting thin wire into the legs before stuffing and sewing the opening closed carefully.

Experiment with textured stitches or a faux fur yarn for an unconventional, whimsical crewmate with lots of character.

Common Mistakes & How to Fix Them

βœ— Skipping stitch markers when joining the two legs can cause misalignment; place a marker at the join point to keep your seams even and centered. βœ— Using a larger hook than recommended will make stitches loose and stuffing show through; switch to a smaller hook or tighter tension to hide stuffing. βœ— Forgetting to stuff as you go results in awkward shapes and lumps; stuff gradually and consistently to maintain smooth contours before closing rounds. βœ— Not sewing through the correct row when attaching the bone top causes instability; align the bone with row 14 of the body and stitch through the back stitches for a secure attachment.

Among Us Amigurumi Pattern

Make a playful Among Us crewmate amigurumi with a removable bone top using simple amigurumi techniques. This intermediate pattern guides you through legs, body, and the bone top with clear round-by-round instructions. Perfect for gifting or decorating, the finished toy is compact and full of character. Youll enjoy stitching small shapes and learning clean assembly methods.

Intermediate 2-4 Hours

Materials Needed for Among Us Amigurumi Pattern

β€” Main Fabric

  • 01
    Worsted weight yarn (#4) - 'I Love This Cotton!' White (color 6) - small amount for bone and bumps
  • 02
    Worsted weight yarn (#4) - 'I Love This Cotton!' Aubergine (color 32) - main accent/top color (as shown)
  • 03
    Worsted weight yarn (#4) - 'I Love This Cotton!' Red (color 60) - body color (amount varies per toy size)
  • 04
    Additional worsted weight colors for secondary bodies or trim as desired (approx 20-60g per color depending on size)

β€” Tools Required

  • 01
    D3/3.25 mm Crochet Hook
  • 02
    Polyester Fiberfill
  • 03
    Darning Needle
  • 04
    Scissors

Progress Tracker

0% Complete

β€” Head :

Infos :

Diagram chart provided for head (follow crochet symbol chart on pattern page). O = CHAIN (CH). X = SINGLE CROCHET (SC). V = INCREASE 2 IN 1 STITCH.

β€” Body :

Info :

Create a "magic ring" using main yarn

Round 01 :

[SC] x5 inside ring (10)

Round 02 :

[INC] x5 (10)

Round 03 :

[SC, INC] x5 (15)

Round 04-09 :

[SC] across (15)

Info :

Slip stitch off.

Info :

Create a second leg, this time do not slip stitch off.

Round 10 :

Chain 3 and attach first leg to second. SC all stitches from 2nd leg, SC across three chains, SC all stitches from 1st leg, SC across the back of the three chains. (36)

Round 11-15 :

[SC] around.

Info :

Fasten off.

β€” Bone Top :

Info :

Create a "magic ring" using white yarn

Round 01 :

[SC] x6 inside ring (6)

Round 02 :

[INC] x6 (12)

Round 03-04 :

[SC] across (12)

Info :

Slip stitch off. Create a second bone bump, this time do not slip stitch off.

Round 05 :

[SC] across both bumps together. (24)

Round 06 :

[DEC] x12 (12)

Round 07-11 :

[SC] around.

Info :

Change to secondary yarn.

Round 12 :

[SC1, INC] x6 inside ring (18)

Round 13 :

[SC1, INC, SC1] x6 (24)

Round 14 :

[SC3, INC] x6 (30)

Round 15 :

[SC2, INC, SC2] x6 (36)

Info :

Slip stitch off and sew through back stitches from row 14 of the body.

β€” Assembly :

Info :

Stuff body and bone top as desired before closing openings; use polyester fiberfill for a firm but soft finish.

Info :

Align the bone top with the back stitches from row 14 of the body and sew through the back stitches to secure.

Info :

Weave in all ends and trim excess yarn after sewing pieces together for a neat finish.

Assembly Instructions

  • Sew the two leg pieces together by chaining 3 to join, then SC across all stitches of the second leg, across the three chains, and across the first leg; finish the join and continue rounds 11-15 to form the body.
  • Stuff the body firmly but evenly before closing the top opening; use small amounts of fiberfill at a time to shape the legs and body smoothly.
  • Place the bone top so its base aligns with the back stitches of row 14 on the body, then sew through the back stitches from row 14 to secure the bone in place.
  • Use a darning needle to whipstitch or ladder stitch the bone top to the body, making small, even stitches to ensure the attachment is secure and tidy.
  • Weave in and trim all yarn tails after assembly, and pinch seams flat as you sew to hide join lines and create a polished look.

Important Notes

  • πŸ’‘Hook size is not as important as having your stitches tight so stuffing does not show through the fabric.
  • πŸ’‘If you change your yarn size, adjust your eyes and embroidery accordingly to keep proportions correct.
  • πŸ’‘Stuff gradually while shaping; overstuffing can distort the form and under-stuffing can make the toy floppy.
  • πŸ’‘Pin pieces in place before sewing to check alignment and symmetry, especially when attaching the bone top.

This tiny Among Us amigurumi is perfect for gifting, decorating, or collecting β€” small but full of personality! 🧢 Follow the step-by-step rounds and simple assembly to create a polished mini toy to be proud of. ✨ Share your finished crewmates and enjoy creating many color variations! 🎁

You ask,

we answer.

FAQs

What size will the finished piece be?

The finished amigurumi measures approximately 10-12 cm tall when using worsted weight yarn and a 3.25 mm hook, though exact size depends on your tension and stuffing.

Can I use different yarn weights for this pattern?

Yes, you can use different yarn weights, but this will affect the final size; choose an appropriate hook for the yarn and adjust eyes and embroidery accordingly.

Do I need prior crochet experience for this pattern?

This pattern is rated intermediate, so basic knowledge of crochet stitches and techniques (magic ring, SC, INC, DEC) is recommended for best results.

How long does this project typically take to complete?

Most crocheters complete this project in 2-4 hours, though time may vary based on experience, customization, and assembly preferences.