🧢 Beautiful ✨ Detailed πŸ’ Adorable

The Bowling Llama Amigurumi Pattern

The Bowling Llama Amigurumi Pattern
4.6β˜… Rating
5-7 Hours Time Needed
1.1K Made This
βœ‚οΈ

Intermediate Level

Ideal for those with basic crochet experience, featuring slightly more advanced stitches and techniques to expand your skills.

⏱️

Weekend Treat

Takes 5-7 hours, making it an enjoyable project to finish over a couple of days.

🧸

Cute Companion

An adorable friend to cherish, handcrafted with love to bring comfort and joy for years to come.

About This The Bowling Llama Amigurumi Pattern

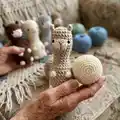
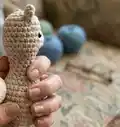
This pattern makes a charming bowling-themed llama and a coordinating bowling ball using chunky velvet-style yarn. The design is worked as a no-sew project, so ears, legs and snout are integrated while crocheting for an easy assembly. Techniques include bobble stitches, front-loop (FLO) work and small color changes to create textured details.

The Bowling Llama Amigurumi Pattern crochet pattern - detailed view of completed project

You'll get clear round-by-round instructions, stuffing and finishing notes, plus video links for tricky steps. The finished llama stands around 15cm tall and makes a delightful handmade gift.

Why You'll Love This The Bowling Llama Amigurumi Pattern

I absolutely love this pattern because it turns simple stitches into an irresistibly textured little character. I enjoy how the bobble stitch adds playful dimension and how the no-sew construction keeps assembly quick and neat. I also love that it pairs perfectly with the matching bowling ball for a mini play set. Making a set is so satisfying β€” you finish with a cute, usable toy that friends and kids adore.

The Bowling Llama Amigurumi Pattern step 1 - construction progress The Bowling Llama Amigurumi Pattern step 2 - assembly progress The Bowling Llama Amigurumi Pattern step 3 - details and accessories The Bowling Llama Amigurumi Pattern step 4 - final assembly and finishing

Switch Things Up

I love customizing this pattern by changing yarn colors to create matching or contrasting bowling sets; try pastel tones for a nursery-friendly look.

To make a mini keychain version, I switch to a sport or DK weight yarn and a smaller hook β€” this makes tiny, adorable llamas for gifts.

I sometimes swap the bobble stitch for small embroidered spots to simplify the texture if I want a sleeker finish.

Try using bright, bold colors for a playful, kid-friendly bowling set that stands out on a playroom shelf.

For a sturdier, display-only version I add a small amount of sand or poly pellets to the base of the ball before closing for weight and balance.

I also experiment with safety eye sizes β€” 6mm eyes give a sweet look, while 8mm eyes are more expressive on larger versions.

If you want poseable limbs, I sometimes insert thin armature wire into the body before stuffing and close over it carefully.

You can create outfits or tiny accessories (scarves, bows) in contrasting yarns to personalize each llama character.

When making a set, I vary the yarn textures β€” one plush llama in velvet and another in a smooth bulky yarn β€” for tactile variety.

I always recommend testing a small swatch first to make sure you like the scale and texture; swapping yarn weight and hook size is the fastest way to change finished size.

Common Mistakes & How to Fix Them

βœ— Not using the recommended chunky velvet yarn can change the finished size drastically; use a similar bulky velvet yarn and the suggested hook to match gauge and proportions. βœ— Skipping the invisible decrease technique leads to visible gaps at shaping points; practice invisible decreases and use them for smoother shaping. βœ— Stitch spacing that is too loose will let stuffing show through the stitches; maintain close, even tension and use tighter stitches to keep stuffing hidden. βœ— Forgetting to add stuffing at the correct rounds makes shaping difficult later; stuff gradually at the rounds indicated and adjust firmness as you go to keep the shape consistent. βœ— Placing safety eyes after too much stuffing can distort the face; insert safety eyes between the rounds specified (between rounds 6 and 7) before over-stuffing.

The Bowling Llama Amigurumi Pattern

Make a sweet, pocket-sized bowling llama set with this detailed crochet pattern. You will create a cuddly llama and matching bowling ball using chunky velvet yarn and clear step-by-step instructions. Perfect for gifting or playful nursery decor, the pattern includes techniques like bobble stitches and color changes to give your llama charming texture and personality.

Intermediate 5-7 Hours

Materials Needed for The Bowling Llama Amigurumi Pattern

β€” Main Fabric

  • 01
    Chunky velvet yarn (4-5 mm) - cream (main body) - amount: approx 50-100g depending on color
  • 02
    Chunky velvet yarn (4-5 mm) - white (snout and spots) - small amount for details
  • 03
    Chunky velvet yarn (4-5 mm) - gray (bowling ball base) - small amount
  • 04
    Chunky velvet yarn (4-5 mm) - yellow (bowling ball contrast) - small amount
  • 05
    Suggested yarn examples: Himalaya Velvet, Himalaya Dolphin Baby (bulky/velvet style)
  • 06
    Polyester stuffing (fiberfill) - small bag for stuffing head, body, and ball
  • 07
    Optional: small plastic pad (2 cm radius) or milk bottle piece to flatten bottom (for standing stability)

β€” Tools Required

  • 01
    Crochet hook size 4.0 mm
  • 02
    6 mm toy safety eyes (2 pieces per llama)
  • 03
    Needle for sewing and weaving in ends
  • 04
    Stitch marker
  • 05
    Scissors
  • 06
    Polyester stuffing (fiberfill)
  • 07
    Pins for assembly (optional)

Progress Tracker

0% Complete

β€” Head & Body :

Info :

As this Llama is crocheted as a no-sew project, the legs, nose, and ears are integrated into the body and head, without separate parts. The ears are in round 2, the snout in rounds 6-8, and the legs in rounds 12 and 23.

Info :

Start in cream yarn. (Note: Use cream yarn in black word, white yarn in pink word)

Round 1 :

8sc in MR [8]

Round 2 :

2inc, (ch 4 , skip 2 ch from the hook, slst in next 2 ch), inc in next st of the base, 3inc, (ch 4 , skip 2 ch from the hook, slst in next 2 ch), inc in next st of the base, inc [16]

Round 3 :

(3sc, inc) x 4 [20]

Round 4 - 5 :

20sc [20]

Round 6 :

8sc, 4inc, 8sc [24]

Round 7 :

8sc, 8sc, 8sc [24]

Round 8 :

8sc, 4dec, 8sc [20]

Round 9 :

20sc [20]

Round 10 :

sc, dec, (2sc, dec) x 4, sc [15]

Round 11 - 14 :

15sc [15]

Info :

Stuff the head firmly with fiberfill.

Round 15 :

(2sc, inc) x 5 [20]

Round 16 :

(4sc, inc) x 4 [24]

Round 17 :

24sc [24]

Round 18 :

11sc, bo4, 4sc, bo4, 7sc [24]

Round 19 - 22 :

24sc [24]

Round 23 :

11sc, bo4, 5sc, bo4, 6sc [24]

Round 24 :

24sc [24]

Round 25 :

(sc, dec) x 8 [16]

Info :

Stuff the body firmly with fiberfill.

Info :

Optional: You can insert a pad, 2cm in radius, made from plastic or a milk bottle, inside the llama to flatten its bottom. This will enable your llama to stand upright on its own.

Round 26 :

8dec [8]

Info :

Fasten off, leaving the yarn tail. Using the yarn needle, weave the yarn tail through the front loop of each remaining stitch and pull it tight to close.

Info :

Insert the 6mm safety eyes between rounds 6 and 7, 8 stitches apart. Embroider the nose with brown threads. Use powder blush for the nose and the cheeks.

β€” Bowling Ball :

Info :

Start in gray yarn. (Note: Use yellow yarn in orange word, gray yarn in black word)

Round 1 :

8sc in MR [8]

Round 2 :

8inc [16]

Round 3 :

(sc, inc) x 2, (sc, inc) x 6 [24]

Round 4 :

(2sc, inc) x 3, (2sc, inc) x 3, (2sc, inc) x 2 [32]

Round 5 :

32sc [32]

Round 6 :

(3sc, inc) x 8 [40]

Round 7 - 12 :

40sc [40]

Round 13 :

(3sc, dec) x 8 [32]

Round 14 :

32sc [32]

Round 15 :

(2sc, dec) x 2 + (2sc, dec) x 3 + (2sc, dec) x 3 [24]

Round 16 :

(sc, dec) x 6 + (sc, dec) x 2 [16]

Info :

Stuff the ball firmly with fiberfill.

Round 17 :

8dec [8]

Info :

Fasten off, leaving the yarn tail. Using the yarn needle, weave the yarn tail through the front loop of each remaining stitch and pull it tight to close.

Assembly Instructions

  • Insert 6mm safety eyes between rounds 6 and 7 of the head, placing them 8 stitches apart and secure the washers tightly behind the stitches.
  • Embroider the llama nose using brown thread through the snout area (rounds 6-8) and add light powder blush to the cheeks for a soft look.
  • Stuff the head and body firmly as indicated: stuff the head at rounds 11-14 and the body after round 25, adding more stuffing gradually to maintain shape.
  • If you want the llama to stand upright, insert the optional 2cm radius pad (plastic or milk bottle piece) into the base before closing, then weave the tail through front loops and tighten.
  • Weave in all yarn tails neatly with a yarn needle through front loops of remaining stitches, and knot or secure ends hidden inside the body for a clean finish.

Important Notes

  • πŸ’‘Make the invisible decrease stitches to have a better results.
  • πŸ’‘Add toy stuffing according to instruction of each part and stuff gradually to keep shapes even.
  • πŸ’‘Stitches should be close together so that when the finished toy is stuffed, the stuffing doesn't come out through gaps in the stitches.
  • πŸ’‘The pattern includes color change techniques, bobble stitch technique and the X stitch technique for single crochet stitch; master these for best results.
  • πŸ’‘Finished size: the finished toy is approximately 15cm (~ 5.9 inch) high.

This adorable Bowling Llama set brings cozy texture and playful charm to your handmade collection. The chunky velvet yarn creates a soft, tactile finish that kids and crafters will love. Make a full set of llamas and balls in different colors for a delightful shelf display or a thoughtful gift. 🧢✨😊

You ask,

we answer.

FAQs

What size will the finished piece be?

The finished amigurumi measures approximately 15 cm tall when using the recommended chunky velvet yarn and 4.0 mm hook.

Can I use different yarn weights for this pattern?

Yes, you can substitute yarn but the final size and texture will change; choose an appropriate hook for the yarn weight and expect differences in proportions.

Do I need prior crochet experience for this pattern?

This pattern is rated intermediate; familiarity with basic stitches, increases, decreases, and bobble stitches is recommended for best results.

How long does this project typically take to complete?

Most crocheters complete the llama and ball set in 5-7 hours, though time may vary depending on experience and finishing details.