🧶 Beautiful ✨ Detailed 💝 Adorable

Ladybug Amigurumi Pattern

Ladybug Amigurumi Pattern
4.0★ Rating
2-3 Hours Time Needed
1.2K Made This
✂️

Intermediate Level

Ideal for those with basic crochet experience, featuring slightly more advanced stitches and techniques to expand your skills.

⏱️

Bite-Sized Project

Finishes in 2-4 hours—perfect for an afternoon of creative relaxation.

🧸

Cute Companion

An adorable friend to cherish, handcrafted with love to bring comfort and joy for years to come.

About This Ladybug Amigurumi Pattern

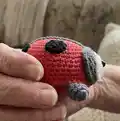
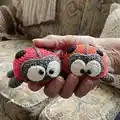
This pattern creates a small, adorable ladybug amigurumi using DK cotton yarn and a 2.0 mm hook. It includes step-by-step rounds for the belly, back, muzzle, eyes, paws and spots, plus clear assembly instructions. The design is compact and photo-referenced so you can match the finished shape as you go.

Ladybug Amigurumi Pattern crochet pattern - detailed view of completed project

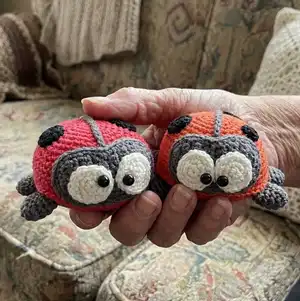
Perfect for gifting or keeping as a sweet handmade accent, the ladybug measures approximately the same size shown when made with the recommended materials. Detailed tips and finishing notes are included to help you achieve a neat, professional look.

Why You'll Love This Ladybug Amigurumi Pattern

I absolutely love this pattern because it turns simple stitches into a playful, three-dimensional character with personality. I enjoy how compact the design is—it's quick to make yet satisfying to complete. The construction teaches thoughtful joining and finishing that improve amigurumi technique. I also love how customizable it is: swap colors, change eye types, or add accessories to personalize each ladybug.

Ladybug Amigurumi Pattern step 1 - construction progress Ladybug Amigurumi Pattern step 2 - assembly progress Ladybug Amigurumi Pattern step 3 - details and accessories Ladybug Amigurumi Pattern step 4 - final assembly and finishing

Switch Things Up

I love to change the color palette when I make this ladybug; try soft pastels for a nursery-safe version or neon shades for a modern twist.

You can easily change the size by swapping yarn weight and hook size; bulky yarn with a larger hook makes a chunky cuddle friend while fine yarn makes a tiny keychain version.

I often replace the bead eyes with embroidered eyes for a child-safe toy, or add safety eyes if the recipient is not for very young children.

Try making different spot arrangements: vary the number and size of spots to give each ladybug its own personality.

Add tiny accessories like a crocheted bow, scarf, or a little hat to make seasonal or gift-ready versions.

For a posable version, I sometimes add thin wire to the limb cores before sewing to allow slight posing of the paws.

Experiment with texture by using a boucle or a slightly fuzzy cotton to give the shell a soft, tactile surface.

I also enjoy creating sets in complementary colors to display as a collection—try three sizes with coordinating palettes.

Make them magnetic by sewing a small flat magnet inside the belly if you want fridge decorations; secure well and warn gift recipients about magnets.

When sewing on the muzzle and eyes, I pin and baste lightly first to adjust placement until the face looks right—this small step makes a big difference in the final expression.

Common Mistakes & How to Fix Them

✗ Crocheting too loosely can create holes where stuffing shows through; use tighter tension or a smaller hook to close gaps. ✗ Forgetting to count stitches after increases or decreases leads to uneven shaping; count at the end of each round and place a marker to track the start. ✗ Not stuffing gradually makes the body lumpy and hard to shape; add stuffing in small increments while you crochet around the opening. ✗ Skipping the joining step details when connecting belly and back can distort the seam; follow the step-by-step join method and insert the hook through both loops for an even edge. ✗ Cutting threads too short before sewing parts together makes finishing difficult; leave enough tail for stitching and weaving in ends to secure pieces neatly.

Ladybug Amigurumi Pattern

Make a charming hand-crocheted ladybug that doubles as a cute decor piece or a tiny toy. This pattern includes full, photo-referenced assembly steps and easy-to-follow rounds so you can crochet confidently. You will learn how to crochet the body, muzzle, eyes, paws and spots and how to sew everything together for a neat finish.

Intermediate 2-3 Hours

Materials Needed for Ladybug Amigurumi Pattern

— Main Fabric

  • 01
    PaintBox Yarns Cotton DK (100% cotton, 125 m per 50 g) - Pillar Red (415) - approx 50 g
  • 02
    PaintBox Yarns Cotton DK - Granite Grey (407) - approx 50 g
  • 03
    Small amount of Champagne White (403) - about 10 g for eyes
  • 04
    Small amount of Pure Black (402) - about 10 g for spots and details
  • 05
    Polyester stuffing (hollow fiber) - small bag

— Tools Required

  • 01
    Crochet hook size 2.0 mm (I used Clover)
  • 02
    Scissors
  • 03
    Yarn needle with big eye for sewing
  • 04
    Stitch markers (optional)
  • 05
    Black beads 6 mm in diameter (2 pcs) for eyes
  • 06
    Sewing pins for positioning pieces
  • 07
    Polyester stuffing (hollow fiber)

Progress Tracker

0% Complete

— Belly :

Info :

With dark gray yarn. Use a hook 2.0 mm. The belly is crocheted in a spiral.

1 row :

6 sc in magic ring (6)

2 row :

2 sc in each sc (12)

3 row :

(1 sc, sc inc)* 6 (18)

4 row :

(2 sc, sc inc)* 6 (24)

5 row :

(3 sc, sc inc)* 6 (30)

6 row :

(4 sc, sc inc)* 6 (36)

7 row :

(5 sc, sc inc)* 6 (42)

8 row :

(6 sc, sc inc)* 6 (48)

9 row :

(7 sc, sc inc)* 6 (54)

10 row :

(8 sc, sc inc)* 6, sl.st (60)

Info :

Tie off the thread and cut it (pic. 1).

— Back :

Info :

With red yarn. Use a hook 2.0 mm. The back is crocheted in a spiral.

1 row :

6 sc in magic ring (6)

2 row :

2 sc in each sc (12)

3 row :

(1 sc, sc inc)* 6 (18)

4 row :

(2 sc, sc inc)* 6 (24)

5 row :

(3 sc, sc inc)* 6 (30)

6 row :

(4 sc, sc inc)* 6 (36)

7 row :

(5 sc, sc inc)* 6 (42)

8 row :

42 sc (42)

9 row :

(6 sc, sc inc)* 6 (48)

10 rows :

48 sc (48)

11 row :

(7 sc, sc inc)* 6 (54)

12 rows :

54 sc (54)

13 row :

(8 sc, sc inc)* 6 (60)

14 row :

60 sc (60)

Infos :

Don’t cut the work thread (pic. 2). Join the belly and the back together: put the wrong sides of the pieces to each other (pic. 3), insert the crochet hook through the loops of the both pieces (pic. 4) and crochet sc (pic. 5). Work sc around the edge. Stuff the body as you go round. (pic. 6-10). Finish with sl.st. Tie off the thread and hide it inside.

— Muzzle :

Info :

With dark gray yarn. Use a hook 2.0 mm. The muzzle is crocheted in rows. Crochet 5 ch (pic. 11)

1 row :

start in the second loop from the hook and crochet 1 sc inc, 2 sc, 1 sc inc, 1 ch, turn (6)

2 row :

1 sc inc, 4 sc, 1 sc inc, 1 ch, turn (8)

3-6 rows :

4 rows - 8 sc, 1 ch, turn (8)

7 row :

6 sc, 1 sc dec, 1 ch, turn (7)

8 row :

1 sc dec, 5 sc, 1 ch, turn (6)

9 row :

5 sc, 1 sc inc, 1 ch, turn (7)

10 row :

1 sc inc, 6 sc, 1 ch, turn (8)

11-14 rows :

4 rows - 8 sc, 1 ch, turn (8)

15 row :

1 sc dec, 4 sc, 1 sc dec, 1 ch, turn (6)

16 row :

1 sc dec, 2 sc, 1 sc dec, 1 ch (4)

Info :

Don’t cut the thread and work sc around the edge of the muzzle. Finish with sl.st. (pic. 12-18) Tie off the thread and leave enough for sewing.

— Eyes. 2 pcs :

Info :

With white yarn. Use a hook 2.0 mm. The eyes are crocheted in a spiral.

1 row :

6 sc in magic ring (6)

2 row :

2 sc in each sc (12)

3 row :

(1 sc, sc inc) *6 (18)

Info :

Finish with sl.st. Tie off and leave enough thread for sewing (pic. 19).

— Paws. 6 pcs :

Info :

With dark gray yarn. Use a hook 2.0 mm. The paws are crocheted in a spiral.

1 row :

5 sc in magic ring (5)

2 row :

2 sc in each sc (10)

3-5 rows :

3 rows - 10 sc (10)

Info :

Fold two edges of the paw to each other and work 4 sc (pic. 20-23). Finish with 1 ch. Tie off the thread and leave enough for sewing. The paws don’t need to be stuffed. (pic. 24).

— Spots. (as many spots as you’d like) :

Info :

With black yarn. Use a hook 2.0 mm. The spots are crocheted in a spiral.

Item Name (Big spot) :

1 row: 6 sc in magic ring (6)

Round 2 :

2 row: 2 sc in each sc, sl.st (12)

Info :

Tie off and leave enough thread for sewing.

Item Name (Small spot) :

1 row: 6 sc in magic ring (6)

Info :

Finish with sl.st. Tie off and leave enough thread for sewing (pic. 25).

— Assembly :

Info :

- Crochet 27 ch with dark gray yarn and sew the chain onto the body (pic. 26-31).

Info :

- Sew the muzzle onto the body (pic. 32-37).

Info :

Use two black beads 6 mm in diameter for eyes and sew them onto the whites of the ladybug’s eyes. (pic. 38, 39). Note: If you don’t have the beads I suggest, you can embroider the eyes.

Info :

- Sew the whites of the ladybug’s eyes onto the muzzle (pic. 40-43).

Info :

- Sew the paws onto the body (pic. 44-50).

Info :

- Sew the spots onto the back (pic. 51-53).

Info :

Congratulations! Your ladybug is ready! I wish you nice crocheting!

Assembly Instructions

  • Crochet a 27 ch chain with dark gray yarn and sew the chain onto the body to create the central dorsal seam (see pics. 26-31) to shape the back detail.
  • Sew the muzzle onto the front of the body, pinning it in place first and attaching evenly around the edge (see pics. 32-37).
  • Sew the white eye pieces onto the muzzle (pics. 40-43), then add two black 6 mm beads as pupils to the whites (pics. 38-39) or embroider eyes if preferred.
  • Position and sew the six paws evenly around the belly edge so the toy sits stably (pics. 44-50), folding each paw edge and securing with 4 sc before attaching.
  • Arrange and sew the black spots onto the back as desired (pics. 51-53), fastening threads and hiding ends neatly inside the body.

Important Notes

  • 💡Crochet with tight stitches to ensure there are no holes through which stuffing can be seen; if you find tiny holes, switch to a smaller hook.
  • 💡Stuff the body gradually as you work the joining round so the shape is even and there are no lumps.
  • 💡Pin parts in place before sewing to maintain symmetry and achieve a neat finish.
  • 💡Leave long enough thread tails for sewing pieces securely and hiding ends inside the body after finishing.

This sweet Ladybug amigurumi is a joy to crochet and quick to finish, perfect for gifting or as a tiny handmade keepsake. The pattern includes full rounds, parts and a photo-referenced assembly guide to help you sew everything in place. Try different colors or make a mini army of ladybugs to decorate a shelf or give as pocket-sized presents. 🧶🐞

You ask,

we answer.

FAQs

What size will the finished piece be?

The finished ladybug measures approximately 7 cm (2.7 in) using the recommended DK cotton yarn and 2.0 mm hook.

Can I use different yarn weights for this pattern?

Yes, you can use different yarn weights but that will change the final size—use a compatible hook and expect size and stitch adjustments.

Do I need prior crochet experience for this pattern?

This pattern is rated intermediate; basic knowledge of single crochet, increases, decreases and working in spirals is recommended.

How long does this project typically take to complete?

Most crocheters finish this pattern in 2-3 hours, depending on experience, finishing and assembly speed.