๐Ÿงถ Beautiful โœจ Detailed ๐Ÿ’ Adorable

Teya the Fairy Amigurumi Pattern

Teya the Fairy Amigurumi Pattern
4.7โ˜… Rating
8-10 Hours Time Needed
3.2K Made This
โœ‚๏ธ

Intermediate Level

Ideal for those with basic crochet experience, featuring slightly more advanced stitches and techniques to expand your skills.

โฑ๏ธ

All-Day Adventure

Requires 8-10 hours, ideal for a full day of immersive crocheting.

๐Ÿฐ

Whimsical Buddy

Playful characters full of personality, designed to spark imagination and become cherished playtime favorites.

About This Teya the Fairy Amigurumi Pattern

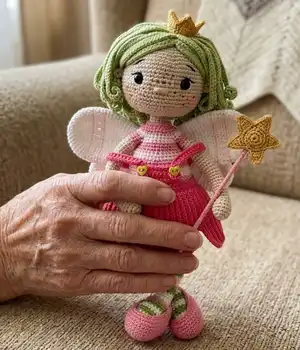
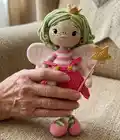
This pattern teaches you how to crochet Teya, a sweet fairy amigurumi with detailed hair, a tiny crown, wings and a little wand. The instructions are organized round-by-round with helpful notes on eye placement, sculpting and finishing. You will work top-to-bottom for the head and assemble the wig, crown and accessories for a polished result.

Teya the Fairy Amigurumi Pattern crochet pattern - detailed view of completed project

The pattern uses YarnArt Jeans yarn and a 2.0 mm hook to create an 11.8 inch tall doll with firm shaping. Plenty of photos and sculpting tips are included to guide you through finishing details.

Why You'll Love This Teya the Fairy Amigurumi Pattern

I absolutely love this pattern because it captures a whimsical, storybook charm while still teaching useful amigurumi shaping techniques. I enjoy designing hair wigs and the method here creates full, styled hair that feels magical to make. The crown and facial sculpting let me add personality with small details, which is always my favorite part. Seeing the doll come together from simple rounds into an expressive character never fails to make me smile.

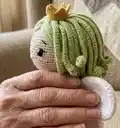
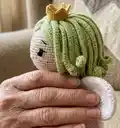
Teya the Fairy Amigurumi Pattern step 1 - construction progress Teya the Fairy Amigurumi Pattern step 2 - assembly progress Teya the Fairy Amigurumi Pattern step 3 - details and accessories Teya the Fairy Amigurumi Pattern step 4 - final assembly and finishing

Switch Things Up

I love personalizing amigurumi and this pattern is great for experimenting with colors and textures.

You can change the hair color to pastels or variegated yarn for a different look; try a soft beige or lavender for a dreamy fairy.

Make a mini version by using thinner yarn and a smaller hook for a portable keychain fairy.

If you want a chunkier, cuddlier doll use a bulkier yarn and a larger hook โ€” adjust eye size accordingly.

I often add embroidered freckles, different eye sizes or felt accessories to vary facial expressions and charm.

Try swapping the crown for a flower halo or tiny hat to create seasonal or themed fairies.

Add wire to the arms and legs if you want a posable fairy; wrap the wire and cover with yarn before stuffing.

Experiment with different button choices or tiny charms as dress fasteners to match your character's personality.

Change the wings to lace or crochet them in a glitter or metallic thread for a magical effect.

I recommend testing one small change at a time so you can see how each tweak affects balance and assembly.

Common Mistakes & How to Fix Them

โœ— Skipping the stitch marker placement can cause misaligned shaping and eye placement; place a marker at the center back and move it each round to stay oriented. โœ— Installing the eyes without marking the sockets first can lead to uneven positioning; use pins or safety eyes placement before final glue or fastening. โœ— Understuffing the head makes sculpting difficult and floppy; stuff firmly in small increments to keep an even round shape for sculpting. โœ— Forgetting to sculpt around safety eyes may give a flat look; always sculpt or pad around eyes as instructed before securing them permanently.

Teya the Fairy Amigurumi Pattern

Make your own charming Teya the Fairy with this full crochet pattern. You will create a sweet, poseable fairy doll complete with wig, crown, wings, and a little wand. The pattern includes clear step-by-step rounds, material lists, and assembly notes so you can follow along with confidence. Perfect as a thoughtful handmade gift or a colorful addition to your amigurumi collection.

Intermediate 8-10 Hours

Materials Needed for Teya the Fairy Amigurumi Pattern

โ€” Main Fabric

  • 01
    Beige yarn Jeans by YarnArt - 1 full yarn ball (color code 05) for head, arms and body details
  • 02
    Dark pink yarn Jeans by YarnArt - 1/2 yarn ball (color code 42) for dress accents
  • 03
    Light pink yarn Jeans by YarnArt - 1/2 yarn ball (color code 74) for stripes and details
  • 04
    Pink yarn Jeans by YarnArt - 1/2 yarn ball (color code 36) for skirt and straps
  • 05
    Light green yarn Jeans by YarnArt - 1 full yarn ball (color code 11) for hair (wig)
  • 06
    Green yarn Jeans by YarnArt - 1/2 yarn ball (color code 69) for accents
  • 07
    Green yarn Jeans by YarnArt - 1/2 yarn ball (color code 62) for stripes and accents
  • 08
    Yellow yarn Jeans by YarnArt - small amount (color code 67) for crown and star details

โ€” Tools Required

  • 01
    Size 2.0 mm crochet hook
  • 02
    2 buttons for the fairy (green heart buttons suggested) and one small pink button to make the dragonfly (optional)
  • 03
    Pipe cleaner or any other wire (to install into the arms)
  • 04
    Toy eyes diameter 12 mm (and 3 mm to make the dragonfly)
  • 05
    Toy stuffing (polyester fiberfill)
  • 06
    Thin black thread to decorate (for eyelashes and eyebrow lines)
  • 07
    Clear glue

Progress Tracker

0% Complete

โ€” Size :

Info :

Final size of the work with the recommended materials and tools is 11,8 inches tall.

โ€” Head :

Info :

Work bottom up in beige yarn color code 05. Stitch marker goes through the middle of the back.

Round 1 :

Start 6 SC in a MR (6)

Round 2 :

6 INC SC (12)

Round 3 :

(1 SC, INC)6 (18)

Round 4 :

(2 SC, INC)6 (24)

Round 5 :

(3 SC, INC)6 (30)

Round 6 :

(4 SC, INC)6 (36)

Round 7 :

(5 SC, INC)6 (42)

Round 8 :

(6 SC, INC)6 (48)

Round 9 :

(7 SC, INC)6 (54)

Round 10 :

(8 SC, INC)6 (60)

Round 11-12 :

60 SC (60), 2 rounds.

Round 13 :

(9 SC, INC)6 (66)

Round 14-25 :

66 SC (66), 12 rounds.

Info :

Install the eyes in the 19th-20th rounds with the distance 14 stitches between the eyes.

Round 26 :

(9 SC, dec)6 (60)

Round 27 :

60 SC (60)

Round 28 :

(8 SC, dec)6 (54)

Info :

Stuff well.

Round 29 :

(7 SC, dec)6 (48)

Round 30 :

(6 SC, dec)6 (42)

Round 31 :

(5 SC, dec)6 (36)

Round 32 :

(4 SC, dec)6 (30)

Round 33 :

(3 SC, dec)6 (24)

Round 34 :

(2 SC, dec)6 (18)

Info :

Do not sew the opening closed.

โ€” Ears :

Round 1 :

Start 6 SC in a MR, sl st (6)

Info :

Sew the ears on the 19th-21st rounds.

โ€” Hair (wig) :

Info :

Crochet hair in green color code 11.

Round 1 :

Start 6 SC in a MR (6)

Round 2 :

6 INC SC (12) into BLO.

Round 3 :

(1 SC, INC)6 (18)

Round 4 :

(2 SC, INC)6 (24) into BLO.

Round 5 :

(3 SC, INC)6 (30)

Round 6 :

(4 SC, INC)6 (36) into BLO.

Round 7 :

(5 SC, INC)6 (42)

Round 8 :

(6 SC, INC)6 (48) into BLO.

Round 9 :

(7 SC, INC)6 (54)

Info :

Where you stopped working make ch35 and from the 2nd stitch from hook crochet 34 SC, now make sl st into nearest stitch, one more sl st into next stitch, crochet ch35 and crochet 34 SC from the 2nd stitch from hook, repeat to the end of the round. You made 27 hair strands.

Info :

Crochet sl st in the 8th round. Make ch37 and from the 2nd stitch from hook crochet 36 SC, sl st into next stitch , one more sl st into next stitch and make ch37 and repeat to the end of the round. You made 21 hair strands.

Info :

SL ST in the 6th round. Make ch39 and from the 2nd stitch from hook crochet 38 SC, sl st into next stitch , one more sl st into next stitch and make ch39, repeat to the end of the round. You made 15 hair strands.

Info :

SL ST in the 4th round. Make ch41 and crochet from the 2nd stitch from hook 40 SC , sl st into next stitch, one more sl st into next stitch and crochet ch41 and repeat to the end of the round . You made 10 hair strands.

Info :

SL ST in the 2nd round. Make ch43 and from the 2nd stitch from hook crochet 42 SC, sl st into next stitch, one more sl st into next stitch and make ch 43, repeat to the end of the round. You made 6 hair strands.

Info :

Glue the wig on the head. But first of all I recommend steaming the wig to make the hair strands straight. Keep the shape of the wig as pictured.

โ€” Details :

Info :

Install the eyes in the 19th - the 20th rounds with the distance 14 stitches between the eyes. I glue the eyes, so I will place pins to mark the eye sockets. Do sculpting.

Info :

Please note: (If you use safety eyes, do sculpting around them, if you glue the eyes, place pins, and do sculpting and only then glue the eyes). When sculpting is done, glue the eyes, now embroider white lines along the eyes as pictured. Embroider thin black line and eyelashes line. Embroider the nose on the 22nd round, grabbing 3 or 4 stitches, there are two ways to embroider the nose: the first way just make stitches back and forth.

Info :

Now step 2 or 3 stitches up from the eyes, embroider the eyebrows grabbing 3 stitches with the distance 14 stitches between the eyebrows.

Info :

Now use soft pastel pink color to tone the cheeks.

โ€” Crown :

Info :

Work in yellow color.

Round 1 :

17 SC, crochet sl st to connect the round.

Round 2 :

Ch1, 17 SC, sl st. (17)

Round 3 :

Ch1, DC into the 3rd stitch from hook, into the same stitch ( 1 DC, ch1, 1 DC, ch1, TR, ch4 and make sl st into the 1st stitch of the chain, TR, ch1, DC, ch1, DC, ch1), now step 2 SC and crochet sl st into the 3rd stitch, Ch1, DC into the 3rd stitch from hook, into the same stitch ( 1 DC, ch1, 1 DC, ch1, TR, ch4 and make sl st into the 1st stitch of the chain, TR, ch1, DC, ch1, DC, ch1), now step 2 SC and crochet sl st into the 3rd stitch, Ch1, DC into the 3rd stitch from hook, into the same stitch ( 1 DC, ch1, 1 DC, ch1, TR, ch4 and make sl st into the 1st stitch of the chain, TR, ch1, DC, ch1, DC, ch1), now step 2 SC and crochet sl st into the 3rd stitch.

Info :

You made 3 triangles. Sew or glue the crown on the head, as pictured.

โ€” Arms :

Info :

Work in beige color code 05.

Round 1 :

Start 6 SC in a MR (6)

Round 2 :

6 INC SC (12)

Round 3 :

12 SC (12)

Round 4 :

(2 SC, INC)4 (16)

Round 5-7 :

16 SC (16), 3 rounds.

Round 8 :

(2 SC, dec)4 (12)

Round 9-32 :

12 SC (12), 24 rounds.

Info :

Change the yarn to pink color.

Round 33-35 :

12 SC (12), 3 rounds.

Assembly Instructions

  • Install the eyes in the 19th-20th rounds with 14 stitches between them; place pins to mark sockets and sculpt around eyes before gluing or securing safety eyes.
  • Sew the ears onto the head aligning them between rounds 19-21 and secure with a whipstitch so both ears match symmetrically.
  • Glue or sew the wig in place on the head after steaming the wig to straighten strands; keep the wig shape as pictured and hide the wig seam under hair.
  • Sew or glue the crown to the top of the wig as pictured, centering it at the hairline.
  • Insert pipe cleaner or wire into the arms before stuffing and sew the arms to the body securely so they hold pose; stuff firmly and evenly before final attachment.

Important Notes

  • ๐Ÿ’กInstall eyes before final sculpting and secure them only after you are happy with sculpting and placement to avoid having to reposition glued eyes.
  • ๐Ÿ’กSteam the wig before gluing to make the hair strands straight and shape the wig to match the pictures.
  • ๐Ÿ’กStuff the head well and evenly before sculpting; understuffing reduces the effectiveness of sculpting details.
  • ๐Ÿ’กUse pins to mark placements and check symmetry before sewing or gluing any accessories such as ears, crown or eyes.

This sweet Teya the Fairy amigurumi brings a touch of magic to your handmade collection. Create delicate hair, a tiny crown and expressive facial details that make this doll truly special. Perfect as a gift or a display piece โ€” each tiny stitch adds personality and charm. ๐Ÿงšโ€โ™€๏ธ๐Ÿงถ

You ask,

we answer.

FAQs

What size will the finished piece be?

The finished amigurumi measures approximately 11.8 inches tall when using the recommended YarnArt Jeans yarn and a 2.0 mm hook.

Can I use different yarn weights for this pattern?

Yes, you can use different yarn weights, but the final size will change; choose an appropriate hook for your yarn and be prepared for adjustments to eye placement and stuffing.

Do I need prior crochet experience for this pattern?

This pattern is rated intermediate, so basic knowledge of amigurumi stitches (MR, SC, INC, DEC) and finishing techniques like sculpting and sewing pieces together is recommended.

How long does this project typically take to complete?

Most crocheters finish this project in about 8-10 hours, depending on experience level and the amount of detail you add during sculpting and assembly.