🧢 Beautiful ✨ Detailed πŸ’ Adorable

A Hairy Caterpillar Amigurumi Pattern

A Hairy Caterpillar Amigurumi Pattern
4.4β˜… Rating
5-7 Hours Time Needed
3.0K Made This
βœ‚οΈ

Intermediate Level

Ideal for those with basic crochet experience, featuring slightly more advanced stitches and techniques to expand your skills.

⏱️

Weekend Treat

Takes 5-7 hours, making it an enjoyable project to finish over a couple of days.

🧸

Cute Companion

An adorable friend to cherish, handcrafted with love to bring comfort and joy for years to come.

About This A Hairy Caterpillar Amigurumi Pattern

This pattern creates a small, colourful hairy caterpillar amigurumi built from multiple joined segments. It uses DK yarn and works from the head down, changing colours for each segment. Youll add eyes, antennae, tiny feet and a playful spine of yarn hairs for texture.

A Hairy Caterpillar Amigurumi Pattern crochet pattern - detailed view of completed project

Includes full materials, abbreviations and round-by-round instructions written in UK terminology. Ideal for making a tactile decorative toy or a unique handmade gift.

Why You'll Love This A Hairy Caterpillar Amigurumi Pattern

I absolutely love this pattern because it combines simple crochet techniques with playful texture and colour changes that bring the caterpillar to life. I enjoy the modular build β€” each segment is quick to make so you see progress fast. The hairy spine adds a crafty interactive detail that children adore. Sewing on the tiny feet and antennae is a satisfying finishing step that makes each piece feel truly handmade and special.

A Hairy Caterpillar Amigurumi Pattern step 1 - construction progress A Hairy Caterpillar Amigurumi Pattern step 2 - assembly progress A Hairy Caterpillar Amigurumi Pattern step 3 - details and accessories A Hairy Caterpillar Amigurumi Pattern step 4 - final assembly and finishing

Switch Things Up

I love how easy it is to customise this caterpillar by swapping colours; try a pastel palette for a soft nursery toy or bright neons for a bold, playful look.

I often change yarn weight and hook size when I want a mini or jumbo version; a 3.5mm hook with fingering yarn makes a tiny keyring, while bulky yarn with a 6mm hook makes a chunky plush version.

I sometimes add embroidered eyebrows or a tiny tongue to give the caterpillar extra personality and expression.

You can replace safety eyes with embroidered eyes for a baby-safe version or use smaller safety eyes for a more delicate face.

If you want poseable legs, try inserting thin wire into the feet before stuffing and sewing to make the feet adjustable.

For a seasonal twist, change the hair strand colours to autumn tones or festive reds and greens for holiday-themed caterpillars.

I like to make a whole family of caterpillars in graduated sizes and colours to display together β€” they make great gifts and market items.

Try using different stitch textures (for example switch to HDC or BLO rounds) to create striping or ridges along the segments.

I sometimes add tiny crocheted props like a leaf or mushroom to set with the caterpillar for a small scene or photo prop.

Don’t be afraid to experiment with placement of feet and eyes; moving them a stitch or two can change the character of your finished toy dramatically.

Common Mistakes & How to Fix Them

βœ— Not leaving a small hole in the eye ring; this prevents fitting the safety eye stem through so stop closing the magic ring completely when making eye rings. βœ— Placing the safety eyes too low or too wide; mark positions between rows 3 and 4 and count about seven stitches apart before securing backs. βœ— Overstuffing body segments causing distortion; stuff gradually as you work and maintain even, light stuffing for smooth shapes. βœ— Skipping stitch counts during increases and decreases leads to mis-shaped segments; count after each round and follow the repeat patterns exactly. βœ— Pulling hair strands too tightly when attaching them can flatten the spine; pull loops gently and cut hairs to the advised length so they stand up nicely.

A Hairy Caterpillar Amigurumi Pattern

Make a colourful, tactile hairy caterpillar amigurumi using this UK-terminology pattern. Youll work modular body segments, add playful hair strands, and sew on features for a charming finished toy. Clear round-by-round instructions and small accessory pieces make this a fun, hands-on crochet project. Perfect as a colourful gift or a playful addition to your handmade toy collection.

Intermediate 5-7 Hours

Materials Needed for A Hairy Caterpillar Amigurumi Pattern

β€” Main Fabric

  • 01
    Double Knit (DK) yarn - Red x1 skein
  • 02
    Double Knit (DK) yarn - Dark Green x1 skein
  • 03
    Double Knit (DK) yarn - Bright Green x1 skein
  • 04
    Double Knit (DK) yarn - Sage Green x1 skein
  • 05
    Oddments of Purple for antennae
  • 06
    Oddments of Dark Brown for feet
  • 07
    Oddments of Yellow for hair strands

β€” Tools Required

  • 01
    Crochet hook 4mm
  • 02
    Stuffing (polyester filling)
  • 03
    Safety eyes 12mm green x2
  • 04
    Safety nose 9mm black triangle nose
  • 05
    Stitch marker
  • 06
    Tapestry needle for sewing in ends

Progress Tracker

0% Complete

β€” Materials :

Infos :

Yarn- Any Double Knit yarn in; Red x1, Dark Green x1, Bright Green x1, Sage Green x1, oddments of purple, dark brown, and yellow. Hook - 4mm. Stuffing. Safety eyes - 12mm green x2. Safety nose - 9mm black triangle nose. Stitch marker. Tapestry Needle for sewing in ends.

β€” Abbreviations :

Info :

ch - chain. dc - double crochet. dec - decrease. inc - increase. ss - slip stitch. st - stitch. FO - fasten off.

β€” Eye Rings x2 :

Info :

Using Yellow make a magic ring, ch1

Round 1 :

dc x8 into ring, ss into first st. FO.

Info :

Do not fully close your magic ring, leave a small hole in the centre, just enough to fit the stem of the safety eye through.

Info :

Pop a safety eye into the centre, but do not attach the back yet. You will attach the eyes to the head between rows 3 and 4 once you have made the head.

β€” Head &Body :

Info :

You will be starting at the head and working down the body to the tail.

Info :

Stuff as you go.

Info :

Using Red make a magic ring, ch1

Round 1 :

dc x8 into ring (8)

Round 2 :

inc around (16)

Round 3 :

[inc, dc] repeat around (24)

Round 4 :

[inc, dc x2] repeat around (32)

Round 5-10 :

dc around (32)

Info :

Attach eyes (including eye rings), between rows 3 and 4, about 7 stitches apart.

Round 11 :

[dec, dc x2] repeat around (24)

Round 12 :

[dec, dc] repeat around (16)

Round 13 :

dec around (8). Change to Dark Green

Round 14 :

inc (24)

Round 15 :

[inc, dc] repeat around (24)

Round 16 :

[inc, dc x2] repeat around (32)

Round 17-20 :

dc around (32)

Round 21 :

[dec, dc x2] repeat around (24)

Round 22 :

[dec, dc] repeat around (16)

Round 23 :

dec around (8). Change to Bright Green

Round 24-32 :

repeat rows 14-23 - Changing to Sage Green at the end of round 32.

Round 33-41 :

repeat rows 14-23 - Changing to Dark Green at the end of round 41.

Round 42 :

inc around (16)

Round 43 :

[inc, dc] repeat around (24)

Round 44-46 :

dc around (24)

Round 47 :

[dec, dc] repeat around (16)

Round 48 :

dec around (8). change to Bright Green

Round 49-55 :

repeat rows 42-48, changing to Sage Green at teh end of row 55.

Round 56 :

inc around (16)

Round 57-58 :

dc around (16)

Round 59 :

dec (8)

Round 60 :

dec (4)/ FO. leaving a long end to close. Thread end through remaining stitches and pull to close.

Info :

Sew in ends

β€” Antenna x2 :

Info :

Using Purple make a magic ring, ch1

Round 1 :

dc x3 into ring (3)

Round 2 :

inc, dc, inc (5)

Round 3 :

dc around (5)

Round 4 :

dec, dc x3 (4)

Round 5-6 :

dc around (4). FO.

Info :

Stuff tips of antenna lightly.

Info :

Sew antenna to centre top of head, a couple of rows above the eyes, and a couple of stitches apart.

β€” Feet x6 :

Info :

Using Brown make a magic ring, ch1

Round 1 :

dc x4 into ring (4)

Round 2 :

inc around (8)

Round 3-4 :

dc around (8). FO

Info :

Stuff lightly.

Info :

Sew 2 feet to the first body segment (first green segment after the head).

Info :

Attach feet to the underside, about 3 stitches apart.

Info :

Sew 2 to the second body segment.

Info :

Sew 2 to the fourth body segment.
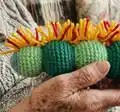
β€” Hairy Spine :

Info :

Cut several 10cm lengths of Yellow yarn, and a about 8 Red.

Info :

Attach along the centre of the Caterpillars back, interspersing the Red at random intervals till you reach the tail.

Info :

To Attach the hair strands - Attach the strands by inserting your crochet hook into the loop of a stitch. Catch the middle of the hair strand and pull a loop through. Pull the ends of the strand through the loop. This should hold firmly.

Info :

Cut spine hairs to length (aprox 2cm), so they stick up nicely.

Info :

Tadah! Enjoy!

Assembly Instructions

  • Attach eyes (including eye rings) between rows 3 and 4 of the head, spacing them about 7 stitches apart and only secure the safety eye backs after positioning.
  • Sew antennae to the centre top of the head a couple of rows above the eyes and a couple of stitches apart, stuffing the tips lightly first.
  • Sew feet to the underside of body segments: attach 2 feet to the first green segment after the head, 2 to the second body segment, and 2 to the fourth body segment, spacing them about 3 stitches apart.
  • Attach the hairy spine by inserting hair strands along the centre of the caterpillars back, interspersing red strands randomly until you reach the tail.
  • Join segments smoothly as you work down from the head, stuffing each segment as you go to maintain even shape and tension.

Important Notes

  • πŸ’‘This pattern is written in UK terminology, so dc = UK double crochet (US single crochet equivalent).
  • πŸ’‘Work with a stitch marker to mark the beginning of each round, especially during increases and decreases to keep consistent stitch counts.
  • πŸ’‘Stuff each segment gradually as you go; overstuffing can distort shapes and under stuffing will make the toy floppy.
  • πŸ’‘Leave a long tail at the final closing (after round 60) to thread through remaining stitches and pull to close securely.

This adorable Hairy Caterpillar pattern makes a colourful, tactile toy perfect for gifting or display. The modular segments and playful hair spine give lots of scope for color play and personalization. Have fun choosing colours and adding tiny details to make each caterpillar unique. 🧢πŸͺ„

You ask,

we answer.

FAQs

What size will the finished piece be?

Finished Length: Aprox 25cm when using DK yarn and a 4mm hook as recommended.

Do I need experience to follow this pattern?

This pattern is rated intermediate β€” basic knowledge of rounds, increases, decreases, and sewing pieces together is recommended.

Can I change the yarn weight or hook size?

Yes, changing yarn weight or hook size will alter the finished size; using thicker yarn and a larger hook will create a chunkier caterpillar, while thinner yarn makes a smaller one.

How do I attach the hair strands securely?

Fold each hair strand in half, pull the folded centre through a stitch with your hook, then pull the ends through the loop and tighten; trim to aprox 2cm for a neat upright spine.