🧢 Beautiful ✨ Detailed πŸ’ Adorable

T-Rex Amigurumi Pattern

T-Rex Amigurumi Pattern
4.5β˜… Rating
5-7 Hours Time Needed
1.8K Made This
βœ‚οΈ

Intermediate Level

Ideal for those with basic crochet experience, featuring slightly more advanced stitches and techniques to expand your skills.

⏱️

Weekend Treat

Takes 5-7 hours, making it an enjoyable project to finish over a couple of days.

🧸

Cute Companion

An adorable friend to cherish, handcrafted with love to bring comfort and joy for years to come.

About This T-Rex Amigurumi Pattern

This pattern teaches you how to crochet a small T‑Rex amigurumi with a detailed step-by-step approach. It uses fine yarn and a small hook to create crisp stitch definition and charming features. You will work in continuous spirals and add a decorative mask, eyes and spots for personality.

T-Rex Amigurumi Pattern crochet pattern - detailed view of completed project

Includes clear abbreviations, stitch counts and photo references to guide assembly. Ideal for intermediate crocheters who enjoy shaping and finishing techniques.

Why You'll Love This T-Rex Amigurumi Pattern

I absolutely love this pattern because it combines fun character design with practical shaping techniques that really improve your amigurumi skills. I enjoyed designing the layered head details and little spots β€” they give the dinosaur so much personality. The pattern is photo-rich which makes assembly and finishing much less intimidating. I also love that the piece is small enough for a weekend project but detailed enough to feel like an accomplishment.

T-Rex Amigurumi Pattern step 1 - construction progress T-Rex Amigurumi Pattern step 2 - assembly progress T-Rex Amigurumi Pattern step 3 - details and accessories T-Rex Amigurumi Pattern step 4 - final assembly and finishing

Switch Things Up

I love how easy it is to customize this T‑Rex by changing colors; try pastel shades for a softer look or bold neon for a playful modern toy.

I often swap the yarn weight and use a 3.5 mm hook with bulkier yarn to create a cuddly oversized version that doubles as a plush toy.

If you want a miniature keychain, use thinner thread and a 1.25 mm hook to scale the pattern down and add a keyring to the head.

For a different expression, adjust the eye placement and needle sculpting β€” moving the eyes slightly closer or farther apart changes the personality entirely.

Add wire armature inside the legs or tail if you want poseable limbs; just insert the wire before final stuffing and secure the ends inside the body.

I like to embroider small freckles or stitches on the mask to give a handmade character; use contrasting threads in short straight stitches for texture.

Try making matching accessories like a tiny scarf, spines or a vest using leftover yarn to create a whole set of characters with different outfits.

Switch the spot colors to metallic or variegated yarn to make shimmering patches that really pop under lights and photos.

When sewing pieces together, pin first and try different placements β€” you can always reposition before making the final whipstitch for a perfect balance.

Finally, experiment with safety eyes or crochet the pupils as shown; I prefer crocheted pupils for durability in toys for small children.

Common Mistakes & How to Fix Them

βœ— Skipping stitch markers while working in a spiral leads to losing track of the round beginning; place a marker at the start of every round and move it as you crochet. βœ— Forgetting to stuff gradually causes lumps and uneven shaping; stuff small amounts at a time and check the form continuously to keep a smooth shape. βœ— Pulling the yarn too tight during invisible color changes can make the edge stiff and hard to work into; keep the final loop loose and wrap the new color gently around the hook. βœ— Not counting stitches after increases or decreases results in wrong shaping later; count stitches after each increase/decrease row to ensure the correct stitch total.

T-Rex Amigurumi Pattern

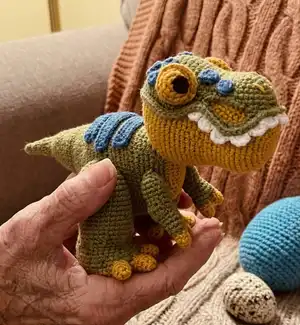
Create a playful T-Rex amigurumi with this detailed crochet pattern. You will learn shaping, color changes and small assembly techniques to build a charming dinosaur. The pattern includes full round-by-round instructions, photos and finishing tips so you can make a neat, professional-looking toy. Perfect as a gift or a collectible to brighten your home.

Intermediate 5-7 Hours

Materials Needed for T-Rex Amigurumi Pattern

β€” Main Fabric

  • 01
    YarnArt Jeans size 2 (50 g / 150 m) - 55% cotton, 45% pac
  • 02
    Mustard - color 84 (used for head and details)
  • 03
    Green - color 69 (used for outer head/mask and body)
  • 04
    Blue - color 16 (spots and stripes)
  • 05
    Yellow - color 35 (eye outer pieces)
  • 06
    White - color 03 (teeth/edging)
  • 07
    Black - color 53 (eye pupils)
  • 08
    Light brown - color 71 (alternate color scheme)
  • 09
    Brown - color 70 (alternate color scheme)
  • 10
    Orange - color 77 (alternate accent color)

β€” Tools Required

  • 01
    Crochet hook size 1.75 mm (Crochet Soft Touch)
  • 02
    Scissors
  • 03
    Stitch markers
  • 04
    Polyester stuffing (sintepuh)
  • 05
    Tapestry/yarn needle for sewing and finishing
  • 06
    Pins for assembly
  • 07
    Thin cotton thread for a row marker (optional)

Progress Tracker

0% Complete

β€” Head :

1 r :

8 sc into MR [8]

2 r :

8 inc [16]

3 r :

(1 sc, inc)*8 [24]

4 r :

1 sc, inc, (2 sc, inc)*7, 1 sc [32]

5 r :

(3 sc, inc)*8 [40]

6 r :

2 sc, inc, (4 sc, inc)*7, 2 sc [48]

7 r - 9 r :

48 sc [48] {3 rounds}

10 r :

10 sc, 4 inc - hdc, 12 sc, dec, (4 sc, dec)*3 {img 1}, 2 sc [48]

11 r - 15 r :

48 sc [48] {5 rounds}

16 r :

10 sc, 4 dec - hdc {img 1-9}, 12 sc, inc, (4 sc, inc)*3, 2 sc {img 10} [48]

17 r - 18 r :

48 sc [48] {2 rounds}

19 r :

(5 sc, inc)*8 [56]

20 r - 21 r :

56 sc [56] {2 rounds}

22 r :

3 sc, inc, (6 sc, inc)*7, 3 sc [64]

23 r - 26 r :

64 sc [64] {4 rounds}

27 r :

3 sc, dec, (6 sc, dec)*7, 3 sc [56]

28 r :

28 sc, (5 sc, dec)*4 [52]

29 r :

30 sc, dec, (4 sc, dec)*3, 2 sc [48]

30 r - 31 r :

48 sc [48] {2 rounds}

32 r :

2 sc, dec, (4 sc, dec)*7, 2 sc [40]

33 r :

40 sc [40]

34 r :

(3 sc, dec)*8 [32]

35 r :

1 sc, dec, (2 sc, dec)*7, 1 sc [24]

36 r :

(1 sc, dec)*8 [16]

37 r :

8 dec [8]

Info :

Stuff with sintepu h. Fasten off leaving a tail about 15 cm long and cut the yarn. Using a tapestry needle, weave the yarn tail through the front loop of each stitch and pull tight to close {img 11}.

β€” Head top / Mask (Green yarn color 69) :

1 r :

14 ch [14] {img 12}

2 r :

from the 2nd stitch from the hook 2 inc, 9 sc, inc, 3 sc in the 1 stitch, inc on the other side of the chain, 9 sc, inc, sc [32] {img 13}

3 r :

3 inc, 11 sc, 5 inc, 11 sc, 2 inc [42] {img 14}

4 r :

(sc, inc)*3, 9 sc, 2 hdc, (dc, inc - dc)*5, 2 hdc, 9 sc, (sc, inc)*2 [52] {img 15}

5 r :

18 sc, 2 hdc, (2 dc, inc - dc)*5, 2 hdc, 15 sc [57] {img 16}

6 r :

(2 sc, inc)*3, 42 sc, (2 sc, inc)*2 [62]

7 r :

2 sc, dec, 19 sc, (3 sc, inc)*5, 19 sc [66] {img 17}

8 r :

5 sc, 5 hdc, 51 sc, 5 hdc [66] {img 18}

9 r :

5 sc, 4 hdc, 5 sc, 4 hdc, 3 sc, 3 hdc in the 1 stitch, 2 sc, inc, (4 sc, inc)*4, 2 sc, 3 hdc in the 1 stitch, 3 sc, 4 hdc, 5 sc, 4 hdc, 2 sc [75] {img 19}

10 r :

8 sc {img 20}, 13 ch {img 21}, from the 9nd stitch from the hook sc {img 22-23}, 4 sc, 3 inc - hdc, 30 sc, 3 inc - hdc, 5 sc {img 24}, 13 ch {img 25}, from the 9nd stitch from the hook sc {img 26-27}, 4 sc {img 28} [91]

11 r :

14 sc, 3 sc in the 1 stitch, 11 sc, 6 hdc, 30 sc, 6 hdc, 11 sc, 3 sc in the 1 stitch, 11 sc [95] {img 29}

12 r :

FLO: 95 sc [95] {img 30}

Info :

Fasten off. White yarn color 03: Go back 11 row to the beginning of the row {img 31}. Back loops only {img 32 - 33}.

Edging :

BLO: 2 sl st {img 34}, ch {img 35}, 3 dc in the 1 stitch {img 36}, ch {img 37}, 3 sl st {img 38}, (ch, 3 dc in the 1 stitch, ch, 3 sl st)*5 {img 39}, 47 sl st {img 40}, (ch, 3 dc in the 1 stitch, ch, 3 sl st)*5, ch, 3 dc in the 1 stitch, ch, sl st {img 41}. Fasten off.

β€” Assembly - join head pieces :

Item :

Fasten 2 pieces with pins {img 42 - 45}.

Item (Sew) :

Sew on a piece of green {img 46 - 45}.

Needle sculpting :

Make a needle sculpting: insert the needle at point 1, exit through point 2 [img 50], insert the needle at point 3, exit through point 4 [img 51]. Similarly, make a tightening for the second eye (points 1-5-6-4) [img 52 - 53]. Fix the thread and hide inside {img 54}.

β€” Eyes (make 2) :

Black yarn color 53 :

1 r: 6 sc into MR [6]. Fasten off {img 55}.

Yellow yarn color 35 :

1 r: 6 sc into MR [6]

2 r :

6 inc [12]

3 r :

3 sc, 3 inc, 3 sc, 3 inc [18]

4 r - 5 r :

18 sc [18] {2 rounds}

6 r :

3 sc, 3 dec, 3 sc, 3 dec [12]

7 r :

6 dec [6] {img 56}. Fasten off leaving a tail about 15 cm long and cut the yarn. Using a tapestry needle, weave the yarn tail through the front loop of each stitch and pull tight to close.

Info :

Sew the black piece to the yellow piece {img 57}. Sew eyes to head {img 60 - 61}.

β€” Spots (make 3) :

Blue yarn color 16 :

1 r: 6 sc into MR [6] {img 65}. Fasten off.

Decoration :

Make a marking with pins {img 47 - 49}. Sew patches to the head {img 62 - 67, 68 - 67}.

Assembly Instructions

  • Fasten the two main head pieces together with pins to check alignment (use images 42-45 as reference).
  • Sew the green mask/top piece to the mustard head using small whipstitches, following the pinned placement for an even seam.
  • Position and sew the eyes to the head at the marked rows (about 5 rows and 11 rows from the top as shown in images 60-61), then secure with needle sculpting for definition.
  • Sew the small blue spot patches to the head in the pinned positions shown (use images 62-68 as guide).
  • After closing openings, hide yarn tails inside and place any decorative ridges or stripes (blue stripes) by sewing them onto the back and head as shown in photos.

Important Notes

  • πŸ’‘Work all parts in a spiral without slip stitches unless otherwise instructed, and use a marker to note the beginning of each round.
  • πŸ’‘Use invisible color change method: work until two stitches before color change, wrap new color around hook and pull through remaining loops to avoid visible gaps.
  • πŸ’‘Back loops only (BLO) and front loops only (FLO) are used for edging and shaping; follow the instructions exactly to match the photos.
  • πŸ’‘Stuff gradually and shape as you go; overstuffing can distort shaping and under stuffing gives a floppy toy.

This charming T‑Rex amigurumi brings playful personality to your handmade collection and makes a lovely gift for dino fans. The pattern pairs detailed stitch counts with clear photos so you can finish each part neatly and confidently. Enjoy the stitching, pinning and sewing steps β€” it all comes together into a quirky little companion! 🧢✨

You ask,

we answer.

FAQs

What size will the finished piece be?

The finished amigurumi measures approximately 12-15 cm tall depending on yarn tension and stuffing, using the recommended fine yarn and 1.75 mm hook.

Can I use different yarn weights for this pattern?

Yes, you can use different yarn weights but the final size and stitch count may vary; switch to an appropriate hook for your yarn and adjust quantities and stuffing accordingly.

Do I need prior crochet experience for this pattern?

This pattern is rated intermediate, so a basic knowledge of single crochet, increases, decreases, and working in spirals is recommended for best results.

How long does this project typically take to complete?

Most crocheters complete this project in 5-7 hours, though time may vary depending on experience level and how much time you spend on assembly and finishing.