🧢 Beautiful ✨ Detailed πŸ’ Adorable

Sugar Mice Amigurumi Pattern

Sugar Mice Amigurumi Pattern
4.6β˜… Rating
2-3 Hours Time Needed
3.0K Made This
βœ‚οΈ

Beginner Friendly Level

Perfect for those just starting their crochet journey, with clear instructions and simple techniques

⏱️

Bite-Sized Project

Finishes in 2-4 hoursβ€”perfect for an afternoon of creative relaxation.

🧸

Cute Companion

An adorable friend to cherish, handcrafted with love to bring comfort and joy for years to come.

About This Sugar Mice Amigurumi Pattern

This pattern makes charming little sugar mice using DK weight yarn and a 3mm hook, with options for contrast ears and tails. It includes both UK and US term versions so you can follow your preferred terminology. The designs are small, quick to make, and ideal for gifts, charity projects or adding to craft stalls.

Sugar Mice Amigurumi Pattern crochet pattern - detailed view of completed project

Each mouse is worked in continuous rounds with clear row-by-row instructions and a simple sewn tail and ears method. The pattern uses minimal yarn and is perfect for using up oddments.

Why You'll Love This Sugar Mice Amigurumi Pattern

I absolutely love this pattern because it transforms small bits of DK yarn into irresistibly cute little mice that bring a smile instantly. I enjoy how quickly one mouse can be worked up in an afternoon, making them perfect for gifts and charity projects. The simplicity of the shaping keeps the process relaxing, while the tiny details like contrast ears and a sewn tail let me add personality. I especially love that I can crochet several in different colours to create a playful set.

Sugar Mice Amigurumi Pattern step 1 - construction progress Sugar Mice Amigurumi Pattern step 2 - assembly progress Sugar Mice Amigurumi Pattern step 3 - details and accessories Sugar Mice Amigurumi Pattern step 4 - final assembly and finishing

Switch Things Up

I love experimenting with colour when I make these sugar mice; try pastel contrasts, monochrome combinations, or bold brights to change the mood of each mouse.

To make a larger version, I switch to a thicker yarn and a larger hook; bulky yarn with a 5mm hook makes a chunky cuddly mouse.

For a miniature version suitable for keyrings, I use finer yarn and a 2.5mm hook and shorten the tail chain for proportion.

I sometimes embroider tiny noses or add felt inner ear details to give each mouse a unique face and expression.

Adding a small bell or squeak before stuffing gives a playful sound; I always stitch it in securely so it stays in place during use.

I like to vary the tail style by crocheting a spiral tail, a braided tail, or leaving the chain simple depending on the look I want.

Try different eye techniques: sewn yarn eyes as in the pattern, tiny safety eyes (if appropriate), or embroidered dots for a softer finish.

Turn these mice into decorations by attaching a small loop at the top to hang on a mobile or tree, or add keyring hardware for a useful accessory.

I often create small themed setsβ€”use coordinating palettes to make party favors or charity stall bundles that sell quickly.

Don’t be afraid to mix textures; a fuzzy DK or boucle contrast yarn for ears can add a delightful tactile quality to your finished mice.

Common Mistakes & How to Fix Them

βœ— Forgetting to place a stitch marker when working in continuous rounds causes lost stitch counts; place a marker at the last stitch of each round and move it up each round. βœ— Overstuffing the body makes the mouse look lumpy and can show stuffing through stitches; stuff gradually and only enough so the piece can be pinched firmly without bulging. βœ— Not tucking the contrast tail ends inside the body can leave visible yarn tails; always pull the contrast tight, tie ends securely and tuck neatly inside before finishing. βœ— Skipping counting increases and decreases will alter shaping and size; count your stitches carefully at the end of each row especially during shaping rows. βœ— Attaching ears without checking placement leads to asymmetry; pin ears in place and check spacing before sewing securely through both layers.

Sugar Mice Amigurumi Pattern

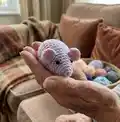
Create a sweet collection of tiny sugar mice with this concise and cheerful crochet pattern. You will love how quickly these pocket-sized friends come together using DK yarn and a 3mm hook. The pattern includes both UK and US terms, clear row-by-row instructions, and simple assembly notes so you can finish with confidence. Perfect for gifts, charity makes, or a cute keyring collection.

Beginner Friendly 2-3 Hours

Materials Needed for Sugar Mice Amigurumi Pattern

β€” Main Fabric

  • 01
    Hayfield Bonus DK Main - 6g
  • 02
    Hayfield Bonus DK Contrast - oddment for ears and tail
  • 03
    Hayfield Bonus Black 0965 - oddment for eyes
  • 04
    Hi-Loft quality toy stuffing - small amount
  • 05
    Optional - small bell or squeak (1 small item)

β€” Tools Required

  • 01
    3mm crochet hook
  • 02
    Wool needle for sewing
  • 03
    Scissors
  • 04
    Stitch markers
  • 05
    Pins for assembly (optional)
  • 06
    Small bell or squeak (optional)

Progress Tracker

0% Complete

Infos :

Unless stated work in continuous rounds marking last stitch of each row with a stitch marker before proceeding with the next. When stuffing parts make sure that you don't overstuff them as you don't want the stuffing to show through when complete. Each part should be filled just enough that it can be easily squeezed when pinched firmly.

β€” Ears (UK Terms) :

Row 1 :

Using Contrast: ch2, (dc, htr, trinc, htr and dc) into 2nd st from hook

Info :

F/O leaving a short end

β€” Body (UK Terms) :

Row 1 :

Using Main: ch2, dc 6sts into 2nd st from hook (alternatively dc 6sts into magic ring) (6)

Row 2 :

(dc into next st, inc) x3 (9)

Row 3 :

dc (9)

Row 4 :

(dc into next 2sts, inc) x3 (12)

Row 5 :

dc (12)

Row 6 :

(dc into next 3sts, inc) x3 (15)

Row 7 :

dc into next 3sts, place straight edge of ear on top of body right side down, working through both layers dc into the next 3sts, then dc into next 3sts, place straight edge of ear on top of body right side down, working through both layers dc into the next 3sts, then dc into last 3sts (15)

Row 8 :

(dc into next 4sts, inc) x3 (18)

Row 9 :

(dc into next 5sts, inc) x3 (21)

Row 10 :

(dc into next 6sts, inc) x3 (24)

Rows 11 - 13 :

dc (24) (3 rows)

Row 14 :

(dc into next 2sts, dec) x6 (18)

Row 15 :

(dc into next st, dec) x6 (12)

Info :

Stuff body (optional - add small bell or squeak at this stage)

Row 16 :

dec x6 (6)

Info :

Leaving a 15cm end, change to contrast and ch1, pull main colour tight and then tie ends together to join. Tuck contrast end inside body.

Row 17 :

ch15, starting in 2nd ch from hook sl st into the next14ch (14)

Info :

F/O leaving a 5cm end. Tuck contrast end inside body. With main 15cm end, and using a running st through front loops, gather last 6sts tightly at the same time making sure that none of your contrast ends are showing. Sew through base of tail a couple of times to secure in place. Weave end through body and cut.

β€” Eyes (UK Terms) :

Info :

Using black oddment sew 2 eyes 1st in length 4 rows back from the starting circle and 4sts apart. Weave ends through body and cut.

β€” Ears (US Terms) :

Row 1 :

Using Contrast: ch2, (sc, hdc, dcinc, hdc and sc) into 2nd st from hook

Info :

F/O leaving a short end

β€” Body (US Terms) :

Row 1 :

Using Main: ch2, sc 6sts into 2nd st from hook (alternatively sc 6sts into magic ring) (6)

Row 2 :

(sc into next st, inc) x3 (9)

Row 3 :

sc (9)

Row 4 :

(sc into next 2sts, inc) x3 (12)

Row 5 :

sc (12)

Row 6 :

(sc into next 3sts, inc) x3 (15)

Row 7 :

sc into next 3sts, place straight edge of ear on top of body right side down, working through both layers sc into the next 3sts, then sc into next 3sts, place straight edge of ear on top of body right side down, working through both layers sc into the next 3sts, then sc into last 3sts (15)

Row 8 :

(sc into next 4sts, inc) x3 (18)

Row 9 :

(sc into next 5sts, inc) x3 (21)

Row 10 :

(sc into next 6sts, inc) x3 (24)

Rows 11 - 13 :

sc (24) (3 rows)

Row 14 :

(sc into next 2sts, dec) x6 (18)

Row 15 :

(sc into next st, dec) x6 (12)

Info :

Stuff body (optional - add small bell or squeak at this stage)

Row 16 :

dec x6 (6)

Info :

Leaving a 15cm end, change to contrast and ch1, pull main colour tight and then tie ends together to join. Tuck contrast end inside body.

Row 17 :

ch15, starting in 2nd ch from hook sl st into the next14ch (14)

Info :

F/O leaving a 5cm end. Tuck contrast end inside body. With main 15cm end, and using a running st through front loops, gather last 6sts tightly at the same time making sure that none of your contrast ends are showing. Sew through base of tail a couple of times to secure in place. Weave end through body and cut.

β€” Eyes (US Terms) :

Info :

Using black oddment sew 2 eyes 1st in length 4 rows back from the starting circle and 4sts apart. Weave ends through body and cut.

Assembly Instructions

  • Position the ears on the body when instructed in Row 7: place the straight edge of each ear on top of the body right side down and work through both layers to join, then sew securely through the ear base.
  • Sew the tail base: after creating the ch15 tail (Row 17) tuck the contrast end inside the body, use the main 15cm end to gather last 6 stitches through front loops, then sew through the base of the tail a couple of times to secure in place.
  • Attach the eyes by sewing with black oddment: position each eye 4 rows back from the starting circle and 4 stitches apart, then weave ends through the body and cut.
  • Weave and hide all yarn ends inside the body before finishing; tie the contrast ends securely and tuck them inside to prevent unraveling.
  • If using a small bell or squeak, add it before fully stuffing and closing the body to ensure it is secure and centred.

Important Notes

  • πŸ’‘Use a stitch marker to mark the final stitch of each round when working in continuous rounds to maintain correct stitch counts.
  • πŸ’‘Stuff parts moderately so the shape is smooth; overstuffing will cause the stuffing to show through the stitches.
  • πŸ’‘Tuck all contrast ends inside the body after joining and secure with knots if needed to prevent ends from showing.

These sweet Sugar Mice are perfect for quick handmade gifts, charity makes, or a colourful collection of pocket pals. Each tiny mouse uses very little yarn and comes together quickly, so you can make a whole family in an afternoon. Add little bells, different colours, or keyring hardware for instant charm and personality. 🧢🐭

You ask,

we answer.

FAQs

What size will the finished piece be?

The finished sugar mouse measures approximately 6-8 cm long depending on yarn tension and whether you use UK or US stitch terms with the recommended DK yarn and 3mm hook.

Can I use different yarn weights for this pattern?

Yes, you can use different yarn weights but this will affect the final size; choose an appropriate hook for the yarn and expect proportion changes.

Do I need prior crochet experience for this pattern?

This pattern is beginner friendly but expects knowledge of basic stitches (chain, single/double crochet, increases and decreases) and working in continuous rounds.

How long does this project typically take to complete?

Most crocheters complete a single sugar mouse in 2-3 hours, though time may vary based on experience level and whether you add extras like bells or sewn details.