🧢 Beautiful ✨ Detailed πŸ’ Adorable

Stanley the Strawberry Amigurumi Pattern

Stanley the Strawberry Amigurumi Pattern
4.6β˜… Rating
2-3 Hours Time Needed
1.5K Made This
βœ‚οΈ

Beginner Friendly Level

Perfect for those just starting their crochet journey, with clear instructions and simple techniques

⏱️

Bite-Sized Project

Finishes in 2-4 hoursβ€”perfect for an afternoon of creative relaxation.

🎁

Tiny Treasure

Small, sweet, and gift-worthy creations that fit perfectly in the palm of your hand with detailed charm.

About This Stanley the Strawberry Amigurumi Pattern

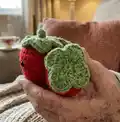
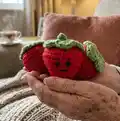
Stanley the Strawberry is a tiny, adorable amigurumi strawberry worked in continuous rounds using worsted weight yarn. The pattern includes full round-by-round instructions, tips for finishing, and simple embroidery for the face. It's quick to make and perfect for gifts, keychains, or a cute desk companion.

Stanley the Strawberry Amigurumi Pattern crochet pattern - detailed view of completed project

You will create the body, add an embroidered mouth and optional safety eyes, and finish with a simple green stem loop. The pattern uses basic crochet stitches, making it ideal for new amigurumi makers.

Why You'll Love This Stanley the Strawberry Amigurumi Pattern

I absolutely love this pattern because it turns just a few simple stitches into a delightfully expressive little character. I enjoy how quickly it comes together, yet it still has charming details like the leafy top and embroidered mouth that give it personality. Making Stanley feels rewarding β€” he is small enough to finish in one sitting but detailed enough to feel handmade and special. I love gifting these tiny strawberries because they always bring smiles and are practical to mail or tuck into gift packages.

Stanley the Strawberry Amigurumi Pattern step 1 - construction progress Stanley the Strawberry Amigurumi Pattern step 2 - assembly progress Stanley the Strawberry Amigurumi Pattern step 3 - details and accessories Stanley the Strawberry Amigurumi Pattern step 4 - final assembly and finishing

Switch Things Up

I love experimenting with color changesβ€”try pastel red or pink yarn for a softer, whimsical Stanley.

You can make Stanley larger or smaller by changing yarn weight and hook size; bulky yarn will give you a chunkier plush and fingering weight will create a tiny keychain version.

I often swap the green for variegated greens to create a more textured leafy top that stands out from the body.

For child-safe toys, I replace the safety eyes with French knot embroidery or felt circles sewn on securely.

I like adding tiny seed embroidery using contrasting yarn for extra detailβ€”just a few French knots make a big difference.

Try making a whole set in a rainbow of colors for a playful display or pattern testing for seasonal collections.

I sometimes add a small loop of ribbon or a metal keychain ring to the stem loop to create a strawberry keyring or bag charm.

To make Stanley poseable, you could insert a small wire into the stem before attaching, but be cautious if giving to children.

I experiment with different facial expressions by moving the mouth placement slightly up or downβ€”this instantly changes Stanley's personality.

Consider crocheting matching miniature accessories like tiny leaves, a hat, or mini felt tags to personalize each strawberry as a gift.

Common Mistakes & How to Fix Them

βœ— Not marking the beginning of rounds can cause you to lose track of where each round starts; use a stitch marker on the first stitch of each round when working continuously. βœ— Joining rounds with a slip stitch will create a visible seam and disrupt the continuous round shaping; do not join rnds with a slst, instead work in continuous rounds as instructed. βœ— Inserting safety eyes in the wrong position will affect facial symmetry; place the 6mm safety eyes between rounds 8 and 9 approximately 1 stitch apart as recommended. βœ— Forgetting to stuff as you go results in lumps and uneven shaping; stuff each piece gradually and evenly while shaping according to the rounds to maintain a smooth finish. βœ— Pulling your invisible decreases too tight can distort the shape and close the top prematurely; maintain gentle, consistent tension and stuff slightly before closing. βœ— Skipping the step to weave the yarn tail through the back loops of rnd 14 will leave a hole at the top; follow the weaving instructions and pull the tail tight to securely close the opening.

Stanley the Strawberry Amigurumi Pattern

Make a charming, palm-sized strawberry amigurumi you can finish in an afternoon. This cute Stanley pattern uses worsted weight yarn and basic stitches to create a sweet, gift-ready toy with embroidered details and an optional stem loop. Clear rounds and assembly notes guide you step-by-step so you can enjoy a satisfying, small project.

Beginner Friendly 2-3 Hours

Materials Needed for Stanley the Strawberry Amigurumi Pattern

β€” Main Fabric

  • 01
    Worsted weight yarn (#4) - Red - main color (small amount, approx 20-30g)
  • 02
    Worsted weight yarn (#4) - Green - small amount for stem and leaves (approx 5-10g)
  • 03
    Black embroidery thread or black yarn - small length for mouth

β€” Tools Required

  • 01
    Crochet hook size G (4.0mm or 4.25mm)
  • 02
    Two 6mm safety eyes (optional)
  • 03
    Tapestry needle
  • 04
    Stitch marker
  • 05
    Measuring tape
  • 06
    Scissors
  • 07
    Polyester stuffing (Fibre Fill)

Progress Tracker

0% Complete

β€” Pattern Notes :

Info :

This design is worked in continuous rounds, mark the beginning of each round with a stitch marker. Do not join rnds with a slst!

Info :

Stuff each piece as you work, unless otherwise stated.

Info :

Tip: I suggest using 6mm safety eyes. Insert them according to the manufacturer's directions between rnds 8 & 9 approx. 1 st apart.

β€” Body :

Round 1 :

using red create a magic ring, sc 6. (6)

Round 2 :

*sc 2, scinc in next* repeat around. (8)

Round 3 :

*sc 3, scinc in next* repeat around. (10)

Round 4 :

*sc 4, scinc in next* repeat around. (12)

Round 5 :

*sc 3, scinc in next* repeat around. (15)

Round 6 :

*sc 4, scinc in next* repeat around. (18)

Round 7 :

*sc 5, scinc in next* repeat around. (21)

Round 8 :

*sc 6, scinc in next* repeat around. (24)

Info :

Insert the safety eyes between rnds 8 & 9 (OR embroider eye so they are 1st apart).

Round 9 :

*sc 7, scinc in next* repeat around. (27)

Round 10 :

*sc 8, scinc in next* repeat around. (30)

Round 11 :

sc in each st around. (30)

Round 12 :

invdec 15 times (15); leaving a long tail, change to green.

Round 13 :

*sc, invdec* repeat around. (10), join to first with slst.

Round 14 :

ch 1, turn; working in front loops *sc, [2dc, ch 2, 2dc] in next* repeat around. (5 sc, 5 leaves)

Info :

Fasten off and weave in ends. Using a tapestry needle, weave the yarn tail from the join in and out of the back loops of rnd 14, pull tight to close the hole. Continue to weave the yarn tail in and out of the top until the opening is fully closed.

Mouth :

Using a small length of black embroidery threat or yarn, embroider a mouth just below the eyes. (See photo on page 1).

Stem :

Using green, ch 7 (or until desired length). Fasten off and attach as loop on top of the strawberry. (See photo on page 1).

Assembly Instructions

  • Insert and secure two 6mm safety eyes between rounds 8 and 9 approximately 1 stitch apart, or embroider eyes instead for a soft finish.
  • Embroider a small mouth just below the eyes using black embroidery thread or black yarn to achieve the pictured expression.
  • Weave the long yarn tail from the join through the back loops of rnd 14, pull tight to close the hole, then continue to weave the tail in and out of the top until fully closed.
  • Attach the green stem loop by fastening the chain loop to the top center (where rnd 14 is closed) and sew securely through the top with a tapestry needle.
  • Stuff the strawberry evenly as you work, adding more stuffing before final decreases to achieve the desired plump shape.

Important Notes

  • πŸ’‘Work in continuous rounds and mark the beginning of each round with a stitch marker; do not join rounds with a slip stitch.
  • πŸ’‘Stuff each piece as you work for even shaping and to avoid lumps; stuff more firmly at the base if you want it to stand slightly.
  • πŸ’‘Insert safety eyes between rounds 8 and 9 approximately 1 stitch apart, or embroider eyes if making for a child to keep it fully soft.
  • πŸ’‘Weave and secure yarn tails thoroughly after closing the top to prevent the opening from reappearing during use.

Stanley the Strawberry is a tiny handmade delight you can finish quickly and gift with a smile. He fits perfectly in the palm of your hand and makes a wonderful little charm or desk buddy. Keep making a patchwork of strawberries in different colors to brighten your day and your gifts! πŸ“πŸ§Ά

You ask,

we answer.

FAQs

What size will the finished piece be?

The finished amigurumi measures approximately 2.5" (6 cm) tall when using worsted weight yarn and a G hook as recommended.

Can I use different yarn weights for this pattern?

Yes, you can change yarn weight but this will alter the final size; use an appropriate hook for your chosen yarn and adjust stuffing accordingly.

Do I need prior crochet experience for this pattern?

This pattern is beginner friendly, but basic knowledge of single crochet, increases, and invisible decreases will help you follow the rounds more easily.

How long does this project typically take to complete?

Most crocheters finish Stanley in about 2-3 hours, though time may vary depending on experience and how much detailing you add.

Are safety eyes required for this pattern?

Safety eyes are optional; the pattern recommends 6mm eyes and placement between rounds 8 and 9, or you can embroider eyes for a child-safe version.