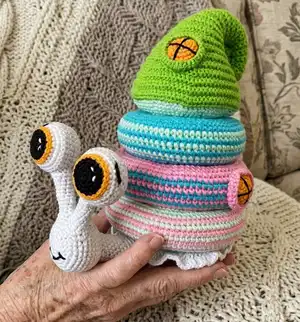
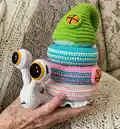
Make a playful stacking snail toy that doubles as a cuddly amigurumi and a fun stacking game. This pattern walks you through each round, color change and assembly step so you can create a colorful snail house stack. Perfect for handmade gifts, nursery decor or a cheerful toy to brighten your day.
Progress Tracker
0% Complete
— BASE :
Round 3 :
(1 sc; inc)*6 (18)
Round 4 :
(2 sc; inc)*6 (24)
Round 5 :
(3 sc; inc)*6 (30)
Round 6 :
FLO (4 sc; inc)*6 (36)
Round 7 :
(5 sc; inc)*6 (42)
Round 8 :
3 sc; inc; (6 sc; inc)*5; 3 sc (48)
Round 9 :
(7 sc; inc)*6 (54)
Round 10 :
4 sc; inc; (8 sc; inc)*5; 4 sc (60)
Round 11 :
FLO (9 sc; inc)*6 (66)
Round 12 :
5 sc; inc; (10 sc; inc)*5; 5 sc (72)
Round 13 :
(11 sc; inc)*6 (78)
Round 14 :
6 sc; inc; (12 sc; inc)*5; 6 sc (84)
Round 15 :
(13 sc; inc)*6 (90)
Round 16-17 :
90 sc (90) cut the yarn, hide a tail.
Infos :
Sew two parts of the base together in back loops of rounds 6 and 11. Fill with stuffing as you go. After that start to crochet tail, connecting both parts.
— TAIL :
Round 1 :
10 sc(one part) + 10 sc (second part)(20) continue to work in rounds
Round 3 :
(dec; 8 sc)*2 (18)
Round 5 :
(dec; 7 sc)*2 (16)
Round 7 :
(dec; 6 sc)*2 (14)
Round 9 :
(dec; 5 sc)*2 (12)
Round 11 :
(2 sc; dec)*3 (9)
Round 13 :
(1 sc; dec)*3 (6)-fasten off.
Infos :
Connect 2 parts with 35 sc, turn and make (dc inc)*35 (70). Make it the same way starting from both sides of the tail and filling with stuffing as you go.
Info :
In the end there will be a hole with 20 sc, here we'll start to make a neck and then head of a snail.
— NECK & HEAD :
Round 1 :
10 sc(one part) + 10 sc (second part)(20) continue to work in rounds
Round 6 :
3 sc; 4 inc; 4 sc; 4 dec; 1 sc (20)
Round 7 :
15 sc; 4 hdc; 1 sc (20)
Round 8 :
4 sc; 4 inc; 4 sc; 4 dec (20)
Round 9 :
16 sc; 4 hdc (20)
Round 10 :
6 sc; 4 inc; 4 sc; 4 dec (22*)
Round 11 :
16 sc; 4 hdc (20)
Round 12 :
6 sc; 4 inc; 4 sc; 4 dec (22*)
Round 13 :
(1 sc; inc)*10 (30)
Round 14 :
(4 sc; inc)*6 (36)
Round 22 :
(4 sc; dec)*6 (30)
Round 23 :
(3 sc; dec)*6 (24)
Round 24 :
(2 sc; dec)*6 (18)
Round 25 :
(1 sc; dec)*6(12)
Round 26 :
6 dec (6) cut the yarn, sew the hole, hide a tail.
Info :
(*)- + decreases from the beginning of the other round
— POLE :
Round 4 :
(1 sc; inc)*6 (18)
Round 7 :
(2 sc; inc)*6 (24)
Round 11 :
(3 sc; inc)*6 (30)
Round 16 :
(4 sc; inc)*6 (36)
Round 22 :
(5 sc; inc)*6 (42)
Round 29 :
(6 sc; inc)*6 (48)
Round 37 :
(7 sc; inc)*6 (54)
Round 46 :
(8 sc; inc)*6 (60) cut the yarn, leave a long tail for sewing.
Info :
Sew the pole with the part of the base (in round 11) like in the pictures.
— EYES (Part 1) (make 2) :
Round 3 :
(1 sc; inc)*6 (18)
Round 4 :
18 sl st (18) - change to yellow color
Round 5 :
BLO (2 sc; inc)*6 (24)
Round 6 :
24 sl st (24) change to white color
Round 7 :
(3 sc; inc)*6 (30)
Round 8-10 :
30 sc (30) fasten off.
— EYES (Part 2) (make 2) :
Round 3 :
(1 sc; inc)*6 (18)
Round 4 :
(2 sc; inc)*6 (24)
Round 5 :
(3 sc; inc)*6 (30)
Round 7 :
connect with R10 30sc (30)
Round 8-9 :
30 sc (30) fasten off.
— EYES (Part 3) (make 2) :
Round 1 :
13 ch, 1slst to form a circle
Round 3 :
(1 sc; dec)*6 (8)
Round 13 :
(1 sc; inc)*6 (12)
Round 14 :
12 sc (12) cut the yarn leave long tail for sewing. Sew as in the pictures.
— LARGE RING :
Round 1 :
60 ch; slst in 1st ch (60)
Round 2 :
(9 sc; inc)*6 (66)
Round 3 :
5 sc; inc; (10 sc; inc)*5; 5 sc (72)
Round 4 :
(11 sc; inc)*6 (78)
Round 5 :
6 sc; inc; (12 sc; inc)*5; 6 sc (84)
Round 6 :
(13 sc; inc)*6 (90)
Round 7 :
7 sc; inc; (14 sc; inc)*5; 7 sc (96)
Round 8 :
(15 sc; inc)*6 (102)
Round 9 :
102 sc (102) change to pink color
Round 10 :
102 sc (102) change to light green color
Round 11 :
102 sc (102) change to pink color
Round 12 :
102 sc (102) change to light green color
Round 13 :
102 sc (102) change to pink color
Round 14 :
102 sc (102) change to light green color
Round 16 :
(15 sc; dec)*6 (96)
Round 17 :
7 sc; dec; (14 sc; dec)*5; 7 sc (90)
Round 18 :
(13 sc; dec)*6 (84)
Round 19 :
6 sc; dec; (12 sc; dec)*5; 6 sc (78)
Round 20 :
(11 sc; dec)*6 (72)
Round 21 :
5 sc; dec; (10 sc; dec)*5; 5 sc (66)
Round 22 :
(9 sc; dec)*6 (60) cut the yarn, leave a long tail for sewing.
Info :
Sew round 22 with round 1, fill with stuffing as you go.
— MIDDLE RING :
Round 1 :
48 ch; slst in 1st ch (48)
Round 2 :
(7 sc; inc)*6 (54)
Round 3 :
4 sc; inc; (8 sc; inc)*5; 4 sc (60)
Round 4 :
(9 sc; inc)*6 (66)
Round 5 :
5 sc; inc; (10 sc; inc)*5; 5 sc (72)
Round 6 :
(11 sc; inc)*6 (78)
Round 7 :
6 sc; inc; (12 sc; inc)*5; 6 sc (84) change to blue
Round 8 :
(13 sc; inc)*6 (90) change to pink
Round 9 :
90 sc (90) change to blue
Round 10 :
90 sc (90) change to pink
Round 11 :
90 sc (90) change to blue
Round 12 :
90 sc (90) change to pink
Round 13 :
90 sc (90) change to blue
Round 14 :
90 sc (90) change to pink
Round 16 :
(13 sc; dec)*6 (84)
Round 17 :
6 sc; dec; (12 sc; dec)*5; 6 sc (78)
Round 18 :
(11 sc; dec)*6 (72)
Round 19 :
5 sc; dec; (10 sc; dec)*5; 5 sc (66)
Round 20 :
(9 sc; dec)*6 (60) Sew round 20 with round1, fill with stuffing as you go.
— SMALL RING :
Round 1 :
36 ch; slst in 1st ch (36)
Round 2 :
(5 sc; inc)*6 (42)
Round 3 :
3 sc; inc; (6 sc; inc)*5; 3 sc (48)
Round 4 :
(7 sc; inc)*6 (54)
Round 5 :
4 sc; inc; (8 sc; inc)*5; 4 sc (60)
Round 6 :
(9 sc; inc)*6 (66)
Round 7 :
5 sc; inc; (10 sc; inc)*5; 5 sc (72)
Round 8 :
(11 sc; inc)*6 (78)
Round 9 :
78 sc (78) change to light green
Round 10 :
78 sc (78) change to blue
Round 11 :
78 sc (78) change to light green
Round 12 :
78 sc (78) change to blue
Round 13 :
78 sc (78) change to light green
Round 14 :
78 sc (78) change to blue
Round 16 :
(11 sc; dec)*6 (72)
Round 17 :
5 sc; dec; (10 sc; dec)*5; 5 sc (66)
Round 18 :
(9 sc; dec)*6 (60)
Round 19 :
4 sc; dec; (8 sc; dec)*5; 4 sc (54)
Round 20 :
(7 sc; dec)*6 (48)
Round 21 :
3 sc; dec; (6 sc; dec)*5; 3 sc (42)
Round 22 :
(5 sc; dec)*6 (36) Sew round 22 with round 1, fill with stuffing as you go.
— WINDOWS (make 3) :
Round 3 :
(1 sc; inc)*6 (18)
Round 4 :
(2 sc; inc)*6 (24)
Round 5 :
24 sc (24) change to blue/pink/green color
Round 7 :
(3 sc; inc)*6 (30) cut the yarn, leave a long tail for sewing
Info :
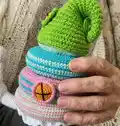
Sew the windows to the middle ring, small ring and a roof.
— DOOR :
Round 2 :
5 sc; 3 sc in 1; 5 sc; turn (13)
Round 3 :
1 ch; 5 sc; 3 inc; 5 sc; turn (16)
Round 4 :
1 ch; 5 sc; (1 sc; inc)*3; 5 sc; turn (13) change to light green color
Round 5 :
1 ch; BLO 16 sc; turn (16)
Round 6 :
1 ch; BLO 16 sc (16) cut the yarn, leave a long tail for sewing
Info :
Sew the doors to the large ring.
— ROOF :
Row 3 :
BLO 1 ch; 2 sc; inc; 2 sc; turn (6)
Row 4 :
BLO 1 ch; 6 sc; turn (6)
Row 5 :
BLO 1 ch; 3 sc; inc; 2 sc; turn (7)
Row 6 :
BLO 1 ch; 7 sc; turn (7)
Row 7 :
BLO 1 ch; 3 sc; inc; 3 sc; turn (8)
Row 8 :
BLO 1 ch; 8 sc; turn (8)
Row 9 :
BLO 1 ch; 4 sc; inc; 3 sc; turn (9)
Row 10 :
BLO 1 ch; 9 sc; turn (9)
Row 11 :
BLO 1 ch; 4 sc; inc; 4 sc; turn (10)
Row 12 :
BLO 1 ch; 10 sc; turn (10)
Row 13 :
BLO 1 ch; 5 sc; inc; 4 sc; turn (11)
Row 14 :
BLO 1 ch; 11 sc; turn (11)
Row 15 :
BLO 1 ch; 5 sc; inc; 5 sc; turn (12)
Row 16 :
BLO 1 ch; 12 sc; turn (12)
Row 17 :
BLO 1 ch; 6 sc; inc; 5 sc; turn (13)
Row 18 :
BLO 1 ch; 13 sc; turn (13)
Row 19 :
BLO 1 ch; 6 sc; inc; 6 sc; turn (14)
Row 20 :
BLO 1 ch; 14 sc; turn (14)
Row 21 :
BLO 1 ch; 7 sc; inc; 6 sc; turn (15)
Row 22 :
BLO 1 ch; 15 sc; turn (15)
Row 23 :
BLO 1 ch; 7 sc; inc; 7 sc; turn (16)
Row 24 :
BLO 1 ch; 16 sc; turn (16)
Row 25 :
BLO 1 ch; 8 sc; inc; 7 sc; turn (17)
Row 26 :
BLO 1 ch; 17 sc; turn (17)
Row 27 :
BLO 1 ch; 8 sc; inc; 8 sc; turn (18)
Row 28 :
BLO 1 ch; 18 sc; turn (18)
Row 29 :
BLO 1 ch; 9 sc; inc; 8 sc; turn (19)
Row 30 :
BLO 1 ch; 19 sc; turn (19)
Row 31 :
BLO 1 ch; 9 sc; inc; 9 sc; turn (20)
Row 32 :
BLO 1 ch; 20 sc; turn (20)
Row 33 :
BLO 1 ch; 10 sc; inc; 9 sc; turn (21)
Row 34 :
BLO 1 ch; 21 sc; turn (21)
Row 35 :
BLO 1 ch; 10 sc; inc; 10 sc; turn (22)
Row 36 :
BLO 1 ch; 22 sc; turn (22)
Row 37 :
BLO 1 ch; 11 sc; inc; 10 sc; turn (23)
Row 38 :
BLO 1 ch; 23 sc; turn (23)
Row 39 :
BLO 1 ch; 11 sc; inc; 11 sc; turn (24)
Row 40 :
BLO 1 ch; 24 sc; turn (24)
Row 41 :
BLO 1 ch; (3 sc; inc)*6; turn (30)
Row 42 :
BLO 1 ch; 30 sc; turn (30)
Row 43 :
BLO 1 ch; (4 sc; inc)*6; turn (36)
Row 44 :
BLO 1 ch; 36 sc; turn (36)
Row 45 :
BLO 1 ch; (5 sc; inc)*6; turn (42)
Row 46 :
BLO 1 ch; 42 sc; turn (42)
Row 47 :
BLO 1 ch; (6 sc; inc)*6; turn (48)
Row 48 :
BLO 1 ch; 48 sc; turn (48)
Row 49 :
BLO 1 ch; (7 sc; inc)*6; turn (54)
Row 50 :
BLO 1 ch; 54 sc; turn (54)
Row 51 :
BLO 1 ch; (8 sc; inc)*6; turn (60)
Row 52 :
BLO 1 ch; 60 sc; turn (60)
Row 53 :
BLO 1 ch; (9 sc; inc)*6; turn (66)
Row 54 :
BLO 1 ch; 66 sc; turn (66)
Row 55 :
BLO 1 ch; (10 sc; inc)*6; turn (72)
Row 56 :
BLO 1 ch; 72 sc; turn (72)
Row 57 :
BLO 1 ch; (11 sc; inc)*6; turn (78)
Row 58 :
BLO 1 ch; 78 sc; turn (78)
Row 59 :
BLO 1 ch; (12 sc; inc)*6; turn (84)
Row 60 :
BLO 1 ch; 84 sc; turn (84)
Row 61 :
BLO 1 ch; (13 sc; inc)*6; turn (90)
Row 62 :
BLO 1 ch; 90 sc; turn (90) change to light green color and from now on continue to work in rounds
Round 63 :
BLO 1 ch; (13 sc; dec)*6 (84)
Round 64 :
6 sc; dec; (12 sc; dec)*5; 6 sc (78)
Round 65 :
(11 sc; dec)*6 (72)
Round 66 :
5 sc; dec; (10 sc; dec)*5; 5 sc (66)
Round 67 :
(9 sc; dec)*6 (60)
Round 68 :
4 sc; dec; (8 sc; dec)*5; 4 sc (54)
Round 69 :
(7 sc; dec)*6 (48)
Round 70 :
3 sc; dec; (6 sc; dec)*5; 3 sc (42)
Round 71 :
(5 sc; dec)*6 (36)
Round 76 :
(4 sc; dec)*6 (30)
Round 79 :
(3 sc; dec)*6 (24)
Round 82 :
(2 sc; dec)*6 (18)
Round 84 :
(1 sc; dec)*6 (12)
Round 85 :
6 dec (6) cut the yarn, finish, hide a tail.
Create a joyful Stacking Snail for play or decor with bright, friendly colors and thoughtful details. This modular design lets you mix colors and swap rings for new looks every time. Handmade toys bring smiles and become cherished keepsakes—have fun making yours! 🧶✨