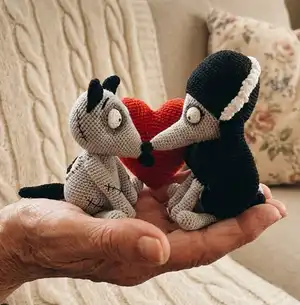
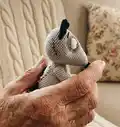
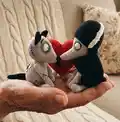
Make two charming amigurumi dogs, Sparky and Persephone, with this detailed crochet pattern. You will find full round-by-round instructions, materials, and step-by-step assembly guidance to create these whimsical companions. The design features large expressive eyes, sewn details, and optional bolt and spot embellishments for a unique handmade gift.
Progress Tracker
0% Complete
— Sparky :
Head :
Starting with Color A: 1. Make 6 sc into a magic ring= 6
Round 2 :
(sc, inc) x 3= 9
Round 3 :
(2 sc, inc) x 3= 12
Rounds 4-6 :
sc in each st around
Round 7 :
(2 sc, dec) x 3= 9
Round 8 :
(sc, dec) x 3= 6
Round 9 :
Increase in each st around= 12
Round 10 :
sc in each st around
Round 11 :
(sc, inc) x 6= 18
Rounds 12-13 :
sc in each st around
Round 14 :
(2 sc, inc) x 6= 24
Rounds 15-16 :
sc in each st around
Info :
Stuff the head as you work
Round 17 :
(3 sc, inc) x 6= 30
Rounds 18-19 :
sc in each st around
Round 20 :
(4 sc, inc) x 6= 36
Rounds 21-22 :
sc in each st around
Round 23 :
(5 sc, inc) x 6= 42
Rounds 24-25 :
sc in each st around
Round 26 :
(4 sc, inc) x 6, 12 sc= 48
Round 27 :
(5 sc, inc) x 6, 12 sc= 54
Round 28 :
(6 sc, inc) x 6, 12 sc= 60
Rounds 29-37 :
sc in each st around
Round 38 :
(8 sc, dec) x 6= 54
Round 39 :
sc in each st around
Info :
Place eyes between rows 27 and 28, leaving 20 holes between them. 1st eye is placed before the 2nd increase. Count 20 holes after the first eye and place the 2nd eye. If you want the sunken eye look, do not place the backs of the eyes on until round 42. The backs of the large eyes will be hard to place. They may overlap. Check this before you place the backs of the eyes. TIP! You may have to adjust the eye placement depending on yarn and hook size you use.
Round 40 :
(7 sc, dec) x 6= 48
Round 41 :
(6 sc, dec) x 6= 42
Round 42 :
(5 sc, dec) x 6= 36
Info :
Now for the eyes. Stuff the head well. Cut a long piece of yarn and remove the eyes. Place the needle in the hole where the first eye was and thread the needle into a hole next to the eye hole. Go back and forth between each eye hole repeating the process from the first eye. Pull slightly on the yarn after going through each hole. Do this about 3 times on each side until you reach the look you want.
Note :
Use some black eyeshadow to paint around the eye hole. This will give your sparky and Persephone the dark look around the eyes. Place the eye in the hole to make sure you have dusted on enough black. Follow the pictures for help. There is also a youtube video I have for extra help on this process. https://www.youtube.com/watch?v=9XoBnTY6k70&t=55s
Info :
To place the backs of the eyes you will need to remove most of the stuffing to place the washers on the eyes then re stuff it.
Round 43 :
(5 sc, dec) x 6= 30
Round 44 :
(4 sc, dec) x 6= 24
Round 45 :
(3 sc, dec) x 6= 18
Round 46 :
(2 sc, dec) x 6= 12
Info :
F/O and sew the hole closed.
— Body :
Body :
With Color B: 1. Make 6 sc into a magic ring= 6
Round 2 :
Increase in each st around= 12
Round 3 :
(sc, inc) x 6= 18
Round 4 :
(2 sc, inc) x 6= 24
Round 5 :
(3 sc, inc) x 6= 30
Round 6 :
(4 sc, inc) x 6= 36
Round 7 :
(5 sc, inc) x 6= 42
Round 8 :
(6 sc, inc) x 6= 48
Round 9 :
(7 sc, inc) x 6= 54
Round 10 :
(8 sc, inc) x 6= 60
Rounds 11-15 :
sc in each st around
Round 16 :
(8 sc, dec) x 6= 54
Rounds 17-18 :
sc in each st around
Round 19 :
(7 sc, dec) x 6= 48
Rounds 20-21 :
sc in each st around
Round 22 :
(6 sc, dec) x 6= 42
Rounds 23-24 :
sc in each st around
Round 25 :
(5 sc, dec) x 6= 36
Rounds 26-27 :
sc in each st around
Info :
Start stuffing the body
Round 28 :
(4 sc, dec) x 6= 30
Rounds 29-30 :
sc in each st around
Round 31 :
(3 sc, dec) x 6= 24
Rounds 32-33 :
sc in each st around
Info :
If you decide to use the 15 mm safety eyes for bolts, place them between rounds 31 and 32 of the body. Approximately 11 holes between them. Do not secure the washers too tightly. There is also a crochet version of bolts on page 8 if you would prefer to use that.
Info :
F/O and leave a long tail for sewing
— Arms :
Arms(Make 2) :
With Color B: 1. Make 6 sc into a magic ring= 6
Round 2 :
Increase in each st around= 12
Round 3 :
(sc, inc) x 6= 18
Rounds 4-5 :
sc in each st around
Round 6 :
7 sc, dec x 2, 7 sc= 16
Round 7 :
6 sc, dec x 2, 6 sc= 14
Rounds 8-13 :
Sc in each st around
Info :
Stuff the arms as you work
Rounds 15-20 :
Sc in each st around
Info :
Stop stuffing the arms
Rounds 22-26 :
Sc in each st around
Round 27 :
(4 sc, dec) x 2= 10
Rounds 28-29 :
Sc in each st around
Info :
F/O and leave a long tail for sewing
— Tail :
Tail :
With Color A: 1. Make 6 sc into a magic ring= 6
Rounds 2-3 :
sc in each st around
Info :
Stuff the tail as you work
Round 4 :
(sc, inc) x 3= 9
Rounds 5-6 :
sc in each st around
Round 7 :
(2 sc, inc) x 3= 12
Rounds 8-9 :
sc in each st around
Round 10 :
(3 sc, inc) x 3= 15
Rounds 11-20 :
sc in each st around
Info :
F/O and leave a long tail for sewing
— Legs :
Legs(Make 2) :
With Color B: 1. Make 6 sc into a magic ring= 6
Round 2 :
Increase in each st around= 12
Round 3 :
(sc, inc) x 6= 18
Rounds 4-5 :
Sc in each st around
Round 6 :
7 sc, dec x 2, 7 sc= 16
Round 7 :
6 sc, dec x 2, 6 sc= 14
Info :
Stuff the legs as you work
Rounds 8-11 :
Sc in each st around
Rounds 13-16 :
Sc in each st around
Info :
Stop stuffing the legs
Rounds 18-21 :
sc in each st around
Round 22 :
(4 sc, dec) x 2= 10
Round 23 :
sc in each st around
Info :
F/O and leave a long tail for sewing
— Bolts :
Bolts(Make 2) :
I chose to use safety eyes for bolts but there is a crochet version here if you prefer that. With Color A: Make a magic ring
Step :
Ch 1, make 6 sc into the magic ring, join to the 1st sc with a sl st
Step :
Ch 1, sc in each st around, join to the 1 st sc with a sl st
Step :
Ch 1, increase in each st around, join to the 1st sc with a sl st= 12
Info :
Stuff the bolt as you work lightly
Step :
Ch 1, BLO sc in each st around, join to the 1st sc with a sl st
Step :
Ch 1, BLO dec x 6, join to the 1st sc with a sl st= 6
Info :
F/O and leave a long tail for sewing
— Ears :
Ears(Make 2) :
With Color A: 1. Make 4 sc into a magic ring= 4
Round 2 :
sc in each st around
Round 3 :
(sc, inc) x 2= 6
Round 4 :
sc in each st around
Round 5 :
(sc, inc) x 3= 9
Round 6 :
sc in each st around
Round 7 :
(2 sc, inc) x 3= 12
Round 8 :
sc in each st around
Round 9 :
(3 sc, inc) x 3= 15
Round 10 :
sc in each st around
Round 11 :
(4 sc, inc) x 3= 18
Rounds 12-14 :
sc in each st around
Info :
F/O and leave a long tail for sewing
— Square on Back :
Square on Back :
With Color C: Ch 11
Row 1 :
Sc in 2nd ch from hook and across= 10
Row 2 :
Ch 1, turn, sc across= 10
Info :
F/O and leave an extra long tail for sewing
— Spots :
Spots(Make 2) :
With Color A: 1. Make 6 sc into a magic ring= 6
Round 2 :
(sc, inc) x 3= 9
Info :
F/O and leave a long tail for sewing
— Assembly :
Head and Body :
1. Pin the head to the body for extra support. You may need to add more stuffing as you sew. 2. Sew the head to the body.
Ears :
1. Pin the ears on top of the head. Approximately between rows 36 and 37. 2. Sew the ears onto the head.
Arms :
1. Pin the arms to the side of the body in a forward facing angle, underneath the neck. Since these are handmade there are no row placements I use. I just judge based on how they look. If you are using the safety eyes as bolts, place them underneath the bolts and sew into place. 2. Sew the arms onto the body
Legs :
1. Turn the body upside down with the nose facing away from you. 2. Pin the legs onto the bottom of the body approximately between rounds 5 and 6. 3. Sew the legs onto the body
Tail :
1. Pin the tail onto the back of the body approximately between rounds 11 and 17. 2. Sew the tail onto the body.
Back :
1. Pin the square onto the back of the body. 2. Sew the square onto the back. 3. Pin the spots onto the square and sew them on. 4. Add some black stitches with embroidery thread around the edges of the square.
— Persephone :
Head :
Starting with Color A: 1. Make 6 sc into a magic ring= 6
Round 2 :
(sc, inc) x 3= 9
Rounds 3-5 :
sc in each st around
Round 6 :
(sc, dec) x 3= 6
Round 7 :
increase in each st around= 12
Rounds 8-9 :
sc in each st around
Round 10 :
(3 sc, inc) x 3= 15
Rounds 11-12 :
sc in each st around
Round 13 :
(4 sc, inc) x 3= 18
Rounds 14-15 :
sc in each st around
Round 16 :
(5 sc, inc) x 3= 21
Rounds 17-18 :
sc in each st around
Info :
Stuff the head as you work
Round 19 :
(6 sc, inc) x 3= 24
Rounds 20-21 :
sc in each st around
Round 22 :
(7 sc, inc) x 3= 27
Rounds 23-24 :
sc in each st around
Round 25 :
(8 sc, inc) x 3= 30
Rounds 26-27 :
sc in each st around
Round 28 :
(2 sc, inc) x 6, 12 sc= 36
Round 29 :
(3 sc, inc) x 6, 12 sc= 42
Round 30 :
(4 sc, inc) x 6, 12 sc= 48
Round 31 :
(5 sc, inc) x 6, 12 sc= 54
Round 32 :
(6 sc, inc) x 6, 12 sc= 60
Rounds 33-34 :
sc in each st around
Round 35 :
sc in each st around with an additional 10 stitches. The last stitch of this round will be the beginning of each row from now on.
Info :
Place eyes between rows 30 and 31, leaving 13 holes between them. 1st eye is placed before the 2nd increase. Count 13 holes after the first eye and place the 2nd eye. If you want the sunken eye look, do not place the backs of the eyes on until row 64. The backs of the large eyes will be hard to place. They may overlap. Check this before you place the backs of the eyes. TIP! You may have to adjust the eye placement depending on yarn and hook size you use.
Now :
Now you are going to start working in chain and turning the head.
Round 36 :
Ch 1, turn, dec, 26 sc, dec= 28
Round 37 :
Ch 1, turn, dec, 24 sc, dec= 26
Round 38 :
Ch 1, turn, dec, 22 sc, dec= 24
Round 39 :
Ch 1, turn, dec, 20 sc, dec= 22
Round 40 :
Ch 1, turn, dec, 18 sc, dec= 20
Round 41 :
Ch 1, turn, dec, 16 sc, dec= 18
Round 42 :
Ch 1, turn, dec, 14 sc, dec= 16
Round 43 :
Ch 1, turn, dec, 12 sc, dec= 14
Round 44 :
Ch 1, turn, dec, 10 sc, dec= 12
Round 45 :
Do not Ch 1, turn your work, Make 12 sc across, Make 6 sc going down one side, Make 30 sc around the head, Make 6 sc going up one side of the head. = 54
Round 46 :
sc in each st around
Round 47 :
(8 sc, inc) x 6= 60
Round 48 :
(9 sc, inc) x 6= 66
Rounds 49-52 :
sc in each st around
Round 53 :
(9 sc, dec) x 6= 60
Rounds 54-55 :
sc in each st around
Round 56 :
(8 sc, dec) x 6= 54
Rounds 57-58 :
sc in each st around
Round 59 :
(7 sc, dec) x 6= 48
Rounds 60-61 :
sc in each st around
Round 62 :
(6 sc, dec) x 6= 42
Rounds 63-64 :
sc in each st around
Info :
Now for the eyes. Stuff the head well. Cut a long piece of yarn and remove the eyes. Place the needle in the hole where the first eye was and thread the needle into a hole next to the eye hole. Go back and forth between each eye hole repeating the process from the first eye. Pull slightly on the yarn after going through each hole. Do this about 3 times on each side until you reach the look you want. Use some black eyeshadow to paint around the eye hole. This will give your sparky and Persephone the dark look around the eyes. Place some false eyelashes on the back of the eye before you place the backs on the eyes. Place the eye in the hole to make sure you have dusted on enough black. Follow the pictures for help. There is also a youtube video I have for extra help on this process. https://www.youtube.com/watch?v=9XoBnTY6k70&t=55s To place the backs of the eyes you will need to remove most of the stuffing to place the washers on the eyes then re stuff it.
Round 65 :
(5 sc, dec) x 6= 36
Round 66 :
(4 sc, dec) x 6= 30
Round 67 :
(3 sc, dec) x 6= 24
Round 68 :
(2 sc, dec) x 6= 18
Round 69 :
(sc, dec) x 6= 12
Info :
F/O and sew the hole closed
— Persephone Body and Parts :
Body :
Starting with Color A: 1. Make 6 sc into a magic ring= 6
Round 2 :
Increase in each st around= 12
Round 3 :
(sc, inc) x 6= 18
Round 4 :
(2 sc, inc) x 6= 24
Round 5 :
(3 sc, inc) x 6= 30
Round 6 :
(4 sc, inc) x 6= 36
Round 7 :
(5 sc, inc) x 6= 42
Round 8 :
(6 sc, inc) x 6= 48
Rounds 9-12 :
sc in each st around
Round 13 :
(6 sc, dec) x 6= 42
Info :
Stuff the body as you work
Round 14 :
sc in each st around
Round 15 :
(5 sc, dec) x 6= 36
Round 16 :
sc in each st around
Round 17 :
(4 sc, dec) x 6= 30
Rounds 18-22 :
sc in each st around
Round 23 :
(4 sc, inc) x 6= 36
Round 24 :
(5 sc, inc) x 6= 42
Round 25 :
(6 sc, inc) x 6= 48
Round 26 :
(7 sc, inc) x 6= 54
Round 27 :
(8 sc, inc) x 6= 60
Rounds 28-32 :
sc in each st around
Round 33 :
(8 sc, dec) x 6= 54
Round 34 :
(7 sc, dec) x 6= 48
Round 35 :
sc in each st around
Round 36 :
(6 sc, dec) x 6= 42
Round 37 :
(5 sc, dec) x 6= 36
Round 38 :
sc in each st around
Round 39 :
(4 sc, dec) x 6= 30
Round 40 :
(3 sc, dec) x 6= 24
Info :
F/O and leave a long tail for sewing
Ears(Make 2) :
With Color A: 1. Make 4 sc into a magic ring= 4
Round 2 :
Increase in each st around= 8
Round 3 :
(inc, sc) x 4= 12
Round 4 :
(inc, 2 sc) x 4= 16
Round 5 :
(inc, 3 sc) x 4= 20
Round 6 :
(inc, 4 sc) x 4= 24
Round 7 :
Sc in each st around
Round 8 :
(inc, 5 sc) x 4= 28
Rounds 9-10 :
Sc in each st around
Round 11 :
(inc, 6 sc) x 4= 32
Rounds 12-15 :
Sc in each st around
Round 16 :
(dec, 14 sc) x 2= 30
Round 17 :
Sc in each st around
Round 18 :
(dec, 13 sc) x 2= 28
Round 19 :
Sc in each st around
Round 20 :
(dec, 12 sc) x 2= 26
Round 21 :
Sc in each st around
Round 22 :
(dec, 11 sc) x 2= 24
Info :
Do not stuff the ears
Round 23 :
Sc in each st around
Round 24 :
(dec, 10 sc) x 2= 22
Round 25 :
Sc in each st around
Round 26 :
(dec, 9 sc) x 2= 20
Round 27 :
Sc in each st around
Round 28 :
(dec, 8 sc) x 2= 18
Round 29 :
Sc in each st around
Round 30 :
(dec, 7 sc) x 2= 16
Rounds 31-35 :
Sc in each st around
Info :
F/O and leave a long tail for sewing
— Arms/Legs (Persephone alternative) :
Arms/Legs(Make 4) :
Starting with Color B: 1. Make 6 sc into a magic ring= 6
Round 2 :
Increase in each st around= 12
Round 3 :
(sc, inc) x 6= 18
Rounds 4-5 :
sc in each st around
Round 6 :
7 sc, dec x 2, 7 sc= 16
Round 7 :
6 sc, dec x 2, 6 sc= 14
Info :
Stuff the arms as you work
Rounds 8-9 :
sc in each st around
Rounds 11-12 :
sc in each st around
Rounds 14-15 :
sc in each st around
Info :
Stop stuffing the arms and legs
Rounds 17-18 :
sc in each st around
Round 20 :
sc in each st around
Info :
F/O and leave a long tail for sewing
— Tail (Persephone) :
Tail :
Starting with Color A: 1. Make 6 sc into a magic ring= 6
Round 2 :
Increase in each st around= 12
Rounds 3-5 :
sc in each st around
Info :
Do not stuff the tail from this point on
Rounds 7-13 :
sc in each st around
Info :
F/O and leave a long tail for sewing
— Hair Pieces :
Hair Pieces(Make 2) :
With Color C: Chain approximately 172. F/O and leave a long tail for sewing
— Finishing and Stitches :
Stitches and Face :
1. Embroider stitches on different parts of the arms, legs and body, random spots to give the frankenweenie effect. You can even add a little black shadow on the stitches for an extra frankenweenie look. 2. Embroider some eyebrows with a strand of black yarn, not embroidery thread.
Info :
You now have your finished Sparky and Persephone! If you have any questions or concerns please email me at sweetoddityart@gmail.com or etsy convo me. I will get back to you asap. Please share your finished sparky with me as often as you want! I love seeing them!
This delightful Sparky and Persephone amigurumi duo brings character and charm to every stitch. They make wonderful handmade gifts and display pieces with lots of personality and custom options. Grab your hook, choose your colors, and make your own quirky companions today! 🧶🧵