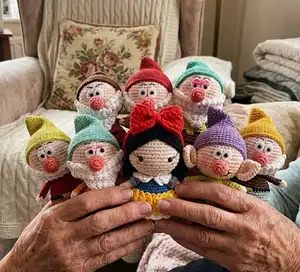
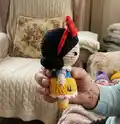
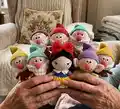
Create a charming Snow White and her Seven Dwarfs set with this detailed crochet pattern. You'll make finger puppets or short dolls using simple amigurumi techniques and clear step-by-step instructions. The pattern includes yarn/color lists for each character, full stitch-by-stitch rounds, and handy assembly notes. Perfect for gifting, playtime, or a collectible set to display.
Progress Tracker
0% Complete
— Master 1st Leg (yarn A) :
Round 1 :
ch 4, start on the 2nd st from the hook, sc 2, (sc 3) on the last st, sc 1, inc (8)
Round 2 :
inc, sc 1, inc 3, sc 1, inc 2 (14)
Round 3-4 :
sc 14 (2 rnds) (14)
Round 5 :
sc 2, dec 5, sc 2, change to yarn B (9)
Round 6-11 :
sc 9 (6 rnds) (9)
— Master 2nd Leg (yarn A) :
Round 1-11 :
Repeat rnd 1-11 of the 1st Leg (9)
Info :
Do not break the yarn, join with the last st of the 1st leg (pic 1-2), continue to crochet the Master's Body.
— Master Body (yarn B) :
Round 12 :
sc 9 (on the 1st leg), sc 9 (on the 2nd leg) (pic 3) (18)
Round 13-15 :
sc 18 (3 rnds) (18)
Round 16 :
[sc 4, dec] 3x, stuff firmly (15)
Round 17 :
[sc 3, dec] 3x (12)
Round 18 :
[sc 2, dec] 3x (9)
Round 19-24 :
sc 9 (6 rnds) (9)
Round 25 :
[sc 1, dec] 3x (6)
Info :
Break the yarn, weave in the last 6 sts, hide the remaining yarn (pic 4).
— Master Head (yarn B) :
Round 1 :
sc 6 into a magic loop (6)
Round 3 :
(sc 1, inc) x 6 (18)
Round 4 :
(sc 2, inc) x 6 (24)
Round 5 :
(sc 3, inc) x 6 (30)
Round 6 :
(sc 4, inc) x 6 (36)
Round 7-11 :
sc 36 (5 rnds) (36)
Round 12 :
(sc 4, dec) x 6 (30)
Round 13 :
(sc 3, dec) x 6 (24)
Round 14 :
(sc 2, dec) x 6 (18)
Round 15 :
(sc 1, dec) x 6 (12)
Info :
Before stuffing, if you do not make the body, you can use a 1cm-diameter cylinder (pic 9) or use the body you crocheted (pic 10-11), then stuff firmly and continue to finish the head.
Round 32 :
[sc 1, dec] 6x (12)
Info :
Break the yarn, weave in the last 6 sts, hide the remaining yarn (pic 12-13). Join yarn C on the 1st st of the flo on rnd 12 (pic 14).
— Snow White's Dress (yarn C) :
Round 1 :
[sc 3, inc] 3x (15)
Round 2 :
[sc 1, inc, sc 1] 5x (20)
Round 3 :
[sc 3, inc] 5x (25)
Round 4 :
[sc 2, inc, sc 2] 5x (30)
Round 5 :
[sc 5, inc] 5x (35)
Round 6 :
[sc 3, inc, sc 3] 5x, change to yarn D (40)
Round 7 :
(blo) sc 40 (40)
Round 8-12 :
sc 40 (5 rnds) (40)
Round 13 :
(flo) *ch 3, slst on the next st*, repeat ** till the end
Info :
Break the yarn, hide the remaining yarn (pic 15-16). Join yarn A on the 1st st of the flo on rnd 7 (pic 17), continue to crochet the following rnds as shown:
Rnd 1 (after joining yarn A) :
*(sc 1, ch 2, sc 1) on the same st, skip 1 st*, repeat ** till the end (pic 18)
Rnd 2 :
*(sc 1, ch 2, sc 1) on the chain-space of the last rnd, skip 2 st*, repeat ** till the end
Info :
Break the yarn, hide the remaining yarn (pic 19). Join yarn A on rnd 7 and sew the collar later as instructed.
— Snow White's Collar (yarn D) :
Round 1 :
ch 5, start on the 2nd st from the hook, slst 4, ch 1, turn (4)
Round 2 :
(blo) 4 slst, ch 1, turn (4)
Round 3-41 :
Repeat rnd 2 (39 rnds) (4)
Info :
Break the yarn (pic 20). Sew the collar on the body (pic 21).
— Snow White's Arms (yarn B, X2) :
Round 1 :
sc 7 into a magic loop (7)
Round 2-3 :
sc 7 (2 rnds) (7)
Round 5-6 :
sc 6 (2 rnds), change to yarn E (6)
Round 7 :
ch 2, [(dc 2) in the same st] 6x, slst on the ch 2 (12)
Info :
Break the yarn, sew 2 edges together, then sew the arms on the body (pic 22). Use red yarn to embroider the dotted line on the arms (pic 23-24-25).
— Snow White's Hair (yarn F) :
Round 1 :
sc 6 into a magic loop (6)
Round 3 :
[sc 1, inc] 6x (18)
Round 4 :
[sc 1, inc, sc 1] 6x (24)
Round 5 :
[sc 3, inc] 6x (30)
Round 6 :
[sc 2, inc, sc 2] 6x (36)
Round 7 :
[sc 5, inc] 6x (42)
Round 8 :
[sc 3, inc, sc 3] 6x (48)
Round 9-18 :
sc 48 (10 rnds) (48)
Round 19 :
sc 13, hdc 2, dc 5, hdc 2, sc 1, slst 1, sc 1, hdc 2, dc 5, hdc 2, sc 14 (48)
Round 20 :
[long set of stitches forming hairline and details as pictured — follow picture sequence for styling] (full sequence shown on page)
Info :
Break the yarn. Wear the hair on the head (pic 30-31). Insert the 6mm eyes between rnd 19&20, 8 sts apart. Use brown thread to embroider eyelashes, white yarn to make the eyes bigger, pink thread to embroider the cheeks (pic 33).
— Snow White's Bowtie (yarn G) :
Round 1 :
ch 39, start on the 3rd st from the hook, [sc 1, ch 1, skip 1 st] 18x, sc on the last st, ch 1, turn (38)
Round 2 :
[sc 1 on the chain-space of the last rnd, ch 1, skip 1 st] 18x, sc on the last st, ch 1, turn (38)
Round 3-9 :
Repeat rnd 2 (7 rnds) (38)
Info :
Break the yarn with a really long rest, sew 2 edges together (pic 34-35-36). Use a tapestry needle to make the bowtie shape (pic 37), then wrap the remaining yarn around the bowtie (pic 38).
— Bowtie's band (yarn G) :
Round 1 :
ch 54, start on the 3rd st from the hook, hdc 52, slst on the 1st ch (52)
Info :
Break the yarn, sew 2 edges together, and then sew the bowtie to the band (pic 39). Wear the bowtie on the hair (pic 40-41). If you just make the finger puppet, your Snow White is ready to play with. Put the body inside the head (pic 42-43) to make a doll.
— 7 Dwarf's Clothes (yarn C) :
Round 1 :
[sc 3, inc] 3x (15)
Round 2 :
[sc 1, inc, sc 1] 5x (20)
Round 3 :
[sc 3, inc] 5x (25)
Round 4 :
[sc 2, inc, sc 2] 5x (30)
Round 5 :
[sc 5, inc] 5x (35)
Round 6 :
[sc 3, inc, sc 3] 5x (40)
Round 7-8 :
sc 40 (2 rnds), change to yarn D (40)
Round 9 :
sc 18, change to yarn E, sc 3, change back to yarn D, sc 19, change to yarn F
Round 10-12 :
sc 40 (3 rnds) (40)
Info :
Break the yarn, hide the remaining yarn (pic 46). Short/Long beard and noses are made as separate pieces per dwarf instructions.
— 7 Dwarf's Arms (yarn B, X2) :
Round 1 :
sc 7 into a magic loop (7)
Round 2 :
sc 7, change to yarn C (7)
Round 5-9 :
sc 6 (5 rnds) (6)
Info :
Break the yarn, sew 2 edges together.
— Long Beard (yarn G) :
Round 1-3 :
Crochet as 1-3 rnd of Short Beard (24)
Round 4 :
ch 1, [sc 4, dec 1] 4x, ch 1, turn (20)
Round 5 :
slst 5, ch 2, [bobble 1, hdc 1] 5x, ch 1, turn (10)
Round 6 :
dec 1, sc 6, dec 1, ch 2, turn (8)
Round 7 :
[Bobble 1, hdc 1] 4x, ch 1, turn (8)
Round 8 :
dec 4, ch 2, turn (4)
Round 9 :
[bobble 1, hdc 1] 2x (4)
Info :
Break the yarn with a long rest to sew later (pic 47).
— Nose (yarn H) :
Round 1 :
sc 5 into a magic loop (5)
Round 3 :
[sc 1, inc] 5x (15)
Info :
Break the yarn with a long rest to sew later.
— Hat (yarn I) :
Round 1 :
sc 6 into a magic loop (6)
Round 2 :
[sc 1, inc] 3x (9)
Round 3 :
[sc 2, inc] 3x (12)
Round 4 :
[sc 3, inc] 3x (15)
Round 5 :
[sc 4, inc] 3x (18)
Round 6 :
[sc 5, inc] 3x (21)
Round 7 :
[sc 6, inc] 3x (24)
Round 8 :
[sc 7, inc] 3x (27)
Round 9 :
[sc 8, inc] 3x (30)
Round 10 :
slst 15, sc 15 (30)
Round 11 :
[sc 9, inc] 3x (Tips: if you find it’s too hard to crochet on the slst sts, just crochet on the flo of the slst sts) (33)
Round 12 :
slst 17, sc 16 (33)
Round 13 :
[sc 10, inc] 3x (36)
Round 14 :
slst 19, sc 17 (36)
Round 15 :
[sc 11, inc] 3x (39)
Round 16 :
[sc 12, inc] 3x (42)
Round 17 :
[sc 13, inc] 3x (45)
Round 18 :
[sc 14, inc] 3x (48)
Round 19 :
[sc 15, inc] 3x (51)
Round 20 :
[sc 16, inc] 3x (54)
Round 21-24 :
sc 54 (4 rnds) (54)
Info :
Break the yarn with a long rest to sew later (pic 52). Sew on the head as pic 53. Put the body inside the head (pic 55).
— Ears (yarn B, X2 for Dopey) :
Round 1 :
sc 3 into a magic loop (3)
Info :
Fold the ears in half and sew 2 edges together. Sew the ears for Dopey (pic 56). Use black thread to embroider smiley face for him (pic 57).
— Apple (yarn G) :
Round 1 :
sc 6 into a magic loop (6)
Round 2 :
inc 6 (if you do not make finger puppet, skip rnd 3-11, continue to crochet rnd 12, but on both loops, not just blo) (12)
Round 3-11 :
sc 12 (9 rnds - pic 100), ch 1, turn (12)
Round 12 :
(blo) [sc 1, inc] 6x (18)
Round 13 :
[sc 1, inc, sc 1] 6x (pic 101) (24)
Round 14 :
[sc 3, inc] 6x (30)
Round 15 :
[sc 2, inc, sc 2] 6x (36)
Round 16 :
[sc 5, inc] 6x (42)
Round 17-21 :
sc 42 (5 rnds), change to yarn H (42)
Round 23 :
(blo) sc 42 (42)
Round 24-26 :
sc 42 (3 rnds) (42)
Round 27 :
[sc 5, dec] 6x (36)
Round 28 :
[sc 2, dec, sc 2] 6x (30)
Round 29 :
[sc 3, dec] 6x (24)
Round 30 :
[sc 1, dec, sc 1] 6x, stuff firmly (18)
Round 31 :
[sc 1, dec] 6x (12)
Info :
Break the yarn with a long rest, weave in the last 6 sts (pic 102-103). Use a tapestry needle to make a dent as pic 105. Join yarn H on the 1st st of the flo on rnd 23, continue to crochet the poison drops as pictured.
This Snow White & the Seven Dwarfs set is a playful, charming crochet project that brings storybook characters to life. The modular master pieces let you make many different characters using the same building blocks. Whether you make a single finger puppet or the whole family, each tiny doll is full of personality and handcrafted detail. 🧶 Create a magical collection to gift or display — happy crocheting! 🧵