🧢 Beautiful ✨ Detailed πŸ’ Adorable

Smurf Amigurumi Pattern

Smurf Amigurumi Pattern
4.4β˜… Rating
2-3 Hours Time Needed
4.2K Made This
βœ‚οΈ

Intermediate Level

Ideal for those with basic crochet experience, featuring slightly more advanced stitches and techniques to expand your skills.

⏱️

Bite-Sized Project

Finishes in 2-4 hoursβ€”perfect for an afternoon of creative relaxation.

🧸

Cute Companion

An adorable friend to cherish, handcrafted with love to bring comfort and joy for years to come.

About This Smurf Amigurumi Pattern

This pattern creates a tiny Smurf amigurumi about 10 cm tall worked in light blue and white acrylic yarn. It includes full round-by-round instructions for head, body, legs, arms, ears, nose and hat with finishing notes. Simple shaping, basic crochet stitches and small assembly steps make this a fun, focused project. Finished piece is perfect as a gift, keychain or small display toy.
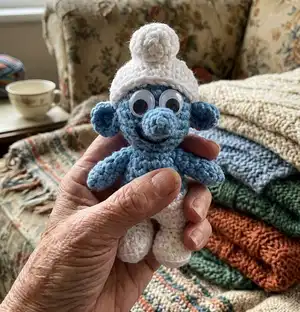
Smurf Amigurumi Pattern crochet pattern - detailed view of completed project

Written in English with stitch abbreviations and clear round counts for easy tracking. Photos and finishing tips are included so you can sew and style your Smurf confidently.

Why You'll Love This Smurf Amigurumi Pattern

I absolutely love this pattern because it turns simple stitches into a charming little character that brings a smile. I enjoyed designing compact shaping so the Smurf feels balanced and cute while remaining quick to make. The small size makes it perfect for using scraps of yarn and for gifting to friends and family. I also like that the assembly is straightforward, letting you personalize the face and hat to give each Smurf its own personality. Creating this pattern felt playful and satisfying, and I hope you enjoy making them as much as I did.

Smurf Amigurumi Pattern step 1 - construction progress Smurf Amigurumi Pattern step 2 - assembly progress Smurf Amigurumi Pattern step 3 - details and accessories Smurf Amigurumi Pattern step 4 - final assembly and finishing

Switch Things Up

I love customizing this Smurf by changing yarn colors and textures to create different personalities.

Try pastel blues for a softer vintage look or bright shades for a cartoonish effect that pops on a shelf.

Make a miniature version by using thinner thread and a smaller hook for a tiny keychain friend.

Use bulkier yarn and a larger hook to make a cuddlier, chunky Smurf thats great as a palm-sized plush.

I often add embroidered eyebrows or a tiny felt accessory like a scarf or belt to personalize each piece.

Replace plastic eyes with embroidered eyes for a baby-safe version or add safety eyes for durability in displayed toys.

Mix yarn types for texture contrasts, for example fluffy white yarn for the hat top and smooth cotton for the body.

Experiment with facial placements: moving the nose slightly up or down creates different expressions and charm.

I sometimes add a tiny pompom to the hat or a tiny applique heart on the trousers to make it gift-ready.

Consider making a family of Smurfs with different hat styles and small props to tell a story or create a themed set.

Common Mistakes & How to Fix Them

βœ— Skipping counts during shaping rounds leads to an incorrect stitch total; always count stitches at the end of each round to confirm accuracy. βœ— Forgetting to stuff as you go causes lumps and uneven shaping; add small amounts of stuffing gradually and shape as you progress. βœ— Not closing the magic ring tightly results in a visible hole at the top; pull the magic ring firmly closed before joining the first round. βœ— Attaching parts without pinning first can create uneven placement; pin or place pieces on the body to check symmetry before sewing.
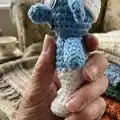
Smurf Amigurumi Pattern

Make a delightful pocket-sized Smurf with this clear, photo-backed crochet pattern. Youll create a cute little Smurf using simple stitches and basic assembly techniques, perfect for gifting or collecting. The pattern is written in English with step-by-step rounds so you can follow along easily. Ideal for makers who enjoy small amigurumi projects and playful characters.

Intermediate 2-3 Hours

Materials Needed for Smurf Amigurumi Pattern

β€” Main Fabric

  • 01
    Wool acrylic 100% Light Blue (for body and details) - amount as needed for a 10cm amigurumi
  • 02
    Wool acrylic 100% White (for hat, trousers and feet) - amount as needed for a 10cm amigurumi

β€” Tools Required

  • 01
    Crochet hook size 2mm
  • 02
    Tapestry needle
  • 03
    Stuffing (polyester fiberfill)
  • 04
    Plastic eyes
  • 05
    Scissors
  • 06
    Small amount of craft glue (for eyes, optional)

Progress Tracker

0% Complete

β€” Stitches used :

Infos :

magic ring. chain (ch). single crochet (sc). half double crochet (hdc). double crochet (dc). treble crochet (tr). slip stitch (sl st). 2dctog = work 2 dc together. back loop = insert hook under back loop only.

β€” Head and body :

Info :

Work in circular rows.

Round 1 :

with Light Blue yarn 10sc in magic ring.

Round 2 :

2sc in each st [20sts]

Round 3-9 :

1sc in each st [20sts]

Round 10 :

(2sctog) rep to end [10sts]

Round 11 :

1sc in each st [10sts]

Round 12 :

(1sc, 2sc in next st) rep to end [15sts]

Round 13-14 :

1sc in each st [15sts]

Round 15 :

(2sc, 2sc in next st) rep to end [20sts]

Round 16 :

1sc in each st [20sts]

Info :

join White yarn

Round 17-19 :

1sc in each st [20sts]

Info :

stuff

Info :

Now we work a leg, continues with the white yarn.

Info :

Counts 10 stitches and join with a chain the last point made with 10Β° stitch.

Round 20 :

3sc, 2sctog, 3sc, 2sctog + chain initially made [9sts]

Round 21 :

2sctog working in the chain and in the first sc [8sts]

Round 22 :

1sc in each st [8sts]

Info :

Now we will work a foot, continues with the white yarn

Round 23 :

2hdc in next st, 1dc and 1tr in next st, 2tr in next st, 1tr and 1dc in next st, 2hdc in next st, 1sc in next 3st [13st]

Round 24 :

1sc in each st [13sts]

Round 25 :

work sl st for all the way around in back loop [13sts]

Info :

Fill with stuffing, sew the two ends and cut the thread.

Info :

Work the other leg and foot in the same way.

β€” Arms :

Round 1 :

with Light Blue yarn 6sc in magic ring.

Round 2 :

1sc in each st [6sts]

Round 3 :

(1sc, 2sctog) rep to end [4sts]

Round 4-6 :

1sc in each st [4sts]

Info :

Fill with stuffing, cut the thread, sew them to the body.

β€” Ears :

Round 1 :

with Light Blue yarn 5sc in magic ring.

Round 2 :

2sc in each st [10sts]

Info :

Cut the thread, sew them to the body.

β€” Nose :

Round 1 :

with Light Blue yarn 6sc in magic ring.

Round 2 :

(1sc, 2sctog) rep to end [4sts]

Round 3 :

1sc in each st [4sts]

Info :

Fill with stuffing, cut the thread, sew it to the center of the head.

β€” Hat :

Round 1 :

with White yarn 10sc in magic ring.

Round 2-9 :

1sc in each st [10sts]

Round 10 :

2sc in each st [20sts]

Round 11 :

(1sc in next 3st, 2sc in next st) rep to end [25sts]

Round 12-14 :

1sc in each st [25sts]

Info :

Fill the top with a bit of stuffing and sew it on the head, glue the eyes and here it is your Smurf :)

Info :

As always you can use my patterns to make and sell your creations, all I ask is that design credit and a link are posted in the description of the item.

Info :

If you have any questions feel free to contact me. Id love to see your work, share photos of your creations to page me on Fb Valery Lab. Thanks again for visiting this page, and happy crocheting! Bye bye!

Assembly Instructions

  • Sew the two legs closed after filling them with stuffing and attach them to the bottom of the body at the position where you worked round 20, securing firmly with a tapestry needle.
  • Attach the arms to the sides of the body between rounds 12-16, positioning slightly forward for a natural pose and sew through several stitches for strength.
  • Sew the ears to the sides of the head at approximately rounds 6-8, spacing them evenly from the centerline of the face.
  • Sew the nose to the center of the face, around the level of rounds 3-6, using small stitches so the nose is secure and centered.
  • Place the hat on top of the head, add a little stuffing to the top, then sew the hat in place and glue or secure the plastic eyes to the face as desired.

Important Notes

  • πŸ’‘Stuff firmly but not too tightly to keep the Smurf soft yet defined; overstuffing will distort shaping.
  • πŸ’‘Pin parts in position before sewing to ensure symmetry and correct placement of arms, ears and nose.
  • πŸ’‘Weave in ends neatly and trim excess thread after sewing each part to avoid bulky seams and visible tails.

This tiny Smurf pattern brings a classic character to life in a pocket-friendly size, ready for collecting or gifting. Its compact design makes it perfect for quick makes and creative color swaps. Make one as a cheerful handmade present or a playful addition to your amigurumi family. 🧢😊

You ask,

we answer.

FAQs

What size will the finished piece be?

The smurf is about 10cm high when made with the recommended 2mm hook and light fingering yarn.

Can I use different yarn weights for this pattern?

Yes, you can use different yarn weights, but the final size will change; adjust your hook size accordingly to keep stitch definition.

Do I need prior crochet experience for this pattern?

This pattern is rated intermediate; basic amigurumi skills like working in the round, decreases and simple assembly are recommended.

How long does this project typically take to complete?

Most crocheters finish this small amigurumi in 2-3 hours depending on experience and how much time is spent on assembly and finishing.