🧢 Beautiful ✨ Detailed πŸ’ Adorable

Simple Slippers Pattern

Simple Slippers Pattern
4.9β˜… Rating
2-3 Hours Time Needed
2.8K Made This
βœ‚οΈ

Beginner Friendly Level

Perfect for those just starting their crochet journey, with clear instructions and simple techniques

⏱️

Bite-Sized Project

Finishes in 2-4 hoursβ€”perfect for an afternoon of creative relaxation.

🧣

Snug Essential

Everyday comfort with practical charm, designed for both functionality and style through changing seasons.

About This Simple Slippers Pattern

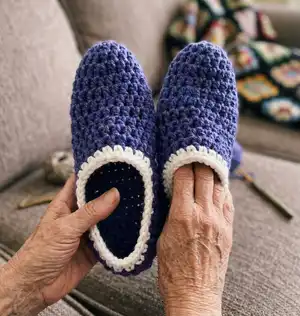
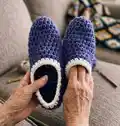
This pattern creates a pair of simple, cozy slippers worked in bulky weight yarn using half double crochet construction. The pattern includes size instructions for sizes 6, 7, 8 and 9 with a small finished edge option. It is designed to be quick and scrappy-friendly so you can use leftover bulky yarn to make a comfy pair.

Simple Slippers Pattern crochet pattern - detailed view of completed project

The slippers are worked from the toe with rounds and short rows to form the foot and heel, then finished with a simple single crochet border. Clear notes explain CH1 handling and sizing adjustments.

Why You'll Love This Simple Slippers Pattern

I absolutely love this pattern because it uses bulky scrap yarn and a large hook to make a satisfying, fast project that actually gets used. I enjoy how forgiving the stitch pattern is, so minor tension differences don't ruin the fit. The slippers are cozy, warm, and perfect for gifting or keeping for yourself. I also love how easy it is to adjust the length by adding or removing rows to suit different feet.

Simple Slippers Pattern step 1 - construction progress Simple Slippers Pattern step 2 - assembly progress Simple Slippers Pattern step 3 - details and accessories Simple Slippers Pattern step 4 - final assembly and finishing

Switch Things Up

I love changing up this pattern by using different bulky yarn textures; a boucle or tweed bulky yarn makes a really cozy, rustic pair.

I often swap colors at the toe or use a contrasting color for the finished edge to make a playful trim.

To make the slippers larger or smaller I change hook size and yarn weight; using a smaller hook tightens the fabric while a larger hook creates a looser, roomier fit.

I sometimes add a thin strip of craft felt or anti-slip fabric to the sole for better traction when wearing around the house.

If I want ankle coverage I add extra row repeats before working the heel to create a taller cuff that stays on better.

For a dressier look I switch the Finished Edge to a simple picot or crab stitch instead of plain SC to add a delicate border.

I also like to embroider a small initial or heart on the vamp for gift customization, using a tapestry needle and contrasting yarn.

When I want a mini keychain version I use lighter yarn and a smaller hook, adjusting rounds to keep the proportions similar.

Try carrying two different bulky yarns held together for an extra chunky, plush finish β€” the slouch and drape change nicely.

I recommend always making a gauge swatch and testing one slipper before committing to a whole pair if you are experimenting with substitutions.

Common Mistakes & How to Fix Them

βœ— Starting each row with CH 1 and counting it as a stitch; remember CH 1 at the beginning of each row is NOT counted as a stitch and work your first stitch into the CH 1 space. βœ— Not measuring your gauge before starting; take time to check 10 ST = 4" width and 8 RW = 4" length to ensure the chosen yarn and hook create the correct fit. βœ— Skipping the instruction to flip the slipper inside out before slip stitching the end; if you forget to flip you will close the slipper incorrectly and distort the shape; always flip and then SL ST the end together. βœ— Cutting the yarn too short when finishing; leave a 10–12 inch tail so you can easily SL ST the end together and securely weave in all ends. βœ— Failing to adjust row counts for fit; if the slipper is too big remove 1 or 2 rows before working the heel or remove 1 or 2 rows from the heel to fine-tune the size.

Simple Slippers Pattern

Make cozy, quick slippers using bulky weight yarn and a large hook. This pattern is perfect for using up yarn scraps and creates a snug, warm pair you can finish in an afternoon. Clear rounds for sizes 6 through 9 are included with a simple finished edge option. Grab your hook and make a comfy pair for yourself or as a thoughtful handmade gift.

Beginner Friendly 2-3 Hours

Materials Needed for Simple Slippers Pattern

β€” Main Fabric

  • 01
    Bulky weight yarn (#5), approximately 90 to 110 yards per pair (use scrap bulky yarn as desired)
  • 02
    Accent/contrast yarn (optional) - small amount for finished edge trim

β€” Tools Required

  • 01
    Size 9mm / N crochet hook
  • 02
    Yarn (bulky #5)
  • 03
    Crochet hooks and scissors

Progress Tracker

0% Complete

β€” What you need :

Info :

Size 9mm/N hook

Info :

You will require roughly 90 to 110 yards bulky 5 weight yarn. I have been using all my bulky yarn scraps to create these cute little slippers.

Info :

Yarn, crochet hooks and scissors

Infos :

HDC – Half Double Crochet. RND - Round. CH - Chain. RPT - Repeat. SC – Single Crochet. ST – Stitch. RW – Row

β€” Gauge :

Info :

Width: 10 ST = 4"

Info :

Length: 8 RW = 4"

β€” Pattern Notes :

Info :

I always wear out my slippers so when my last pair where on the way out I quickly whipped up a new pair to wear. These slippers are quick and easy and I am thrilled with how cozy they are.

Info :

The CH 1 at the beginning of each row will NOT be counted as a stitch. However, you will also work your first stitch in the CH 1 Space.

Info :

If you find the size you are working on is to big remove 1 or 2 rows before you start working on the heel. You may also remove 1 or 2 rows from the heel. Depending on the bulky yarn you choose to work with you may have to make small adjustments. Feel free to contact me at anytime if you need some extra guidance in sizing.

Info :

Here we go:

β€” Size 6 :

Round 1 :

RND 1 - 10 HDC in magic circle, SL ST to the 1st ST

Round 2 :

RND 2 - CH 1, 2 HDC in the same ST as CH 1, HDC in next ST, *2 HDC in next ST, HDC in next ST, RPT from * all around, SL ST to 1ST HDC, (15)

Round 3 :

RND 3 - CH 1, 2 HDC in the same ST as CH 1, HDC in next 2 STs, *2 HDC in next ST, HDC in next 2 STs, RPT from * all around, SL ST to 1ST HDC, (20)

Round 4 :

RND 4 - CH 1, HDC each ST around, SL ST to 1ST HDC (20)

Round 5-9 :

RND 5-9 - RPT RND 4

Round (Row) 10 :

RW 10 - CH 1, HDC into the next 14 (14)

Round (Row) 11 :

RW 11 - CH 1, turn your work so you are now working back across your work, HDC across (14)

Round (Row) 12-15 :

RW 12-15 - RPT RW 13

Info :

Cut yarn leaving 10 – 12 inch tail. Flip slipper inside out and SL ST the end together. Weave in all ends.

Item Name (Finished Edge P1) :

Finished Edge - RND 1 - Starting at the back of the slipper SL ST yarn on SC 23 STs evenly around, SL ST to 1ST SC (23)

Item Name (Finished Edge P2) :

Finished Edge - RND 2 - SC in each ST around, SL ST to 1ST SC, Cut yarn, weave in end (23)

β€” Size 7 :

Round 1 :

RND 1 - 10 HDC in magic circle, SL ST to the 1st ST

Round 2 :

RND 2 – CH 1, 2 HDC in the same ST as CH 1, HDC in next ST, *2 HDC in next ST, HDC in next ST, RPT from * all around, SL ST to 1ST HDC, (15)

Round 3 :

RND 3 - CH 1, 2 HDC in the same ST as CH 1, HDC in next 2 STs, *2 HDC in next ST, HDC in next 2 STs, RPT from * all around, SL ST to 1ST HDC, (20)

Round 4 :

RND 4 – CH 1, HDC each ST around, SL ST to 1ST HDC (20)

Round 5-10 :

RND 5-10 – RPT RND 4

Round (Row) 11 :

RW 11 – CH 1, HDC into the next 14 (14)

Round (Row) 12 :

RW 12 – CH 1, turn your work so you are now working back across your work, HDC across (14)

Round (Row) 13-17 :

RW 13-17 – RPT RW 13

Info :

Cut yarn leaving 10 – 12 inch tail. Flip slipper inside out and SL ST the end together. Weave in all ends.

Item Name (Finished Edge P1) :

Finished Edge - RND 1 - Starting at the back of the slipper SL ST yarn on SC 24 STs evenly around, SL ST to 1ST SC (24)

Item Name (Finished Edge P2) :

Finished Edge - RND 2 – SC in each ST around, SL ST to 1ST SC, Cut yarn, weave in end (24)

β€” Size 8 :

Round 1 :

RND 1 - 10 HDC in magic circle, SL ST to the 1st ST

Round 2 :

RND 2 – CH 1, 2 HDC in the same ST as CH 1, HDC in next ST, *2 HDC in next ST, HDC in next ST, RPT from * all around, SL ST to 1ST HDC, (15)

Round 3 :

RND 3 - CH 1, 2 HDC in the same ST as CH 1, HDC in next 2 STs, *2 HDC in next ST, HDC in next 2 STs, RPT from * all around, SL ST to 1ST HDC, (20)

Round 4 :

RND 4 – CH 1, HDC each ST around, SL ST to 1ST HDC (20)

Round 5-11 :

RND 5-11 – RPT RND 4

Round (Row) 12 :

RW 12 – CH 1, HDC into the next 14 (14)

Round (Row) 13 :

RW 13 – CH 1, turn your work so you are now working back across your work, HDC across (14)

Round (Row) 14-19 :

RW 14-19 – RPT RW 13

Info :

Cut yarn leaving 10 – 12 inch tail. Flip slipper inside out and SL ST the end together. Weave in all ends.

Item Name (Finished Edge P1) :

Finished Edge - RND 1 - Starting at the back of the slipper SL ST yarn on SC 25 STs evenly around, SL ST to 1ST SC (25)

Item Name (Finished Edge P2) :

Finished Edge - RND 2 – SC in each ST around, SL ST to 1ST SC, Cut yarn, weave in end (25)

β€” Size 9 :

Round 1 :

RND 1 - 10 HDC in magic circle, SL ST to the 1st ST

Round 2 :

RND 2 – CH 1, 2 HDC in the same ST as CH 1, HDC in next ST, *2 HDC in next ST, HDC in next ST, RPT from * all around, SL ST to 1ST HDC, (15)

Round 3 :

RND 3 - CH 1, 2 HDC in the same ST as CH 1, HDC in next 2 STs, *2 HDC in next ST, HDC in next 2 STs, RPT from * all around, SL ST to 1ST HDC, (20)

Round 4 :

RND 4 – CH 1, HDC each ST around, SL ST to 1ST HDC (20)

Round 5-13 :

RND 5-13 – RPT RND 4

Round (Row) 14 :

RW 14 – CH 1, HDC into the next 14 (14)

Round (Row) 15 :

RW 15 – CH 1, turn your work so you are now working back across your work, HDC across (14)

Round (Row) 16-20 :

RW 16-20 – RPT RW 13

Info :

Cut yarn leaving 10 – 12 inch tail. Flip slipper inside out and SL ST the end together. Weave in all ends.

Item Name (Finished Edge P1) :

Finished Edge - RND 1 - Starting at the back of the slipper SL ST yarn on SC 26 STs evenly around, SL ST to 1ST SC (26)

Item Name (Finished Edge P2) :

Finished Edge - RND 2 – SC in each ST around, SL ST to 1ST SC, Cut yarn, weave in end (26)

β€” Final Notes :

Info :

I hope you enjoy making these slippers as much as I do! Have fun using up all your scarp yarn and make some cozy slippers.

Info :

Please note that you are welcome to sell your finished products

Assembly Instructions

  • Flip each slipper inside out and slip stitch the opening together using the 10–12 inch tail left after cutting; this closes the heel seam securely.
  • Weave in all ends after closing the heel and after finishing the edged border so that there are no loose yarn tails visible.
  • Work the Finished Edge by slip stitching evenly around the back of the slipper (23–26 SC depending on size), then SC in each ST around and fasten off neatly.
  • If the slipper is too large, remove 1–2 rows before working the heel or remove 1–2 rows from the heel to adjust the fit before closing and finishing.

Important Notes

  • πŸ’‘The CH 1 at the beginning of each row is NOT counted as a stitch; work the first stitch in the CH 1 space to maintain correct stitch counts.
  • πŸ’‘Leave a 10–12 inch tail when cutting yarn so you have enough length to SL ST the end together and weave in ends securely.
  • πŸ’‘Check gauge before you begin: 10 stitches = 4" width and 8 rows = 4" length to ensure correct fit for the sizes provided.
  • πŸ’‘If using different bulky yarns, expect to make small adjustments to the number of rows; test and adjust as needed for fit.

These Simple Slippers are the perfect quick crochet make to use up your bulky yarn scraps and create cozy footwear for home. They work up fast, are easy to adjust for fit, and make wonderful last-minute gifts. Make a pair today and enjoy the warm, handmade comfort. 🧢πŸ₯Ώ

You ask,

we answer.

FAQs

What size will the finished piece be?

The pattern provides sizes 6 through 9; finished dimensions will vary with yarn and tension, so check gauge (10 ST = 4" width, 8 RW = 4" length) for best results.

Can I use different yarn weights for this pattern?

You can substitute yarn weights, but doing so will significantly affect the finished size; use an appropriate hook for your chosen yarn and recheck gauge.

Do I need prior crochet experience for this pattern?

This pattern is beginner friendly, but you should be comfortable with basic stitches like HDC, CH, SL ST and working in rounds and rows.

How long does this project typically take to complete?

Most crocheters finish a pair in about 2-3 hours using bulky yarn and a 9mm hook, though time may vary depending on experience and size.