🧢 Beautiful ✨ Detailed πŸ’ Adorable

Sheep Security Blanket Amigurumi Pattern

Sheep Security Blanket Amigurumi Pattern
4.2β˜… Rating
5-7 Hours Time Needed
3.8K Made This
βœ‚οΈ

Intermediate Level

Ideal for those with basic crochet experience, featuring slightly more advanced stitches and techniques to expand your skills.

⏱️

Weekend Treat

Takes 5-7 hours, making it an enjoyable project to finish over a couple of days.

🧸

Cute Companion

An adorable friend to cherish, handcrafted with love to bring comfort and joy for years to come.

About This Sheep Security Blanket Amigurumi Pattern

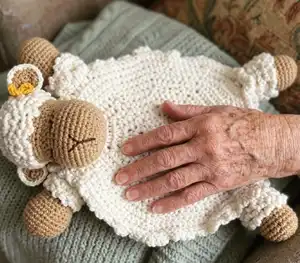
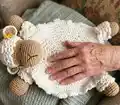
This pattern creates a sheep-shaped security blanket (lovey) combining a small blanket body with an amigurumi head, four feet, ears, tail and a tiny decorative bow. It uses back-loop stitching to create a textured curled edge and a soft, cuddly surface ideal for babies. The instructions include round-by-round details for each part and clear guidance for assembly so you can sew everything together accurately.

Sheep Security Blanket Amigurumi Pattern crochet pattern - detailed view of completed project

Worked mostly in single crochet and half double crochet, with color change and BLO rounds for texture. Perfect for using medium cotton yarn and a contrasting fine cotton for the little bow and embroidered details.

Why You'll Love This Sheep Security Blanket Amigurumi Pattern

I absolutely love this pattern because it combines the charm of amigurumi with the comfort of a soft security blanket, making a practical yet adorable handmade gift. I enjoy the back-loop curl technique that gives the blanket its unique scalloped edge and tactile interest. The pattern flows logically from the blanket center to head and limbs, so I find assembly satisfying and neat. I also love how customizable it is with color and yarn choices, allowing me to make each lovey truly personal.

Sheep Security Blanket Amigurumi Pattern step 1 - construction progress Sheep Security Blanket Amigurumi Pattern step 2 - assembly progress Sheep Security Blanket Amigurumi Pattern step 3 - details and accessories Sheep Security Blanket Amigurumi Pattern step 4 - final assembly and finishing

Switch Things Up

I love how easily this pattern can be customized by changing yarn colors; try soft pastels for a baby girl or muted neutrals for a modern nursery.

I sometimes swap the medium cotton for a sport or DK weight with a smaller hook to create a smaller, pocket-sized lovey perfect for gifting or keychain versions.

I add embroidery variations to change expressions β€” a smiling mouth or sleepy face alters the character dramatically, so I try different placements before final stitching.

I also make the little bow in different colors or add a tiny safety button in the center (securely stitched) for added detail and texture.

For a chunkier, cuddlier blanket, I use a bulkier yarn and a larger hook and increase the rounds until I reach my desired diameter; this creates a plush, soft toy ideal for littler hands.

I like to experiment with adding a small loop behind the head so the lovey can be hung on a stroller or diaper bag β€” it’s practical and decorative.

Try embroidering a small initial or name on the blanket edge to personalize each piece as a meaningful gift that families will treasure.

If you want a more durable lovey, use mercerized cotton and secure all ends with multiple knots before weaving them in; that gives me confidence for washable baby items.

I sometimes add contrasting edging instead of the curled BLO edge by working a round of single crochet in a bright accent color to frame the blanket.

Finally, I experiment with different stuffing amounts in the head and feet to control firmness β€” firmer stuffing keeps shape, while softer stuffing makes it more snuggly for very young babies.

Common Mistakes & How to Fix Them

βœ— Crocheting too loosely can show stuffing through the stitches; use a slightly smaller hook and maintain firmer tension when making head and feet to avoid visible filling. βœ— Forgetting to work on the back loop only for the blanket texture will flatten the curls; be sure to work the specified rounds in BLO to get the intended curled edge effect. βœ— Not stuffing gradually leads to uneven shapes and lumps; stuff small amounts at a time and shape each part as you go to maintain smooth contours. βœ— Skipping stitch counts during increase rounds can throw off your diameter; count your increases after each round and mark the start with a stitch marker to stay accurate. βœ— Changing colors incorrectly at the BLO rounds may leave loose ends; carry or weave in color changes neatly and secure ends before continuing the next rounds.

Sheep Security Blanket Amigurumi Pattern

Make a cuddly sheep security blanket perfect for babies and handmade gift-giving. This pattern guides you through each round to crochet the blanket body, head, ears, feet, tail and little bow with clear step-by-step instructions. You will love the soft textures created by working in the back loop and adding curled edges for a charming finish. Ideal for crocheters who enjoy amigurumi-style projects with simple shaping and adorable results.

Intermediate 5-7 Hours

Materials Needed for Sheep Security Blanket Amigurumi Pattern

β€” Main Fabric

  • 01
    100grs of medium cotton yarn (beige) for head and feet - approx. 100g
  • 02
    100grs of medium cotton yarn (white) for blanket body and curls - approx. 100g
  • 03
    Small amount of light cotton yarn (black) for embroidery details
  • 04
    Small amount of light cotton yarn (yellow) for the little bow
  • 05
    Polyester fiberfill stuffing (for head and feet)

β€” Tools Required

  • 01
    Crochet hook size 3.5mm (for the blanket body)
  • 02
    Crochet hook size 2.0mm (for the head and legs)
  • 03
    Crochet hook size 1.0mm (for the little bow)
  • 04
    Tapestry needle
  • 05
    Polyester fiberfill stuffing

Progress Tracker

0% Complete

β€” Body or Blanket :

Info :

The whole piece is crocheted on the back loop

Round 1 :

start with a magic ring, ch 1 and 11 hdc, close with sl st (12 hdc)

Round 2 :

ch 2, 1 hdc in the same stitch, hdc inc in the next 11 stitches, close with sl st (24hdc)

Round 3 :

ch 2, 1 inc of hdc, *1hdc, 1inc in the next stitch*, close with sl st (36 hdc)

Round 4 :

ch 2, 1 hdc, 1 inc, *2 hdc, 1 inc in the next stitch*, close with sl st (48 hdc)

Round 5 :

ch 2, 2 hdc, 1 inc, *3 hdc, 1 inc in the next stitch*, close with sl st (60 hdc)

Round 6 :

ch 2, 3 hdc, 1 inc, *4 hdc, 1 inc in the next stitch*, close with sl st (72 hdc)

Round 7 :

ch 2, 4 hdc, 1 inc, *5 hdc, 1 inc in the next stitch*, close with sl st (84 hdc)

Round 8 :

ch 2, 5 hdc, 1 inc, *6 hdc, 1 inc in the next stitch*, close with sl st (96 hdc)

Round 9 :

ch 2, 6 hdc, 1 inc, *7 hdc, 1 inc in the next stitch*, close with sl st (108 hdc)

Round 10 :

ch 2, 7 hdc, 1 inc, *8 hdc, 1 inc in the next stitch*, close with sl st (120 hdc)

Info :

Keep crocheting with this frequency until you have 22cm of diameter. On the rounds where the loops remained unworked, keep working below the first free loop, in the center of the beginning, to make the curls. Make 5 ch, 1 sl st in the next stitch and make 5 ch, 1 sl st again in all the loops, all the rounds. Here is a link of a video where you can see this process: https://www.youtube.com/watch?v=nb-liMSQqpk

β€” Head :

Info :

With beige yarn

Round 1 :

6 sc in a magic ring (6)

Round 2 :

6 inc (12)

Round 3 :

1 sc, 1 inc (18)

Round 4 :

2 sc, 1 inc (24)

Round 5 :

3 sc, 1 inc (30)

Round 6 :

4 sc, 1 inc (36)

Round 7 :

5 sc, 1 inc (42)

Round 8 :

6 sc, 1 inc (48)

Round 9-14 :

48 sc (6 rounds) (48)

Round 15 :

6 sc, 1 dec (42)

Round 16 :

5 sc, 1 dec (36)

Round 17 :

36 sc (36)

Round 18 :

5 sc, 1 inc (42)

Round 19 :

6 sc, 1 inc (48)

Round 20 :

48 sc (48)

Round 21 :

change colour to white and make all the next rounds on BLO, repeat 48 sc

Round 22-26 :

48 sc (5 rounds) (48)

Round 27 :

6 sc, 1 dec (42)

Round 28 :

5 sc, 1 dec (36)

Round 29 :

4 sc, 1 dec (30)

Round 30 :

3 sc, 1 dec (24)

Round 31 :

2 sc, 1 dec (18) Start stuffing

Round 32 :

1 sc, 1 dec (12)

Round 33 :

6 dec (6)

Info :

Close the opening with a tapestry needle.

Info :

On the rounds where the loops remain unworked, make 3 ch, 1 sl st, as you did with the blanket part, working from top to bottom.

β€” Embroidering the Eyes and Nose :

Info :

With black embroidery thread, make a V shaped nose with the edges on rnd 8, 4 stitches apart, and the base on rnd 6. Then make a small vertical line of 2 stitches, starting on the base of the nose and going down.

Info :

Embroider the eyes on rnd 14, each eye taking up 3 stitches. The distance between each eye is also 3 stitches. Then embroider the eyelashes as seen in the picture below.

β€” Ears :

Info :

It's 2 pieces for each ear. 1 piece in white, 1 piece in beige

Round 1 :

6 sc in a magic ring (6)

Round 2 :

6 inc (12)

Round 3 :

1 sc, 1 inc (18)

Info :

With white yarn, join the 2 pieces, making 2 sc, 1 inc (24)

β€” Front Feet :

Info :

With beige yarn

Round 1 :

6 sc in a magic ring (6)

Round 2 :

6 inc (12)

Round 3 :

1 sc, 1 inc (18)

Round 4 :

2 sc, 1 inc (24)

Round 5 :

3 sc, 1 inc (30)

Round 6 :

4 sc, 1 inc (36)

Round 7-10 :

36 sc (4 rounds) (36)

Round 11 :

4 sc, 1 dec (30)

Round 12 :

3 sc, 1 dec (24)

Round 13-15 :

24 sc (3 rounds) (24)

Round 16 :

change to white color, 24 sc BLO (24)

Round 17-18 :

24 sc (2 rounds) (24) Start stuffing

Round 19 :

2 sc, 1 dec (18)

Round 20 :

1 sc, 1 dec (12)

Round 21 :

6 dec (6)

Info :

Close the opening with a tapestry needle.

Info :

On the rounds where the loops remain unworked, make 3 ch, 1 sl st, as you did with the blanket part, working from top to bottom.

β€” Back Feet :

Info :

With beige yarn

Round 1 :

6 sc in a magic ring (6)

Round 2 :

6 inc (12)

Round 3 :

1 sc, 1 inc (18)

Round 4 :

2 sc, 1 inc (24)

Round 5-9 :

24 sc (5 rounds) (24)

Round 10 :

change to color white 24 sc BLO

Round 11-12 :

24 sc (2 rounds) (24)

Round 13 :

2 sc, 1 dec (18) Start stuffing

Round 14 :

18 sc (18)

Round 15 :

1 sc, 1 dec (12)

Round 16 :

6 dec (6)

Info :

Close the opening with a tapestry needle.

Info :

On the rounds where the loops remain unworked, make 3 ch, 1 sl st, as you did with the blanket part, working from top to bottom.

β€” Tail :

Info :

With white yarn, BLO

Round 1 :

6 sc in a magic ring (6)

Round 2 :

6 inc (12)

Round 3-4 :

12 sc (2 rounds) (12)

Info :

On the rounds where the loops remain unworked, make 3 ch, 1 sl st, as you did with the blanket part, working from top to bottom.

β€” Assembly :

Info :

Sew the head and the 4 legs on the edges of the blanket, on the top side where you made the curls.

Info :

On the 6th round of the blanket, sew the tail.

β€” Little Bow :

Info :

With light cotton yellow yarn, hook size 1mm. Magic ring, ch 4, 3 tr, ch 4, 1 sl st inside the magic ring, ch 4, 3 tr, ch 4, 1 sl st inside the magic ring. Adjust the magic ring and leave a long tail to tie the center of the bow.

Assembly Instructions

  • Sew the head to the blanket edge: position the head on the top side where you made the curls and whipstitch securely through the head rounds and blanket edge for a flat, even attachment.
  • Attach the four legs to the corners of the blanket: place each foot on the blanket edge at the curled sections and sew firmly with a tapestry needle to secure them in place.
  • Sew the tail onto the 6th round of the blanket: position the tail centered on the 6th round and stitch across the base to anchor it so the tail sits flat.
  • Attach the ears to the head: sew each ear to the head’s sides, aligning them symmetrically and stitching through both ear pieces (white outer, beige inner) for a neat finish.
  • Embroider the eyes and nose: embroider the V-shaped nose with edges on rnd 8 and base on rnd 6, add the small vertical line, then embroider the eyes on rnd 14 with eyelashes as shown in the photos.

Important Notes

  • πŸ’‘Make sure to crochet tight stitches for amigurumi so the filling is not visible; working tighter prevents gaps and keeps stuffing inside.
  • πŸ’‘Stuff firmly but gradually to keep even shapes; add small amounts of stuffing as you go to avoid lumps and overfilling.
  • πŸ’‘Work the blanket and textured rounds in BLO (back loop only) as instructed to create the curled edge and proper surface texture.
  • πŸ’‘Use the recommended hook sizes for different parts; a smaller hook for the head and legs will create tighter stitches than the blanket hook.
  • πŸ’‘Close openings with a tapestry needle and weave in ends neatly to avoid loosening during handling.

Make this sheep security blanket to give a handmade gift full of charm and comfort. The textured BLO curls and cuddly head make it perfect for snuggles and nursery photos. Whether for a baby shower or a special keepsake, this little lovey will be treasured. 🧸🧢

You ask,

we answer.

FAQs

What size will the finished piece be?

The finished sheep security blanket measures approximately 22 cm in diameter for the blanket portion, with head and feet adding extra length; size can vary depending on your tension and yarn.

Can I use different yarn weights for this pattern?

Yes, you can use different yarn weights but it will change the final size and texture; adjust hook sizes accordingly and note that the curled BLO texture may vary with yarn thickness.

Do I need prior crochet experience for this pattern?

This pattern is rated intermediate; basic experience with single crochet, increases, decreases, and working in rounds is recommended to achieve the best results.

How long does this project typically take to complete?

Most crocheters complete this project in 5-7 hours, though actual time depends on experience, speed, and any customizations you choose.

How should I secure the little bow and embroidered details?

Tie the bow center using the long tail left from the magic ring, stitch it to the head or ear with a tapestry needle, and secure embroidery stitches with a few small backstitches on the inside before knotting and weaving ends.