🧢 Beautiful ✨ Detailed πŸ’ Adorable

Sheep No Sew Amigurumi Pattern

Sheep No Sew Amigurumi Pattern
4.5β˜… Rating
2-4 Hours Time Needed
3.8K Made This
βœ‚οΈ

Beginner Friendly Level

Perfect for those just starting their crochet journey, with clear instructions and simple techniques

⏱️

Bite-Sized Project

Finishes in 2-4 hoursβ€”perfect for an afternoon of creative relaxation.

🧸

Cute Companion

An adorable friend to cherish, handcrafted with love to bring comfort and joy for years to come.

About This Sheep No Sew Amigurumi Pattern

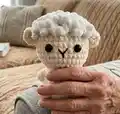
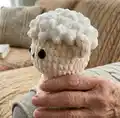
This no-sew sheep amigurumi pattern creates a small, cuddly sheep with a textured wool top and embroidered facial details. The design is worked from the body up into the head for seamless construction and minimal finishing. The pattern uses super bulky yarn (category 6) and a 3.5mm hook for a plush, quick-to-make toy.

Sheep No Sew Amigurumi Pattern crochet pattern - detailed view of completed project

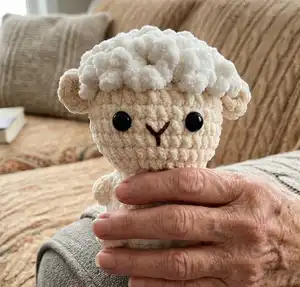
You will switch yarn colors for skin details and add looped wool stitches for the fluffy top. The step-by-step rounds and clear abbreviations make this pattern accessible and enjoyable.

Why You'll Love This Sheep No Sew Amigurumi Pattern

I absolutely love this pattern because it transforms simple stitches into a delightfully textured little sheep that feels handmade and special. I enjoy the no-sew construction β€” it saves time and gives a clean, seamless finish. The fluffy wool technique adds so much personality with minimal effort, and it always brings a smile when I show the finished piece. Making several in different colors is addictive and perfect for gifting.

Sheep No Sew Amigurumi Pattern step 1 - construction progress Sheep No Sew Amigurumi Pattern step 2 - assembly progress Sheep No Sew Amigurumi Pattern step 3 - details and accessories Sheep No Sew Amigurumi Pattern step 4 - final assembly and finishing

Switch Things Up

I love how easy it is to customize this sheep by simply changing colors; try pastel shades or a mottled yarn for a unique look.

I often make a tiny keychain version by using a lighter yarn and a smaller hook β€” it becomes an adorable pocket pal.

I sometimes skip the looped wool and use a textured bulky boucle yarn for a different fluffy effect.

You can embroider different facial expressions to give each sheep its own personality β€” experiment with eye placement and mouth shapes.

To create a standing or weighted base, add a small disk of plastic canvas inside the feet or insert a few metal washers for stability.

I like adding accessories like tiny scarves or bows made from leftover yarn to make gifts more personal.

Try using safety eyes of different sizes or embroidered eyes for baby-safe versions.

If you want a more realistic sheep, use an off-white or cream skin tone and darker wool highlights for contrast.

I recommend practicing the BO and FLO stitches on a small swatch first to ensure consistent texture across the wool area.

For a set, make matching cow and pig variants using the same construction ideas and change color blocking for a coordinated farm collection.

Common Mistakes & How to Fix Them

βœ— Skipping stitch markers before starting rounds can make it hard to identify the beginning of each round; place a marker at the first stitch and move it up after each round. βœ— Overstuffing the body before completing shaping can distort your amigurumi’s curves; stuff gradually and add small amounts to achieve a smooth shape. βœ— Forgetting to change yarn colors exactly where indicated will make the skin/head transition look uneven; switch yarn at the bolded row indicated in the pattern. βœ— Working the bobble or BO stitches too tightly will hide the texture and shorten your rows; use a slightly looser tension for these special stitches to keep an even fabric.

Sheep No Sew Amigurumi Pattern

Make an irresistibly cute no-sew sheep amigurumi using super bulky yarn and simple stitches. This pattern walks you through every round from the body up to the head and finishes with fluffy wool, ears and facial details. Perfect as a sweet handmade gift or a cozy shelf companion you can complete quickly. Follow the step-by-step instructions and photos to create your own charming sheep.

Beginner Friendly 2-4 Hours

Materials Needed for Sheep No Sew Amigurumi Pattern

β€” Main Fabric

  • 01
    Super Bulky yarn (Category 6) - main color: White - small amount
  • 02
    Super Bulky yarn (Category 6) - skin color (beige/skin tone) - small amount
  • 03
    Short length of brown yarn for nose embroidery
  • 04
    For cow variant: Super Bulky yarn in White, Black and Brown colors
  • 05
    For pig variant: Super Bulky yarn in Light Pink and Pink colors
  • 06
    Fiberfill stuffing - small amount for body

β€” Tools Required

  • 01
    Crochet hook size 3.5mm (E)
  • 02
    Stitch marker
  • 03
    Sewing needle / yarn needle
  • 04
    Scissors
  • 05
    Plastic safety eyes 10mm (2 pieces)
  • 06
    Hot glue gun (optional for securing eyes)
  • 07
    Polyester stuffing / fiberfill

Progress Tracker

0% Complete

β€” Body :

Row 1 :

6 SC in an MR (6)

Row 2 :

6 INC (12)

Row 3 :

(SC, INC) 6 times (18)

Row 4 :

(2 SC, INC) 6 times (24)

Row 5 :

8 SC, BO, 6 SC, BO, 8 SC (24)

Row 6 :

8 SC, SC into the stitch's BO, 6 SC, SC into the stitch's BO, 8 SC (24)

Row 7 :

24 SC (24)

Row 8 :

6 SC, BO, 10 SC, BO, 6 SC (24)

Row 9 :

6 SC, SC into the stitch's BO, 10 SC, SC into the stitch's BO, 6 SC (24)

Row 10 :

(SC, DEC) 8 times (16)

Info :

Change to skin color yarn

Row 11 :

FLO, (SC, INC) 8 times (24)

Row 12 :

(SC, INC) 12 times (36)

Row 13-18 :

36 SC (36)

Row 19 :

BLO, (2 SC, DEC) 9 times (27)

Info :

*Stuffing*

Row 20 :

BLO, (SC, DEC) 9 times (18)

Row 21 :

BLO, (SC, DEC) 6 times (12)

Row 22 :

BLO, 6 DEC (6)

Info :

Weave in the yarn end and cut

β€” Sheep\'s Wool :

Info :

Crochet in the FLO from row 21, and continue seamlessly from row 21 down to row 18. (3 ch, Slst) 93 times.

β€” Ears :

Info :

Use Skin color yarn. Crochet the ears onto the stitches at row 18.

Item Name (P1) :

2 Ch, 3 DC, 2 Ch, Slst in one st (make 2 ears)

β€” Assembly :

Info :

Attach eyes on rows 15 and 16, spaced 6 stitches apart.

Info :

Use a short of brown yarn to embroider the nose.

Assembly Instructions

  • Attach eyes on rows 15 and 16, spacing them 6 stitches apart and secure the safety backs firmly.
  • Sew the ears onto the stitches at row 18 using the skin color yarn, positioning them symmetrically on each side of the head.
  • Embroider the nose using a short length of brown yarn centered between the eyes, using small satin or back stitches to form the nose shape.
  • Create the sheep\'s wool by crocheting in the FLO from row 21 down to row 18 using (3 ch, slst) repeated 93 times and trim ends neatly.
  • Weave in all yarn ends securely and trim excess; if desired use a dab of hot glue behind safety eyes for extra security.

Important Notes

  • πŸ’‘Use stitch markers to mark the start of each round for accurate stitch counts and consistent shaping.
  • πŸ’‘Stuff the body gradually while shaping to avoid lumps and to keep the head and body proportions even.
  • πŸ’‘Switch yarn colors exactly where indicated to create a clean transition between wool and skin sections.
  • πŸ’‘Weave in ends and trim after securing parts to keep the amigurumi neat and child-safe.

This adorable no-sew sheep was designed to be quick, fun, and endlessly giftable β€” perfect for weekend makes! 🧢 The textured wool top adds tons of character with a simple loop-and-slst technique you will enjoy repeating. πŸ‘ Finish with embroidered details and safety eyes for a polished, handmade keepsake. ✨

You ask,

we answer.

FAQs

What size will the finished piece be?

The finished amigurumi measures approximately 10-12 cm tall when using super bulky yarn (category 6) and a 3.5mm hook; exact size depends on tension and stuffing.

Can I use different yarn weights for this pattern?

Yes, you can use different yarn weights, but your final size will change; choose an appropriate hook for the yarn weight and adjust stuffing amounts for shape.

Do I need prior crochet experience for this pattern?

This pattern is rated beginner friendly and uses basic stitches, but familiarity with single crochet, increases, decreases, and working in the flo/blo will be helpful.

How long does this project typically take to complete?

Most crocheters complete this project in 2-4 hours, depending on experience and whether you make the wool loops and embroidery by hand.