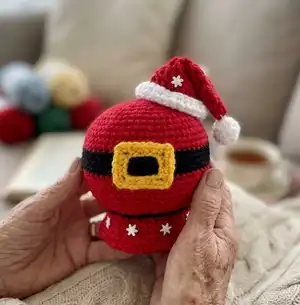
Make a charming Santa Belly Snow Globe to brighten your holiday decor or give as a handmade gift. This small amigurumi-style snow globe combines simple shaping with fun finishing details like a belt buckle, tiny snowflake buttons, and an optional mini Santa hat. You will work in joined and continuous rounds to create a firm spherical globe and a decorative base. Clear step-by-step rounds and assembly tips make this a rewarding weekend project.
Progress Tracker
0% Complete
— Snow globe :
Info :
Ch 1 at the beginning of rounds doesn't count as a St.
Info :
With crochet hook E/4 (3.5 mm) and Color A, make magic ring
Round 1 :
Ch 1, 6 SC in magic ring, Sl St to first SC to join. Total - 6 SC.
Round 2 :
Ch 1, 2 SC in first St and in each St around, Sl St to first SC to join. Total - 12 SC.
Round 3 :
Ch 1, SC in first St, 2 SC in next St, [SC in next St, 2 SC in next St] 5 times, Sl St to first SC to join. Total - 18 SC.
Round 4 :
Ch 1, SC in first St, [2 SC in next St, SC in each of next 2 Sts] 5 times, 2 SC in next St, SC in next St, Sl St to first SC to join. Total - 24 SC.
Round 5 :
Ch 1, SC in first St and in next 2 Sts, 2 SC in next St, [SC in each of next 3 Sts, 2 SC in next St] 5 times, Sl St in first SC to join. Total - 30 SC.
Round 6 :
Ch 1, SC in first St and in next St, [2 SC in next St, SC in each of next 4 Sts] 5 times, 2 SC in next St, SC in each of next 2 Sts, Sl St in first SC to join. Total - 36 SC.
Round 7 :
Ch 1, SC in first St and in next 4 Sts, 2 SC in next St, [SC in each of next 5 Sts, 2 SC in next St] 5 times, Sl St in first SC to join. Total - 42 SC.
Round 8 :
Ch 1, SC in first St and in each of next 2 Sts, [2 SC in next St, SC in each of next 6 Sts] 5 times, 2 SC in next St, SC in each of next 3 Sts, Sl St in first SC to join. Total - 48 SC.
Round 9 :
Ch 1, SC in first St and in next 6 Sts, 2 SC in next St, [SC in each of next 7 Sts, 2 SC in next St] 5 times, Sl St in first SC to join. Total - 54 SC.
Round 10 :
Ch 1, SC in first St and in each of next 3 Sts, [2 SC in next St, SC in each of next 8 Sts] 5 times, 2 SC in next St, SC in each of next 4 Sts, Sl St in first SC to join. Total - 60 SC.
Round 11, 12 :
Ch 1, SC in first St and in each St around, Sl St in first SC to join.
Round 13 :
Ch 1, skip first St, SC in each St around to last St, 2 SC in last St, Sl St in first SC to join. Fasten off Color A.
Info :
Join Color B to first St.
Round 14, 15 :
Ch 1, SC in first St and in each St around, Sl St in first SC to join.
Round 16 :
Ch 1, skip first St, SC in each St around to last St, 2 SC in last St, Sl St in first SC to join.
Round 17 :
Ch 1, SC in first St and in each St around, Sl St in first SC to join. Fasten off Color B.
Info :
Join Color A to first St.
Round 18 :
Ch 1, SC in first St and in each St around, Sl St in first SC to join.
Round 19 :
Ch 1, skip first St, SC in each St around to last St, 2 SC in last St, Sl St in first SC to join.
Round 20, 21 :
Ch 1, SC in first St and in each St around, Sl St in first SC to join.
Round 22 :
Ch 1, skip very first St, SC in each of next 9 Sts, [INV DEC, SC in each of next 8 Sts] 5 times, Sl St to first SC to join. Total - 54 SC.
Round 23 :
Ch 1, SC in first and in each of next 2 Sts, INV DEC, [SC in each of next 7 Sts, INV DEC] 5 times, SC in each of next 4 Sts, Sl St to first SC to join. Total - 48 SC.
Round 24 :
Ch 1, skip very first St, SC in each of next 7 Sts, [INV DEC, SC in each of next 6 Sts] 5 times, Sl St to first SC to join. Total - 42 SC.
Round 25 :
Ch 1, SC in first and in next St, INV DEC, [SC in each of next 5 Sts, INV DEC] 5 times, SC in each of next 3 Sts, Sl St to first SC to join. Total - 36 SC. Fasten off Color A. Join Color B to first St.
Round 26 :
Ch 1, Sl St in first St and in each St around, Sl St to first Sl St to join. Total - 36 Sl Sts. Fasten off Color B.
— Base :
Info :
Continue working on base. Join Color A to BL of first St of previous round.
Round 1 :
Ch 1, BLO: SC in first St and in each of next 7 Sts, 2 SC in next St, [SC in each of next 8 Sts, 2 SC in next] 3 times, Sl St to first SC to join. Total - 40 SC.
Round 2 :
Ch 1, SC in first St and in each St around, Sl St to first SC to join. Total - 40 SC.
Round 3 :
Ch 1, SC in first St and in each of next 8 Sts, 2 SC in next St, [SC in each of next 9 Sts, 2 SC in next St] 3 times, Sl St to first SC to join. Total - 44 SC.
Round 4 :
Ch 1, SC in first St and each St around, Sl St to first SC to join. Total - 44 SC.
Round 5 :
Ch 1, SC in first St and in each of next 9 Sts, 2 SC in next St, [SC in each of next 10 Sts, 2 SC in next St] 3 times, Sl St to first SC to join. Total - 48 SC. Fasten off.
— Bottom :
Info :
The bottom is worked in continuous rounds. Use stitch marker to mark first stitch of each round.
Info :
With Color A, make magic ring
Round 1 :
Ch 1, 6 SC in magic ring.
Round 2 :
2 SC in each St around. Total - 12 SC.
Round 3 :
[2 SC in first St, SC in next St] 6 times. Total - 18 SC.
Round 4 :
SC in first St, [2 SC in next St, SC in each of next 2 Sts] 5 times, 2 SC in next St, SC in next St. Total - 24 Sts.
Round 5 :
[2 SC in first St, SC in each of next 3 Sts] 6 times. Total - 30 Sts.
Round 6 :
SC in first St and in next St, [2 SC in next St, SC in each of next 4 Sts] 5 times, 2 SC in next St, SC in each of next 2 Sts. Total - 36 Sts.
Round 7 :
[2 SC in first St, SC in each of next 5 Sts] 6 times. Total - 42 Sts.
Round 8 :
SC in first St and in each of next 2 Sts, [2 SC in next St, SC in each of next 6 Sts] 5 times, 2 SC in next St, SC in each of next 3 Sts. Total - 48 Sts. Leave long tail for sewing bottom to the base.
Info :
Stuff your snow globe and the base, leave some space at the bottom. Stuff the snow globe very well, make sure it has a nice, spherical shape.
Info :
Cut out a circular piece of cardboard that is slightly smaller than the diameter of the bottom. A compass is very useful for this purpose.
Info :
Using a sewing needle and saved long tail, start sewing the bottom to the base (don't forget to insert the cardboard circle inside). Sew about 3/4 of the diameter, add more stuffing as necessary. Add weighted material for stability, and finish sewing the bottom.
— Belt Buckle :
Info :
With crochet hook E/4 (3.5 mm) and Color C, Ch 18, join with Sl St to first Ch to form a ring. Do not twist the chain.
Round 1 :
Ch 1, SC in first and in next 2 Chs, *(SC, Ch 2, SC) in next*, SC in next 4, repeat from * to *, SC in next 3, repeat from * to *, SC in next 4, repeat from * to *, Sl St to first SC to join. Fasten off.
— Mini Hat :
Info :
Ch 2 (Ch 3) at the beginning of rounds counts as HDC (DC). With crochet hook E/4 (3.5 mm) and Color A, make magic ring
Round 1 :
Ch 3, 6 DC in ring, join with Sl St to top of Ch 3. Total - 7 DC.
Round 2 :
Ch 3, DC in next St and in each of next St around, join with Sl St to top of Ch 3. Total - 7 DC.
Round 3 :
Ch 3, DC in same St, [DC in next, 2 DC in next] 3 times, join with Sl St to top of Ch 3. Total - 11 DC.
Round 4 :
Ch 3, DC in next St and in each of next St around, join with Sl St to top of Ch 3. Total - 11 DC.
Round 5 :
Ch 3, DC in same St and in each of next 2 Sts, [2 DC in next, DC in each of next 2] 2 times, 2 DC in next, DC in next, join with Sl St to top of Ch 3. Total - 15 DC.
Round 6 :
Ch 3, DC in next St and in each of next St around, join with Sl St to top of Ch 3. Total - 15 DC.
Round 7 :
Ch 3, DC in same St and in each of next 3 Sts, [2 DC in next, DC in each of next 3] 2 times, 2 DC in next, DC in each of next 2, join with Sl St to top of Ch 3. Total - 19 DC.
Round 8 :
Ch 3, DC in next St and in each of next St around, join with Sl St to top of Ch 3. Total - 19 DC.
Round 9 :
Ch 3, DC in same St and in each of next 4 Sts, [2 DC in next, DC in each of next 4] 2 times, 2 DC in next, DC in each of next 3, join with Sl St to top of Ch 3. Total - 23 DC. Fasten off Color A.
Info :
Join Color D to first St.
Round 10 :
Ch 2, HDC in next St and in each of next St around, join with Sl St to top of Ch 2. Total - 23 HDC.
Round 11 :
Ch 2, HDC in same St and in each of next 5 Sts, [2 HDC in next, HDC in each of next 5] 2 times, 2 HDC in next, HDC in each of next 4, join with Sl St to top of Ch 2. Total - 27 HDC.
Round 12 :
Ch 2, HDC in same St and in each of next 6 Sts, [2 HDC in next, HDC in each of next 6] 2 times, 2 HDC in next, HDC in each of next 5, join with Sl St to top of Ch 2. Total - 31 HDC. Fasten off. Roll the white trim of the hat up.
Info :
Make a small yarn ball for the pom-pom: Using white yarn, make a tiny ball about 1 inch in diameter. To prevent the ball from unraveling, secure the yarn end. To do that, thread the end into a large sewing needle and make a couple of stitches through the ball. Leave the tail about 5-7 inches long for sewing the ball to the hat.
Info :
Finishing the hat: Sew the small yarn ball to the tip of the Santa hat. Fold the hat. Using a small sewing needle and matching thread, make a couple of stitches to secure it in such position.
Info :
Embellish the hat with tiny snowflake buttons - using a hot glue gun, glue the snowflake buttons to hat.
Info :
Finishing the snow globe: Position the belt buckle on the front of the snow globe (make sure that the seam is on the back) and sew the belt buckle on.
Info :
Embellish the base with snowflake buttons - using a hot glue gun, glue the buttons around the base.
Info :
Sew the Santa hat onto the snow globe.
This little Santa Belly Snow Globe is a delightful seasonal decor piece that fits comfortably in your hand and on any shelf. The combination of a neat spherical globe, a decorative belt buckle, and tiny snowflake buttons makes it a charming holiday accent. Add the optional mini Santa hat for extra personality and display or gift with joy. 🎁❄️