About This Rustic Lamp Pattern
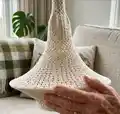
This pattern teaches you how to crochet a sculptural rustic lamp shade using a rope stitch to create a textured, airy fabric. The design includes instructions to work around metal rings to form a sturdy silhouette and clear guidance for finishing and electrical assembly. It is designed to be both decorative and functional and works beautifully as a single pendant or grouped in clusters.

You will learn to join crocheted rounds to metal rings, change chain spacing for shaping, and finish the shade with secure weaving. The pattern includes clear step-by-step rounds and helpful tips for installation and finishing.
Why You'll Love This Rustic Lamp Pattern
I absolutely love this pattern because it turns simple rope stitch repetition into an elegant, sculptural lamp that transforms any room. I love how the open texture creates a soft glow around the bulb while keeping the structure light and airy. I enjoy the combination of crochet and hardware — working around metal rings gives a satisfying, professional finish. I also love that you can easily customize the size and color to fit your decor, making each lamp a unique piece.
Switch Things Up
I love experimenting with color when I make this lamp; you could use a gradient of neutrals or introduce a bold accent color at one band to create a striking look.
You can make the lamp larger or smaller by changing the base chain length and using larger or smaller metal rings; switch to thicker yarn and a bigger hook for a chunkier, more substantial shade.
I often add a contrasting row of surface crochet or embroidery near the rim for a subtle decorative detail that personalizes the lamp.
Try grouping three lamps of different sizes and colors at staggered heights to create a dramatic focal point in a room.
For an outdoor-friendly version, choose weather-resistant cord and a yarn suitable for outdoor use, and consider skipping the fabric stiffener or using a marine-grade spray for protection.
If you want a more closed weave that casts less light, reduce the chain spaces in the rope stitch repeats to tighten the fabric and create a denser shade.
I also like to add small crocheted motifs or beads sewn onto the shade edge for a boho look; just ensure they are secured safely away from the bulb heat source.
To make a pendant that looks vintage, try a darker natural yarn like taupe or grey and age the metal rings slightly for an antique finish.
For a modern, minimal pendant, use crisp white yarn and keep shaping clean and simple, allowing the rope stitch texture to be the main feature.
If you want a fully professional finish, cover the inside of the shade with a thin, heat-resistant fabric lining, ensuring it is mounted a safe distance from the bulb and electrical parts.
Common Mistakes & How to Fix Them
✗ Skipping the initial chain count and joining incorrectly; always count your chains carefully and join with a slip stitch into the first chain to ensure the base is the correct circumference.
✗ Not working around the chain of the previous round when instructed; make sure to place your stitches around the chain space instead of the stitch top to preserve the rope stitch texture and correct shaping.
✗ Forgetting to weave in ends immediately; weave in ends as you go with a wool needle because you will barely be able to reach them later once the lamp is assembled.
✗ Using inconsistent tension when crocheting around metal rings; maintain even tension when pulling yarn over the ring so the stitches sit evenly and the ring is fully covered without gaps or overly tight sections.
✗ Overstuffing or shaping incorrectly around the ring which can distort the profile; follow the round instructions exactly and test placement on the ring frequently to keep the silhouette even.
✗ Failing to secure electrical parts properly; attach the plug, strain relief and fitting securely and follow the assembly steps so the cord and lamp fitting are safe and stable.