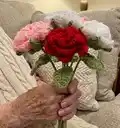
🧢 Beautiful ✨ Detailed πŸ’ Adorable

Rose Pattern

Rose Pattern
4.5β˜… Rating
2-4 Hours Time Needed
1.1K Made This
βœ‚οΈ

Beginner Friendly Level

Perfect for those just starting their crochet journey, with clear instructions and simple techniques

⏱️

Bite-Sized Project

Finishes in 2-4 hoursβ€”perfect for an afternoon of creative relaxation.

🏑

Cozy Accent

A warm touch for your space that transforms ordinary corners into inviting nooks filled with handmade charm.

About This Rose Pattern

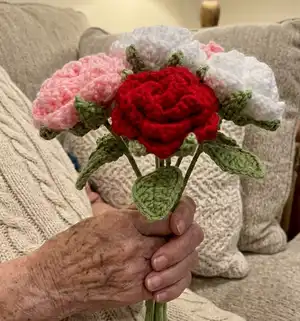
This pattern teaches you how to crochet a realistic-looking rose with petals, a calyx, and wired leaves, then assemble it onto a floral wire stem. It uses worsted weight (Weight 4) yarn and basic crochet stitches for approachable shaping. The pattern includes step-by-step photos and clear folding/sewing instructions to create a professional finished flower. Perfect for making single stems or building a beautiful bouquet.

Rose Pattern crochet pattern - detailed view of completed project

The pattern is written in US crochet terminology and is suited for beginners with knowledge of basic crochet stitches. Detailed stitch sequences and optional textured edge instructions are included for leaves and petals.

Why You'll Love This Rose Pattern

I absolutely love this pattern because it turns simple stitches into elegant, lifelike roses that last forever. I enjoy how quickly one rose comes togetherβ€”each step feels rewarding as the petals form and the flower takes shape. The combination of a wired stem and crocheted calyx and leaf gives the finished flower a professional look that I am proud to gift. Working with color gives me so much joy; small color changes make each rose unique and full of personality.

Rose Pattern step 1 - construction progress Rose Pattern step 2 - assembly progress Rose Pattern step 3 - details and accessories Rose Pattern step 4 - final assembly and finishing

Switch Things Up

I love how easy it is to customize this rose with color changes β€” try ombre petals by alternating two colors every few petals for a unique effect.

Want a mini version? Use a lighter fingering yarn and a smaller hook to produce tiny roses perfect for keychains or brooches.

For a chunkier, cozy rose, switch to a bulky yarn and a larger hook; the petal texture becomes dramatic and plush.

I often add embroidered veins to the leaves or a small bead in the center of the bloom for extra detail and personality.

If you prefer less wiring, use wooden skewers instead of floral wire for a rustic stem, or wrap the wire with floral tape for a softer finish.

Try scented yarn sprays or attach a small sachet to the wrapped stem for a fragrant bouquet gift idea.

Experiment with petal shapes by changing the number of chains in the foundation or adjusting the petal repeat to make fuller or looser roses.

Make a mixed bouquet by combining different sizes and colors, then secure the stems together with ribbon or decorative paper for presentation.

I like to create tiny outfits for the stems too β€” crochet a small pocket or tag and sew it to the stem for a charming keepsake.

For a dramatic centerpiece, cluster multiple roses at varying heights and secure them in a foam-filled vase, wrapping stems together for a professional floral arrangement.

Common Mistakes & How to Fix Them

βœ— Skipping the correct chain count at the start leads to uneven petals; always count the foundation chain (Ch 47) before continuing and recount if necessary. βœ— Pulling the magic ring too tight for the calyx restricts the hole for the floral wire; leave a small open MR so the wire or skewer can pass through easily. βœ— Not leaving a long tail for sewing when finishing the petals causes difficulty during assembly; leave the 12" tail as instructed and thread your darning needle onto the longest tail. βœ— Using a thicker yarn or larger hook will make the rose bulky and lose details; use Weight 4 yarn and a 4.0mm hook as recommended to retain the petal texture.

Rose Pattern

Create a beautiful, long-lasting crochet rose bouquet using this clear, photo-guided pattern. You will learn to make petals, a calyx, wired leaves, and assemble the flower onto a floral stem. This pattern is perfect for gifting, home decor, or practice with shaping and simple textured stitches. Follow the step-by-step instructions and photos to make charming crochet roses in your favorite colors.

Beginner Friendly 2-4 Hours

Materials Needed for Rose Pattern

β€” Main Fabric

  • 01
    Worsted weight yarn (Weight 4), petal color (red, pink, white etc.) - approximately 50g per rose (amount varies by bouquet size)
  • 02
    Worsted weight yarn (Weight 4), green - for calyx and leaves - approximately 20-30g per rose
  • 03
    Optional accent yarns for textured edges or multiple color petals

β€” Tools Required

  • 01
    Crochet hook size 4.0mm
  • 02
    Darning needle (yarn needle) for sewing
  • 03
    Scissors
  • 04
    Hot glue and hot glue gun
  • 05
    Floral stems, 2mm thick, approximately 15 inches long
  • 06
    Flexible floral wire, 22 gauge (cut pieces approx 8 inches for leaves)
  • 07
    Optional: wooden skewer for testing MR hole size

Progress Tracker

0% Complete

β€” Rose Pattern :

Step 1 :

Ch 47 (47)

Step 2 :

In the 2nd chain from the hook, HDC down the entire chain (46)

Step 3 :

Ch 5. Turn your work. Dc in the same stitch as the chain. Sk 2, (1 dc, ch 3, 1 dc) in the same stitch. Repeat [Sk 2, 1 dc, ch 3, 1 dc] until you reach the end of the row. Place 1 DC in the last stitch.

Info :

Rose after Step 3 is completed: Ch 3

Step 4 :

Ch 3. Turn your work. In the chain spaces, repeat [3 dc, 1 tr, 3 dc] and sl st in the space between the two dc from the previous row. Ch 1. Repeat [(3 dc, 1 tr, 3 dc), sl st, ch 1] to create the petals. Place 3 dc in the final chain space of the row. FO. Leave a 12" tail for sewing.

Info :

Your rose will look like the pictured circular ring of petals once you complete Step 4.

β€” Calyx Pattern :

Step 1 :

Place 6 dc in a ring. After the sixth dc, sl st to the top of the first dc to form a ring.

Info :

Leave a small hole in the center of the MR! Don't pull too tight - you need the hole to be big enough to fit your floral wire / wooden skewer through.

Step 2 :

[Ch 7. Starting from the 1st stitch from your hook: (sl st, sc, hdc, dc, dc, tr)]. Sl st to the next stitch in the MR. Repeat this 6 times total to form 6 leaves of the calyx. FO after the sixth leaf and leave a short tail. Tie this tail and the tail from the MR in a knot and weave in the ends.

Info :

Crocheting down the chain, you'll repeat: [sl st, sc, hdc, dc, dc, tr] and sl st to the next stitch in the MR to create each calyx leaf.

β€” Leaf Pattern :

Info :

First, cut approximately an 8" piece of 22 gauge flexible floral wire. You will need this for the leaf.

Step 1 :

Ch 12 (12)

Step 2 :

For the leaf, you will be crocheting around the floral wire. Starting from the third chain from the hook: sc, HDC, DC, DC, TR, TR, DC, DC, HDC, 3 sc in the last chain.

Info :

To crochet around the wire, hold the wire in your hand alongside your work. Insert your hook through the chain and create a single crochet as usual, but make sure your stitch is created around the wire, holding it in place.

Step 3 :

Fold your wire in half, with your work on the right side of the wire. We will now be working on the lefthand side of the wire, from right to left. Sk 1st, HDC, DC, DC, TR, TR, DC, DC, HDC, sc.

Step 4 :

If you like the look of your leaf, FO, leaving a short tail. Weave in your tail. Twist the remaining wire together so your work doesn't slide off.

Info :

Your finished leaf should look like the pictured leaf after Step 4. Twist the bottom of the wire to prevent your work from sliding off.

Step 5 :

To add a textured edge to your leaf (optional): Sl st, chain 1, and sl st to the next st. Repeat this around the entire leaf. FO, weave in the end. Cut off any excess.

β€” Rose Assembly :

Part 1: The Petals - Step 1 :

Begin with the side that does not have the yarn tails. Make sure the correct side of your work is facing you.

Part 1: The Petals - Step 2 :

For the first petal only, fold it in half on itself. Take point A and fold it to touch point B to begin forming the petal shape for rolling.

Part 1: The Petals - Step 3 :

Continue wrapping your work from right to left, folding the petals in on each other. The rose shape will become more pronounced as you wrap.

Part 1: The Petals - Step 4 :

Once you reach the end of your work, you can adjust the petals to your liking. I prefer the center petals to be tighter and the outside petals to be looser, like a real rose.

Part 1: The Petals - Step 5 :

Thread your darning needle onto the longest tail for sewing.

Part 1: The Petals - Step 6 :

Sew several stitches horizontally to secure the very last petal.

Part 1: The Petals - Step 7 :

Sew several stitches through the base of your rose to secure it. These stitches do not need to be uniform. The more you sew, the more secure your rose will be.

Part 1: The Petals - Step 8 :

Once your rose is secure, sew one final stitch so your two yarn tails are next to each other. Tie the yarn tails in a knot, and then weave the remaining tails in. Cut any excess yarn.

Part 2: The Wire, Calyx, and Leaf - Step 1 :

Insert your floral wire through the center of your rose. Turn your rose upside down to make sure you can't see the wire from the top of the rose. Once you're satisfied with the placement, remove the wire, place a small amount of hot glue on the wire, and reinsert it into the rose to secure it.

Part 2: The Wire, Calyx, and Leaf - Step 2 :

With the wrong side of your calyx facing you, insert the floral wire through the middle of the MR. Push the calyx down the wire until it meets the rose.

Part 2: The Wire, Calyx, and Leaf - Step 3 :

The calyx should be positioned so that there is a leaf between each of the rose petals.

Part 2: The Wire, Calyx, and Leaf - Step 4 :

Once positioned properly, place a small amount of hot glue around the base of the rose. Slide the calyx down the wire to glue it in place.

Part 2: The Wire, Calyx, and Leaf - Step 5 :

Place a small amount of hot glue along the leaves, leaving the top portion without glue. Glue the leaf down in place. Repeat this for all six leaves of the calyx.

Part 2: The Wire, Calyx, and Leaf - Step 6 :

Place a small amount of hot glue at the base of the calyx and wire. Attach the same green yarn you used for the calyx and leaf. Quickly twist the wire to begin wrapping it before the glue dries.

Part 2: The Wire, Calyx, and Leaf - Step 7 :

After wrapping the wire for about 1.5-2 inches, add your leaf. Hold the leaf with the wire parallel to the wire stem. Wrap the yarn around both the leaf and stem, securing the leaf in place.

Part 2: The Wire, Calyx, and Leaf - Step 8 :

Continue wrapping and securing the entirety of the stem with the green yarn until you reach your desired finished stem length.

Assembly Instructions

  • Insert the floral wire through the center of the finished rose, test placement by turning the rose upside down, then remove the wire and add a small amount of hot glue to the wire before reinserting to secure the flower.
  • Slide the crocheted calyx down the wire with the wrong side facing you and position it so there is a leaf between each petal, then glue the calyx to the base of the rose with hot glue.
  • Glue each calyx leaf down along the leaf base (leave the top portion free) and repeat for all six leaves so they sit neatly around the rose base.
  • Twist and quickly begin wrapping the floral wire with the same green yarn used for the calyx; after wrapping 1.5–2 inches, add and secure the leaf by wrapping yarn around both leaf wire and stem.
  • Continue wrapping the stem yarn down the entire length of the wire to create a finished, professional-looking stem and trim any excess yarn.

Important Notes

  • πŸ’‘Use Weight 4 worsted acrylic yarn and a 4.0mm hook for best results; switching yarn weight will change size and texture.
  • πŸ’‘Leave a small hole in the center of the magic ring for the calyx so the floral wire can pass through easily.
  • πŸ’‘Leave the 12" tail after finishing the petals to sew and secure the rose properly before inserting wire.
  • πŸ’‘Use hot glue sparingly and allow time to set when securing the wire and gluing the calyx; work carefully to avoid visible glue on finished surfaces.
  • πŸ’‘Twist and secure the wire ends so your crocheted pieces cannot slide off during handling or assembly.

This rose pattern is crafted to help you make lasting, handmade bouquets that never wilt. 🌹 With simple stitches and clear photos, you can create elegant flowers for gifts or decor that will brighten any room. Whether you make a single stem or a whole bouquet, these crochet roses are delightful to make and share. 🧢

You ask,

we answer.

FAQs

What size will the finished rose be?

The finished rose measures approximately 3-4 inches across for the bloom and about 15 inches tall on a 2mm floral stem when using recommended yarn and hook.

Can I use a different yarn weight for this pattern?

Yes, you can use different yarn weights, but the size and detail of the petals and leaves will change; if you choose a heavier yarn, consider a larger hook and expect a chunkier rose.

Do I need special tools for assembly?

You will need floral wire/stems and a hot glue gun in addition to basic crochet tools; floral wire (22 gauge) and a 2mm stem are recommended for stability.

Is this pattern suitable for beginners?

Yes, the pattern is beginner friendly and uses basic stitches like sc, hdc, dc, tr and slip stitch with clear step-by-step photos and folding/sewing instructions.

How long does it take to make one rose?

Most crafters finish a single rose in about 2-4 hours depending on experience and how much time is spent on assembly and shaping.