🧢 Beautiful ✨ Detailed πŸ’ Adorable

Holiday Lights Amigurumi Pattern

Holiday Lights Amigurumi Pattern
4.1β˜… Rating
2-3 Hours Time Needed
1.6K Made This
βœ‚οΈ

Beginner Friendly Level

Perfect for those just starting their crochet journey, with clear instructions and simple techniques

⏱️

Bite-Sized Project

Finishes in 2-4 hoursβ€”perfect for an afternoon of creative relaxation.

🎁

Tiny Treasure

Small, sweet, and gift-worthy creations that fit perfectly in the palm of your hand with detailed charm.

About This Holiday Lights Amigurumi Pattern

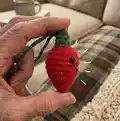
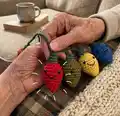
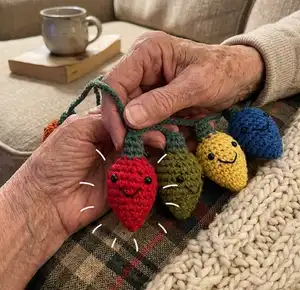
This pattern creates small amigurumi holiday light bulbs that can be strung together to make a festive garland. The bulbs are worked in continuous rounds and shaped with simple increases and decreases. You can add safety eyes and embroidered faces for personality or leave them plain for a minimalist look. The design is portable, quick to make, and perfect for using up scrap yarn.

Holiday Lights Amigurumi Pattern crochet pattern - detailed view of completed project

Each bulb uses worsted weight yarn and a G hook for a firm, neat fabric. Chain them together to form a garland spaced however you prefer.

Why You'll Love This Holiday Lights Amigurumi Pattern

I absolutely love this pattern because it turns basic crochet techniques into something delightfully festive and whimsical. I enjoy how each tiny bulb comes together quickly, letting me make a whole garland in just a few sittings. The pattern is flexible, so I often experiment with color combinations and facial expressions to personalize each bulb. It makes a thoughtful handmade gift or a charming seasonal decoration I can change year after year.

Holiday Lights Amigurumi Pattern step 1 - construction progress Holiday Lights Amigurumi Pattern step 2 - assembly progress Holiday Lights Amigurumi Pattern step 3 - details and accessories Holiday Lights Amigurumi Pattern step 4 - final assembly and finishing

Switch Things Up

I love experimenting with color palettes for these bulbs; try vintage holiday tones, pastels, or bright rainbow sets to totally change the mood.

I often switch yarn weight and hook size to make mini keychain bulbs or oversized chunky bulbs for a bolder garland.

I like substituting a metallic or sparkly yarn for the green topper to add a little shimmer and festive sparkle to the garland.

I sometimes skip safety eyes and embroider tiny faces instead for a softer, child-friendly option that is safe for little ones.

I like to stitch tiny sequins or beads onto the bulb before stuffing for extra texture and holiday shine.

For a posable display, I add a small loop of wire inside the green top to help bulbs hang at a slight angle on the garland.

Make matching sets in themed colors β€” for example, a winter set in blues and silvers or a multicolor retro set for a playful look.

Try spacing bulbs closer together for a dense, luminous garland or space them widely for a subtle dotted effect along a mantel.

I sometimes embroider different expressions to give each bulb its own personality, which makes the set feel like a little cast of characters.

To make a string of lights for outdoor decor, use weather-resistant yarns or synthetic fibers and consider sealing embroidered features if needed.

You can also attach tiny bells or charms between bulbs for added sound and movement in your finished garland.

Common Mistakes & How to Fix Them

βœ— Forgetting to start with a 3 stitch magic ring can make the bulb have a visible hole at the tip; always begin with a tight 3 stitch magic ring and pull it closed before proceeding. βœ— Not counting stitches after increases or decreases leads to uneven shaping and mismatched rounds; count your stitches at the end of every round to ensure correct totals. βœ— Stuffing too early or too much causes lumps and makes decreases difficult; stuff gradually after rounds 9-10 to shape the bulb smoothly and avoid overstuffing. βœ— Skipping placement of safety eyes before stuffing makes positioning harder later; insert and secure safety eyes between the indicated rounds before adding much stuffing. βœ— Switching colors carelessly at the top of the bulb can create loose ends; change yarn neatly, weave ends in as you go, and leave a tail long enough to secure when switching to green.

Holiday Lights Amigurumi Pattern

Create a string of cheerful amigurumi holiday light bulbs to brighten your home or give as handmade gifts. This pattern guides you through crocheting small, decorative bulbs using worsted weight yarn and simple stitches. Youll love how quick each bulb is to make and how customizable the colors and faces can be. Perfect for crafting a festive garland or a set of tiny, giftable decorations.

Beginner Friendly 2-3 Hours

Materials Needed for Holiday Lights Amigurumi Pattern

β€” Main Fabric

  • 01
    Worsted weight yarn (#4) in desired colors - small amounts per bulb (approx 10-20g per bulb depending on size)
  • 02
    Polyfil stuffing for filling bulbs (small bag or 50g for multiple bulbs)
  • 03
    Black embroidery thread (optional) for facial details and mouth

β€” Tools Required

  • 01
    Crochet hook size G (4.0mm)
  • 02
    Needle (yarn needle for sewing and weaving in ends)
  • 03
    Safety Eyes (optional, 6mm recommended)
  • 04
    Scissors

Progress Tracker

0% Complete

β€” Directions :

Info :

Make a 3 stitch magic ring

Round 1 :

Inc around (6)

Round 2 :

*sc 2, inc 1. Repeat from * (8)

Round 3 :

*sc 1, inc 1. Repeat from * (12)

Round 4 :

*sc 2, inc 1. Repeat from * (16)

Round 5 :

*sc 3, inc 1. Repeat from * (20)

Round 6-8 :

sc around (20)

Round 9 :

*sc 3, dec 1. Repeat from * (16)

Round 10 :

*sc 2, dec 1. Repeat from * (12)

Info :

Attach safety eyes if desired. Stuff with Polyfil.

Round 11 :

dec around (6)

Round 12 :

switch to green yarn, sc around (6)

Round 13 :

sc around (6)

Info :

Break off yarn, weave in ends. Embroider eyes and mouth if desired.

Info :

To string together bulbs, begin a chain with desired color and chain through the top of a bulb every 10 inches or spaced however far apart you wish.

Assembly Instructions

  • Attach safety eyes between Rounds 8-10 before adding most of the stuffing to ensure even placement and secure with backs if using safety eyes.
  • Stuff the bulb gradually starting after Round 10 to achieve a smooth shape and avoid overstuffing which can distort decreases.
  • Switch to green yarn at Round 12 and work the green top as shown, then break off yarn and weave in ends securely to prevent unraveling.
  • Embroider eyes and mouth after stuffing and closing the bulb if you prefer embroidered features; use black embroidery thread and a tapestry needle for neat stitching.
  • String finished bulbs by chaining with your chosen color and threading the chain through the top of each bulb approximately every 10 inches, or space to your preference.

Important Notes

  • πŸ’‘Place safety eyes before stuffing to make positioning easier and to ensure symmetry in the face placement.
  • πŸ’‘Work in continuous rounds and use a stitch marker to mark the start of each round for accurate stitch counts.
  • πŸ’‘Stuff bulbs evenly and gradually to maintain the intended bulb shape and avoid lumps or over-firm areas.
  • πŸ’‘Weave in ends securely and leave a longer tail when changing to the green top to make finishing and sewing easier.
  • πŸ’‘Count stitches after increase and decrease rounds to make sure shaping matches the pattern and bulbs look consistent.

These adorable amigurumi holiday lights are the perfect quick craft to bring festive cheer to any room. Theyre small, customizable, and make wonderful gifts for friends and family. String a whole set across your mantel or use a single bulb as a cute ornament. πŸ§ΆπŸŽ„βœ¨

You ask,

we answer.

FAQs

What size will the finished piece be?

Each finished bulb measures approximately 2-3 inches tall depending on yarn tension and stuffing amount when using worsted weight yarn and a G (4.0mm) hook.

Can I use different yarn weights for this pattern?

Yes, you can use different yarn weights, but this will affect the final size. Use an appropriate hook for your yarn and expect larger or smaller bulbs accordingly.

Do I need prior crochet experience for this pattern?

This pattern is beginner friendly and uses basic stitches (sc, inc, dec) and a magic ring; some familiarity with working in the round is helpful.

How long does this project typically take to complete?

Most crocheters complete a set of bulbs in 2-3 hours depending on how many bulbs you make and whether you add faces or embroidery.