🧶 Beautiful ✨ Detailed 💝 Adorable

Crab Memory Game Amigurumi Pattern

Crab Memory Game Amigurumi Pattern
4.7★ Rating
12-15 Hours Time Needed
2.9K Made This
✂️

Beginner Friendly Level

Perfect for those just starting their crochet journey, with clear instructions and simple techniques

⏱️

Multi-Day Project

A rewarding 12+ hour journey—perfect for dedicated crafters who love detailed work.

🧸

Cute Companion

An adorable friend to cherish, handcrafted with love to bring comfort and joy for years to come.

About This Crab Memory Game Amigurumi Pattern

This pattern creates a large mother crab and ten matching baby crabs to play a memory game or display as a set. It includes detailed round-by-round instructions for every piece plus charts and photos to guide you through shaping and assembly. You only need basic crochet skills and a few common tools to make the whole family.

Crab Memory Game Amigurumi Pattern crochet pattern - detailed view of completed project

Written in standard US terminology with recommended yarns and hook sizes included. Perfect as a handmade gift, classroom project, or playful home decor set.

Why You'll Love This Crab Memory Game Amigurumi Pattern

I absolutely love this pattern because it turns simple crochet shapes into a delightful family of crabs that are playful and tactile. I enjoyed designing the baby crabs to be quick to make while still matching the big mum crab for a cohesive set. The pattern is written so you can follow each round easily, and the photos help when joining parts and finishing details. Making the set feels rewarding — you end up with a full memory game that both kids and adults will adore.

Crab Memory Game Amigurumi Pattern step 1 - construction progress Crab Memory Game Amigurumi Pattern step 2 - assembly progress Crab Memory Game Amigurumi Pattern step 3 - details and accessories Crab Memory Game Amigurumi Pattern step 4 - final assembly and finishing

Switch Things Up

I love how easy it is to customize the baby crabs by changing the center color; try pastel centers for a softer look or bright neons for a playful set.

I often use different yarn weights and hooks to make mini or jumbo versions — bulky yarn with a bigger hook gives a lovely chunky mum crab, while fingering yarn and a smaller hook creates pocket-sized babies.

I sometimes add felt or crocheted little bow ties, hats or shells to the babies to turn them into characters for storytelling games.

For a child-safe version I replace safety eyes with embroidered eyes using black yarn and a satin stitch for a smooth, secure finish.

I enjoy adding wire inside the larger legs and claws for gentle posability; if you want them permanently posed, sew them in place after arranging the angle.

Try making a matching storage pouch by crocheting a flat circle and a simple drawstring edge to keep the game pieces together when not in use.

I also like to experiment with facial expressions: moving the mouth embroidery up or down or changing the stitch density alters the crab's personality dramatically.

To create a themed game, use different accent colors for each pair of baby crabs — that helps children learn color matching as well as memory skills.

If you want a sturdier play set, use a tighter tension and slightly smaller hook than recommended to make denser fabric that stands up to handling.

Finally, I sometimes add a small stitch of contrasting color along the shell edge to give a finished, polished look and to help the little ones identify pairs more easily.

Common Mistakes & How to Fix Them

✗ Skipping stitch markers when working rounds can cause you to lose the start of the row; place a marker at the beginning of every round and move it up as you work to prevent miscounts. ✗ Working with loose tension will make pieces floppy and ill-fitting; maintain even, moderate tension and check stitch gauge periodically to keep parts consistent. ✗ Forgetting to stuff as you go leads to lumps or under-filled sections; stuff small amounts frequently and shape as you fill to maintain smooth curves. ✗ Not counting increases and decreases precisely causes uneven shaping; tally the stitch counts after each increase/decrease round and compare to the pattern totals given. ✗ Closing the magic ring too tightly or too loosely will change the center shape; tighten the ring enough to close the hole but leave a small opening if you need to adjust stuffing before finishing. ✗ Leaving very short tails when fastening off makes sewing parts difficult; leave a longer tail for sewing placement, then weave in the end neatly after attaching.

Crab Memory Game Amigurumi Pattern

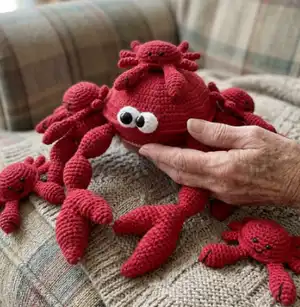
Make a lovable mother crab and TEN baby crabs with this clear, photo-supported amigurumi crochet pattern. You will find step-by-step rounds, stitch charts and finishing notes so you can create a full memory game set. The pattern uses standard US terminology and is beginner friendly while still offering satisfying assembly and finishing.

Beginner Friendly 12-15 Hours

Materials Needed for Crab Memory Game Amigurumi Pattern

— Main Fabric

  • 01
    5 ply 100% cotton yarn - Approx 10 g in Pink color (for mum bottom center)
  • 02
    4 ply 100% cotton yarn - Approx 250 g in Dark Red or Maroon (main color for mum and babies)
  • 03
    Assorted 5 different colors - Approx 2 yards each (for baby centers or accents)
  • 04
    Black and White scraps - Approx 5 g each for embroidered details and eyes backing

— Tools Required

  • 01
    Crochet hook size 3.00 mm
  • 02
    Crochet hook size 3.5 mm
  • 03
    Scissors
  • 04
    Stitch markers
  • 05
    Tapestry needle for sewing
  • 06
    Black safety eyes 15 mm (1 pair)
  • 07
    Black safety eyes 4 mm (10 pairs)
  • 08
    Fiber filling (polyester stuffing)
  • 09
    1 cm button
  • 10
    Pins for assembly (optional)

Progress Tracker

0% Complete

— Baby Crabs :

Bottom part of the body :

Make 10 in 5 different colors. (2 crabs from each color) Starting with any random color. Make 6 foundation chs. Work from the 2nd ch. 3.5 mm hook.

Round 1 :

1 sc inc. 3 sc.1 sc inc. Now work into the other side of the chs. 1 sc inc. 3 sc. 1 sc inc (14)

Round 2 :

2 sc inc. 3 sc. 4 sc inc. 3 sc. 2 sc inc (22)

Info :

Change the color into Dark Red

Round 3 :

22 sc (22)

Round 4 :

(1 sc, 1 sc inc)x11 (33)

Round 5 :

33 sc (33)

Info :

Fasten off.

Top part of the body :

Make 10 Dark red. Make 6 foundation chs. Work from the 2nd ch. 3.5 mm hook.

Round 1 :

1 sc inc. 3 sc.1 sc inc. Now work into the other side of the chs. 1 sc inc. 3 sc. 1 sc inc (14)

Round 2 :

2 sc inc. 3 sc. 4 sc inc. 3 sc. 2 sc inc (22)

Round 3 :

22 sc (22)

Round 4 :

(1 sc, 1 sc inc)x11 (33)

Round 5 to 7 :

33 sc (33)

Info :

Fasten off. Attach safety eyes (4mm) between rnd 4 and 5. 3 sts in between. Embroider the mouth with black color on rnd 6.

Let´s join top and bottom parts together :

Insert the hook into the st in the last rnd (from top part to bottom part) and attach the dark red yarn with a sl st. Work into both parts together. 1 sl st to every st. Before you complete the round fill inside.

Small legs :

Make 60 in Dark red. Work into a magic ring. 3.5 mm hook.

Round 1 :

5 sc into the magic ring (05)

Round 2 to 5 :

5 sc (05)

Info :

Fasten off. Leave the tail.

Large front legs :

Make 20 in Dark red. Work into a magic ring. 3.5 mm hook.

Round 1 :

6 sc into the magic ring (06)

Round 2 :

2 sc inc. 4 sc (08)

Round 3 :

8 sc (08)

Round 4 :

4 sc inc. 4 sc (12)

Round 5 to 7 :

12 sc (12)

Round 8 :

2 sc. 2 inv sc dec. 6 sc. (10)

Round 9 :

2 sc. 1 inv sc dec. 6 sc (09)

Round 10 :

1 inv sc dec. 1 sc. 1 inv sc dec. 4 sc (07)

Round 11 to 14 :

7 sc (07)

Info :

Fasten off. Leave the tail. Embroider V shape in the inner side of the leg.

Let´s join legs :

Join all legs into the bottom part of the body.

— Mum Crab :

Bottom :

Starting with 5 ply pink color yarn. Make a magic ring. ch 3. 3 mm hook.

Round 1 :

12 dc into the magic ring (Total 12 sts) Close the magic ring. Sl st to the top of the 1st dc.

Round 2 :

ch 3. 1 dc inc to every st. Sl st to the top of the 1st dc. (Total 24 sts)

Round 3 :

ch 3. *1 dc, 1 dc inc**. Rep from * to ** for another 11 times. Sl st to the top of the 1st dc. (Total 36 sts)

Round 4 :

ch 3. *2 dc, 1 dc inc**. Rep from * to ** for another 11 times. Sl st to the top of the 1st dc. (Total 48 sts)

Round 5 :

ch 3. *3 dc, 1 dc inc**. Rep from * to ** for another 11 times. Sl st to the top of the 1st dc. (Total 60 sts)

Round 6 :

ch 3. *4 dc, 1 dc inc**. Rep from * to ** for another 11 times. Sl st to the top of the 1st dc. (Total 72 sts)

Round 7 :

ch 3. *5 dc, 1 dc inc**. Rep from * to ** for another 11 times. Sl st to the top of the 1st dc. (Total 84 sts)

Info :

Change the yarn into 4 ply Dark red

Round 8 :

ch 3. *6 dc, 1 dc inc**. Rep from * to ** for another 11 times. Sl st to the top of the 1st dc. (Total 96 sts)

Round 9 :

ch 3. *7 dc, 1 dc inc**. Rep from * to ** for another 11 times. Sl st to the top of the 1st dc. (Total 108 sts)

Info :

Fasten off.

Top :

Starting with 4 ply Dark Red color yarn. Make a magic ring. ch 3. 3 mm hook.

Round 1 :

12 dc into the magic ring (Total 12 sts) Close the magic ring. Sl st to the top of the 1st dc.

Round 2 :

ch 3. 1 dc inc to every st. Sl st to the top of the 1st dc. (Total 24 sts)

Round 3 :

ch 3.*1 dc, 1 dc inc**. Rep from * to ** for another 11 times. Sl st to the top of the 1st dc. (Total 36 sts)

Round 4 :

ch 3.*2 dc, 1 dc inc**. Rep from * to ** for another 11 times. Sl st to the top of the 1st dc. (Total 48 sts)

Round 5 :

ch 3.*3 dc, 1 dc inc**. Rep from * to ** for another 11 times. Sl st to the top of the 1st dc. (Total 60 sts)

Round 6 :

ch 3.*4 dc, 1 dc inc**. Rep from * to ** for another 11 times. Sl st to the top of the 1st dc. (Total 72 sts)

Round 7 :

ch 3.*5 dc, 1 dc inc**. Rep from * to ** for another 11 times. Sl st to the top of the 1st dc. (Total 84 sts)

Round 8 :

ch 3.*6 dc, 1 dc inc**. Rep from * to ** for another 11 times. Sl st to the top of the 1st dc. (Total 96 sts)

Round 9 :

ch 3.*7 dc, 1 dc inc**. Rep from * to ** for another 11 times. Sl st to the top of the 1st dc. (Total 108 sts)

Info :

Fasten off.

Let´s join top and bottom parts together :

Insert the hook into the st in the last rnd (from top part to bottom part) and attach the dark red yarn with a sl st. ch 1. Work into both parts together. 1 sc to every st for next 81 st. Now work into the top part only. 13 sl st. ch 8. 14 sl st. Fasten off.

Small legs :

Make 6 in Dark red. Work into a magic ring. 3.5 mm hook.

Round 1 :

6 sc into the magic ring (06)

Round 2 :

6 sc (06)

Round 3 :

(1 sc , 1 sc inc)x3 (09)

Round 4 :

9 sc (09)

Round 5 :

(2 sc , 1 sc inc)x3 (12)

Round 6 and 7 :

12 sc (12)

Round 8 :

(2 sc , 1 inv sc dec)x3 (09)

Round 9 and 10 :

9 sc (09)

Round 11 :

(2 sc , 1 sc inc)x3 (12)

Round 12 :

(3 sc , 1 sc inc)x3 (15)

Round 13 :

(4 sc , 1 sc inc)x3 (18)

Round 14 to 16 :

18 sc (18)

Round 17 :

(4 sc , 1 inv sc dec)x3 (15)

Round 18 :

(3 sc , 1 inv sc dec)x3 (12)

Round 19 :

(2 sc , 1 inv sc dec)x3 (09)

Round 20 and 21 :

09 sc (09)

Info :

Rep again from rnd 11 to 21. Fasten off. Leave the tail.

Large front legs (Part A) :

Make 2 in Dark red. Work into a magic ring. 3.5 mm hook.

Round 1 :

6 sc into the magic ring (06)

Round 2 :

6 sc (06)

Round 3 :

3 sc inc. 3 sc (09)

Round 4 :

9 sc (09)

Round 5 :

3 sc. 3 sc inc. 3 sc (12)

Round 6 :

12 sc (12)

Round 7 :

4 sc. 4 sc inc. 4 sc (16)

Round 8 :

16 sc (16)

Info :

Fasten off.

Large front legs (Part B) :

Make 2 in Dark red. Work into a magic ring. 3.5 mm hook.

Round 1 :

6 sc into the magic ring (06)

Round 2 :

6 sc (06)

Round 3 :

3 sc inc. 3 sc (09)

Round 4 :

9 sc (09)

Round 5 :

3 sc. 3 sc inc. 3 sc (12)

Round 6 :

12 sc (12)

Round 7 :

4 sc. 4 sc inc. 4 sc (16)

Round 8 and 9 :

16 sc (16)

Round 10 :

6 sc. 4 sc inc. 6 sc. (20)

Round 11 :

20 sc (20)

Round 12 :

11 sc. Insert the hook into the part A. Make 16 sc around part A. Again Make 9 sc to the part B. (36)

Info :

Fasten off.

Round 13 :

(4 sc , 1 inv sc dec)x6 (30)

Round 14 :

(3 sc , 1 inv sc dec)x6 (24)

Round 15 :

2 inv sc dec. 16 sc. 2 inv sc dec (20)

Round 16 and 17 :

20 sc (20)

Round 18 :

2 inv sc dec. 12 sc. 2 inv sc dec (16)

Round 19 :

(2 sc , 1 inv sc dec)x4 (12)

Round 20 :

(2 sc , 1 inv sc dec)x3 (09)

Round 21 and 22 :

9 sc (09)

Round 23 :

(2 sc , 1 sc inc)x3 (12)

Round 24 :

(3 sc , 1 sc inc)x3 (15)

Round 25 :

(4 sc , 1 sc inc)x3 (18)

Round 26 to 28 :

18 sc (18)

Round 29 :

(4 sc , 1 inv sc dec)x3 (15)

Round 30 :

(3 sc , 1 inv sc dec)x3 (12)

Round 31 :

(2 sc , 1 inv sc dec)x3 (09)

Round 32 and 33 :

09 sc (09)

Info :

Rep rnd 23 to 33 one more time. Fasten off. Leave the tail.

Let´s join legs :

Join all legs into the bottom part of the body.

Eyes :

Make 2 in 4 ply White yarn. Work into a magic ring. 3.5 mm hook.

Round 1 :

6 sc into the magic ring (06)

Round 2 :

6 sc inc (12)

Round 3 to 5 :

12 sc (12)

Info :

Attach safety eyes (15mm) between rnd 3 and 4.

Round 6 :

6 inv sc dec (06)

Info :

Fasten off. Close the open. Attach on the top part.

Assembly Instructions

  • Join baby top and bottom: Insert hook into the stitch in the last round (from top part to bottom part) and attach dark red yarn with a slip stitch. Work into both parts together and slip stitch to every stitch; fill the body before completing the last round.
  • Attach baby safety eyes: Place 4 mm safety eyes between rounds 4 and 5 of the baby top with three stitches between them; embroider the mouth on round 6 using black yarn.
  • Join mum top and bottom: Insert hook into the stitch in the last round and attach dark red yarn with a slip stitch. Work 1 single crochet into every stitch for the next 81 stitches, then work the top edging as instructed (13 sl st, ch 8, 14 sl st) and fasten off.
  • Sew legs to the body: Position and sew each leg into the bottom part evenly spaced; pin parts first to ensure symmetry, then whipstitch securely and weave in ends.
  • Attach eyes to the mum crab: Make white eye pieces, secure 15 mm safety eyes between rounds 3 and 4, close and sew the eyes to the top part as pictured for a raised eye effect.
  • Sew decorations and button: Attach the 1 cm button to the bottom part as indicated in the photo to secure the opened top if used as a container; add embroidered details to claws using black yarn.

Important Notes

  • 💡Use stitch markers to mark the start of each round when working in continuous rounds to maintain stitch count and placement.
  • 💡Stuff pieces gradually while shaping; overstuffing or under-stuffing will affect the crab's final shape and the way legs sit.
  • 💡Attach safety eyes before closing the eye round and stuffing so the back washer sits flat against the inside of the piece.
  • 💡Keep tension consistent across all baby crabs to ensure uniform size for the memory game matching pairs.

Create a playful crab family with this crochet memory game and brighten up playtime with hand-stitched charm. The pattern gives you everything to make a mother crab and ten baby crabs that match in pairs. Make colorful centers for extra variety and enjoy gifting or keeping this adorable set. 🧶🦀✨

You ask,

we answer.

FAQs

What size will the finished pieces be?

Baby crabs measure approximately 3 inches for the body; the mother crab body diameter measures approximately 8.5 inches using the recommended yarn and hook sizes.

Can I use different yarn weights for this pattern?

Yes, you can substitute yarn weights but the finished sizes will change; choose an appropriate hook for your yarn and make one test crab to check proportions.

Do I need prior crochet experience for this pattern?

This pattern is beginner friendly, requiring only basic stitches (sc, dc, increases/decreases) and simple seaming; familiarity with magic ring and invisible decreases is helpful.

How long does this project typically take to complete?

Making the full mother crab and ten baby crabs is a multi-day project; expect around 12-15 hours total depending on your speed and how many pieces you make in one session.

Are safety eyes recommended for children’s toys?

Safety eyes are used in the pattern; for toys intended for small children or babies, consider embroidering eyes instead of using safety eyes to eliminate choking hazards.