🧢 Beautiful ✨ Detailed πŸ’ Adorable

Christmas Giftbox Cat Amigurumi Pattern

Christmas Giftbox Cat Amigurumi Pattern
4.6β˜… Rating
5-7 Hours Time Needed
1.5K Made This
βœ‚οΈ

Intermediate Level

Ideal for those with basic crochet experience, featuring slightly more advanced stitches and techniques to expand your skills.

⏱️

Weekend Treat

Takes 5-7 hours, making it an enjoyable project to finish over a couple of days.

🧸

Cute Companion

An adorable friend to cherish, handcrafted with love to bring comfort and joy for years to come.

About This Christmas Giftbox Cat Amigurumi Pattern

This pattern creates a tiny cat peeking out of a wrapped giftbox β€” perfect for holiday decorations or a thoughtful handmade gift. It combines amigurumi shaping for the head and limbs with simple flat crochet to create the box body and bow. The kit uses sport weight yarn and a 2.5mm hook for a compact, tidy finish. Photos and clear round-by-round instructions make assembly straightforward.

Christmas Giftbox Cat Amigurumi Pattern crochet pattern - detailed view of completed project

Swap colors easily to personalize your kitty and box, or scale the size with a different yarn weight for a larger or smaller version. The pattern includes placement notes for eyes, ears, and embroidery details to give your kitty personality.

Why You'll Love This Christmas Giftbox Cat Amigurumi Pattern

I absolutely love this pattern because it captures festive charm in a small, gift-ready amigurumi that finishes quickly. I enjoy how the box is made flat and then shaped, which makes construction neat and beginner-approachable for many stitches. The kitty head is simple but expressive, and I always find embroidering the face to be a calming, creative step. I love that you can customize colors and tiny details to create a whole family of festive kitties.

Christmas Giftbox Cat Amigurumi Pattern step 1 - construction progress Christmas Giftbox Cat Amigurumi Pattern step 2 - assembly progress Christmas Giftbox Cat Amigurumi Pattern step 3 - details and accessories Christmas Giftbox Cat Amigurumi Pattern step 4 - final assembly and finishing

Switch Things Up

I love how easy it is to customize this pattern by swapping colors; try pastel shades for a soft nursery decor version.

I sometimes use bulky yarn and a larger hook to create a chunky, huggable variant that doubles as a holiday pillow companion.

I often change eye style: try embroidered eyes for a completely handmade look or larger safety eyes for a cuter, more graphic face.

I add tiny accessories like a crocheted scarf or a mini tag sewn to the box to personalize gifts for friends and family.

I like to embroider different expressionsβ€”moving the nose and whisker placement gives each kitty unique personality.

I sometimes make a set of three in matching colorways to create a festive display for my mantlepiece or table centerpiece.

I recommend experimenting with metallic or sparkly yarn for the bow to add a holiday shimmer and extra charm.

I also tweak the box stripes by making them wider or narrower to create different visual styles and contrast with the kitty's color.

I sometimes leave the box top removable by stitching only partially and adding a small flap so the kitty can be 'tucked in' for play.

I suggest adding a loop at the top of the bow to turn this into an ornament for the treeβ€”just reduce stuffing slightly and sew a hanging loop securely.

Common Mistakes & How to Fix Them

βœ— Skipping stitch markers during rounds with many repeats can lead to confusion and miscounts; place a marker at the start of each round and move it as you progress to stay on track. βœ— Forgetting to switch yarn color exactly where the pattern indicates will create uneven stripes; when the pattern notes 'switch to red/pink yarn' change colors at the stitch specified and carry yarn neatly or fasten off. βœ— Understuffing the head or body causes limp shapes that do not hold form; add stuffing gradually, checking shape as you go, and stuff firmly but not overly tight to maintain soft roundness. βœ— Pulling stitches too tightly during decreases can distort the shape and close openings unevenly; use gentle even tension on DEC stitches and count stitches after decrease rounds to confirm correct count.

Christmas Giftbox Cat Amigurumi Pattern

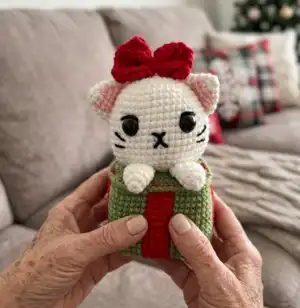
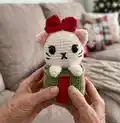
Make a charming Christmas Giftbox Cat to brighten your holidays. This adorable amigurumi combines a cute kitty head with a present-shaped body and a little bow for a festive touch. The pattern guides you through clear, picture-backed steps so you can assemble and finish with confidence. Perfect for gifting or seasonal decor, it uses sport weight yarn and small hooks for a neat finish.

Intermediate 5-7 Hours

Materials Needed for Christmas Giftbox Cat Amigurumi Pattern

β€” Main Fabric

  • 01
    Sport weight yarn (Fine 2) - main colors: white (head, ears), green (box body) - small amounts (approx 30-50g each)
  • 02
    Accent yarn: red (box stripe and bow) - small amount (approx 10-20g)
  • 03
    Accent yarn: pink (ear inner) - small amount (approx 5-10g)
  • 04
    Fiberfill stuffing - small bag for head and body
  • 05
    Optional small amount of black yarn for facial embroidery

β€” Tools Required

  • 01
    Crochet hook size 2.5mm (C)
  • 02
    Stitch marker
  • 03
    Sewing needle (tapestry/yarn needle)
  • 04
    Scissors
  • 05
    Hot glue or fabric glue (to secure bow)
  • 06
    Polyester stuffing (fiberfill)
  • 07
    Safety eyes 8mm (2 pieces) or preferred size
  • 08
    Pins for assembly (optional)

Progress Tracker

0% Complete

β€” Head :

Round 1 :

Row 1: 8 SC in an MR (8)

Round 2 :

Row 2: 8 INC (16)

Round 3 :

Row 3: (SC, INC) 8 times (24)

Round 4 :

Row 4: (2 SC, INC) 8 times (32)

Round 5 :

Row 5: 32 SC (32)

Round 6 :

Row 6: (7 SC, INC) 4 times (36)

Round 7 :

Row 7: (5 SC, INC) 6 times (42)

Round 8 :

Row 8: (6 SC, INC) 6 times (48)

Round 9-17 :

Row 9-17: 48 SC (48)

Round 18 :

Row 18: (4 SC, DEC) 8 times (40)

Round 19 :

Row 19: (3 SC, DEC) 8 times (32)

Round 20 :

Row 20: (2 SC, DEC) 8 times (24)

Round 21 :

Row 21: (SC, DEC) 8 times (16)

Round 22 :

Row 22: (SC, DEC) 5 times, SC (11)

Round 23 :

Row 23: 5 DEC, SC (6)

Info :

Cut the yarn, leaving a long tail for sewing. *Stuffing*

β€” Ears (MAKE 2) :

Info :

Begin with White Yarn. *When the text is pink, switch to pink yarn*

Round 1 :

Row 1: 6 SC in an MR (6)

Round 2 :

Row 2: (SC, INC) 3 times (9)

Round 3 :

Row 3: 2 SC, INC, 2 SC, INC, 2 SC, INC (12)

Round 4 :

Row 4: 3 SC, INC, 3 SC, INC, 3 SC, INC (15)

Round 5 :

Row 5: 4 SC, INC, 4 SC, INC, 4 SC, INC (18)

Info :

Cut the yarn, leaving a long tail for sewing.

β€” Bow :

Round 1 :

Row 1: 12 ch, start in the 3rd chain from the hook: 10 DC, turn (10)

Round 2-5 :

Row 2-5: 2 Ch, 10 DC, turn (10)

Info :

Cut the yarn. Create a bow shape.

β€” Body :

Info :

*When the text is red, switch to red yarn*

Round 1 :

Row 1: 8 SC in an MR (8)

Round 2 :

Row 2: (3 SC in one st, SC) 4 times (16)

Round 3 :

Row 3: (SC, 3 SC in one st, 2 SC) 4 times (24)

Round 4 :

Row 4: (2 SC, 3 SC in one st, 3 SC) 4 times (32)

Round 5 :

Row 5: (3 SC, 3 SC in one st, 4 SC) 4 times (40)

Round 6 :

Row 6: (4 SC, 3 SC in one st, 5 SC) 4 times (48)

Round 7 :

Row 7: (5 SC, 3 SC in one st, 6 SC) 4 times (56)

Round 8 :

Row 8: (6 SC, 3 SC in one st, 7 SC) 4 times (64)

Round 9 :

Row 9: BLO, 2 SC, (11 SC, 5 SC) 3 times, 11 SC, 3 SC (64)

Round 10-21 :

Row 10-21: 2 SC, (11 SC, 5 SC) 3 times, 11 SC, 3 SC (64)

Round 22 :

Row 22: BLO, 5 SC, 2 DEC, (12 SC, 2 DEC) 3 times, 7 SC (56)

Round 23 :

Row 23: 4 SC, 2 DEC, (10 SC, 2 DEC) 3 times, 6 SC (48)

Round 24 :

Row 24: 3 SC, 2 DEC, (8 SC, 2 DEC) 3 times, 5 SC (40)

Round 25 :

Row 25: 2 SC, 2 DEC, (6 SC, 2 DEC) 3 times, 4 SC (32)

Info :

*Stuffing*

Round 26 :

Row 26: SC, 2 DEC, (4 SC, 2 DEC) 3 times, 3 SC (24)

Round 27 :

Row 27: 2 DEC, (2 SC, 2 DEC) 3 times, 2 SC (16)

Round 28 :

Row 28: 8 DEC (8)

Info :

Cut the yarn.

β€” Arms (MAKE 2) :

Round 1 :

Row 1: 6 SC in an MR (6)

Round 2 :

Row 2: (SC, INC) 3 times (9)

Round 3-7 :

Row 3-7: 9 SC (15)

Info :

Cut the yarn, leaving a long tail for sewing.

β€” Assembly :

Item :

Sew the ears onto the head: from row 4 to row 10.

Item :

Attach the eyes between rows 9 and 10, with 9 stitches between them.

Item :

Use black yarn to embroider the nose, eyelids, and beard.

Item :

Use yellow yarn to embroider the eyebrows.

Item :

Secure the bow on the head with glue.

Item :

Sew the head onto the body.

Item :

Attach the arms (without sewing through row 21).

Item :

Crochet slip stitches into row 21 to secure and finish the top edge.

Assembly Instructions

  • Sew the ears onto the head aligning them between head rounds 4 and 10, securing with matching yarn and hiding knots inside.
  • Attach the eyes between body/head rounds 9 and 10 of the head with 9 stitches between them, then secure safety eyes and add backing washers.
  • Sew the head onto the body by matching the neck opening to the top of the box body and whipstitching evenly around to attach.
  • Position and sew the arms to the body sides without sewing through row 21, then reinforce with small stitches to secure placement.
  • Embroider the nose, eyelids, beard with black yarn and the eyebrows with yellow yarn using a yarn needle for clean lines.
  • Secure the bow on top of the head using hot glue for a neat finish and press firmly until set.

Important Notes

  • πŸ’‘Use stitch markers to keep track of the beginning of each round, especially during increases and decreases for even shaping.
  • πŸ’‘Switch to red or pink yarn precisely where the pattern indicates to maintain clean color blocks on the box and ears.
  • πŸ’‘Stuff the head and body gradually and evenly for a smooth shape; overstuffing can distort the amigurumi's proportions.
  • πŸ’‘Leave long tails when cutting yarn for pieces you will sew on later, so you have enough yarn to attach pieces securely.

Congratulations on making your Christmas Giftbox Cat β€” what a sweet and festive creation! This little kitty brings holiday smiles and makes a perfect handmade gift or shelf decoration. Finish with care, personalize colors, and enjoy the cozy feeling of gifting something made by hand. 🧢🎁

You ask,

we answer.

FAQs

What size will the finished piece be?

The finished amigurumi measures approximately 10-12 cm tall when using sport weight yarn and a 2.5mm hook, depending on stuffing and tension.

Can I use different yarn weights for this pattern?

Yes, but changing yarn weight will affect final size; use an appropriate hook for your chosen yarn and adjust eye size and stuffing accordingly.

Do I need prior crochet experience for this pattern?

This pattern is rated intermediate and assumes familiarity with single crochet, increases, decreases, magic ring, and simple embroidery.

How long does this project typically take to complete?

Most crocheters complete this project in 5-7 hours, though time may vary based on experience level and working pace.