🧢 Beautiful ✨ Detailed πŸ’ Adorable

Reversible Octo Mood Hat Amigurumi Pattern

Reversible Octo Mood Hat Amigurumi Pattern
4.7β˜… Rating
5-7 Hours Time Needed
2.2K Made This
βœ‚οΈ

Intermediate Level

Ideal for those with basic crochet experience, featuring slightly more advanced stitches and techniques to expand your skills.

⏱️

Weekend Treat

Takes 5-7 hours, making it an enjoyable project to finish over a couple of days.

🧣

Snug Essential

Everyday comfort with practical charm, designed for both functionality and style through changing seasons.

About This Reversible Octo Mood Hat Amigurumi Pattern

This pattern creates a reversible octopus mood hat β€” two hat crowns joined together so you can flip between contrasting colours and facial expressions. It features a top-down worked hat base, a ruffled brim, and embroidered face details for personality. The construction is designed to be NO SEW except for the face embroidery, making assembly quick and tidy.
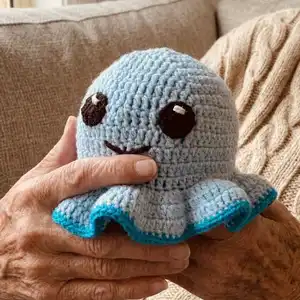
Reversible Octo Mood Hat Amigurumi Pattern crochet pattern - detailed view of completed project

You will make two matching hat bases in contrasting colours and join their brims with a third colour. The pattern uses US crochet terms and works in separate rows for a clean reversible finish.

Why You'll Love This Reversible Octo Mood Hat Amigurumi Pattern

I absolutely love this pattern because it combines simple shaping with playful character design, giving you two hats in one. I enjoy the versatility of creating different moods by changing eye placement and mouth embroidery. The reversible construction is clever and practical β€” you get contrasting looks without complicated sewing. Making the ruffled brim is such a satisfying moment when the hat transforms into a cute octopus shape. I also love how quick it is to crochet and how addicting customizing colours becomes.

Reversible Octo Mood Hat Amigurumi Pattern step 1 - construction progress Reversible Octo Mood Hat Amigurumi Pattern step 2 - assembly progress Reversible Octo Mood Hat Amigurumi Pattern step 3 - details and accessories Reversible Octo Mood Hat Amigurumi Pattern step 4 - final assembly and finishing

Switch Things Up

I love how easy it is to customize this pattern by changing colours β€” try pastel shades for a softer, more whimsical octo, or bold contrasting colours for a high-impact look.

You can make a mini keychain version by using fingering weight yarn and a smaller hook for tiny reversible octos.

I often swap the brim colour for a metallic or variegated yarn to add a subtle shimmer and fun edge detail.

Want a kids size? Simply eliminate the increase rows between rounds 6-8 and check the fit as you go.

I like to embroider eyelashes or freckles to give each hat its own personality and character beyond just mouth and pupils.

For a more durable option, stitch the eyes with felt circles glued and stitched on instead of crocheted pupils for a cleaner finish.

I sometimes add a small pom or crochet tentacle accents at the crown for a playful twist that stands out when worn.

If you prefer a reversible brim that is less ruffled, work fewer increases in rounds 14-16 to reduce the flare.

I recommend experimenting with different stitch textures β€” try hdc or a shell stitch for the brim to change the drape and look.

Don’t be afraid to mix fibres β€” a cotton blend will make a lighter summer hat while acrylic gives a squishy, warm finish perfect for winter.

I also sometimes embroider tiny accessories like bows or stitches to create themed hats for holidays or gifts.

Common Mistakes & How to Fix Them

βœ— Skipping stitch markers when joining the brims will make alignment difficult; place a stitch marker to keep facial details and brim stitches matched before joining. βœ— Starting rows without remembering that ch2 counts as first stitch can throw off your stitch count; always use ch2 as the first dc and count it as your first stitch. βœ— Working with inconsistent tension causes uneven ruffles and brim shape; keep a medium to tight tension throughout and practice on a swatch if needed. βœ— Forgetting to assemble face details before joining the hats can make placement tricky; complete and baste the embroidered eyes and mouth before joining the two hat bases. βœ— Pulling embroidery stitches too tight will pucker the hat fabric; use moderate tension when embroidering pupils and mouth and secure ends neatly inside the hat.
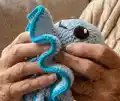
Reversible Octo Mood Hat Amigurumi Pattern

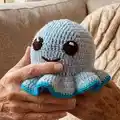
Make a playful reversible octopus mood hat that flips between two faces and colours. This pattern guides you through creating two matching hat bases, adding embroidered facial details, and joining them to make a no-sew reversible brim. Youll love mixing colours to create moods β€” happy, grumpy, or anything in between. Perfect as a fun wearable for kids and adults who love cute, expressive accessories.

Intermediate 5-7 Hours

Materials Needed for Reversible Octo Mood Hat Amigurumi Pattern

β€” Main Fabric

  • 01
    8 ply / worsted weight yarn (Australian Marvel 8ply acrylic recommended) - main colour for Hat A
  • 02
    8 ply / worsted weight yarn (contrasting colour) - main colour for Hat B
  • 03
    8 ply / worsted weight yarn - third colour for brim edge and joining (small amount)
  • 04
    Black yarn for face details and pupils (small amount)
  • 05
    White yarn for eye highlights (small amount)

β€” Tools Required

  • 01
    Crochet hook size 4.0mm
  • 02
    Darning needle / yarn needle for sewing and weaving ends
  • 03
    Stitch markers
  • 04
    Scissors
  • 05
    Pins for assembly (optional)

Progress Tracker

0% Complete

β€” Skills :

Infos :

You will need a basic understanding of crochet and intermediate embroidery skills. This is a minimal sewing project – all construction of the reversible hat is NO SEW and you can leave all your ends inside the two hats... only sewing is face embroidery. This is a pattern only – not a tutorial.

β€” Materials :

Infos :

8 ply/worsted weight yarn – I use (Australian) Marvel 8ply acrylic in these images. You will want 2 contrasting colours for the hats as well as a 3rd matching colour for the brim edge. Black and white yarn for face details. 4mm crochet hook. Darning needle.

β€” Notes :

Infos :

Hat is worked from the top down working in separate rows. Each row starts with ch2 which counts as your first stitch Eg. (inc, 2dc) = chain 2, dc into the same space, 1dc into the next 2 spaces. This is an adult sized hat – smaller sizes can be achieved by eliminating increase rows between row 6-8. This pattern is in US crochet terms. Use medium to tight tension.

β€” Abbreviations :

Infos :

dc – double crochet. hdc – half double crochet. sl st – slip stitch. ch – chain. mc – magic circle. inc – increase (2 dc into the same stitch). (26) – number of stitches in the row. (inc, dc x 4) x Z – repeat pattern in brackets Z times. Flo – front loop only (work into the front loop of the stitch).

β€” Hat Base :

Info :

HAT BASE – Make x2 in contrasting colours - Sl st into end of each row - Each row starts with ch2 which counts as your first dc stitch

Round 1 :

Mc dc 12 (12)

Round 2 :

2 dc into each st (24)

Round 3 :

(2 dc into first stitch, 2 dc) x 8 (32)

Round 4 :

(2 dc into first st, 3 dc) x 8 (40)

Round 5 :

(2 dc into first st, 4 dc) x 8 (48)

Round 6 :

(2 dc into first st, 5 dc) x 8 (56)

Round 7 :

(2 dc into first st, 6 dc) x 8 (64)

Round 8 :

(2 dc into first st, 7 dc) x 8 (72)

Round 9 :

dc around (72)

Round 10-13 :

dc around (72)

Round 14 :

working in flo, 2 x dc in each st (144)

Round 15 :

(2 dc in first st, 1 dc) x 72 (216)

Round 16 :

(2 dc in first st, 7 dc) x 27 (243)

Round 17 :

sew in tail

β€” Face Details :

Info :

Make sure to do this before joining the two hat bases together

Eyes (P1) :

mc(dc) x 12 leaving a long tail for stitching on. Contrast colour embroider pupil – double strand stitch twice. Stitch on eyes and embroider mouth – see images for placement.

Infos :

Happy face = eye pupils pointing up and smiley mouth. Grumpy face = eye pupils facing down and frowny mouth.

β€” Joining hats to make reversible :

Infos :

Tie the tails from the crown of each hat together with a triple knot, insides touching. Place stitch marker to join the brims of each hat making sure face details are in line. Using your third chosen colour HDC both brim edges together working through both stitches on each hat base (see photos). HDC in each st all the way around, sl st into first hdc and sew in tail. Shape the completed hat by shoving that beauty on your head and making sure everything is in line!

Assembly Instructions

  • Tie the tails from the crown of each hat together with a triple knot, insides touching, so the crowns are aligned before joining brims.
  • Place a stitch marker to join the brims of each hat, making sure face details line up symmetrically on both sides before you start joining.
  • Using your third chosen colour, HDC through both brim edges together working through both stitches on each hat base, joining the two hats into one reversible piece.
  • Work HDC in each stitch all the way around the brim, then sl st into the first HDC and sew in the tail securely.
  • Sew on the eyes and embroider the mouth before final joining for the cleanest placement; weave in ends inside the hat so both sides are tidy.

Important Notes

  • πŸ’‘Use stitch markers to keep track of your rounds and to align the two hat brims when joining.
  • πŸ’‘Each row starts with ch2 and that ch2 counts as your first dc stitch β€” remember to count it.
  • πŸ’‘Work with medium to tight tension for best shape and ruffle definition on the brim.
  • πŸ’‘Complete face embroidery before joining the hat bases so placement is accurate and sewing is minimal.

Thanks for making the Reversible Octo Mood Hat β€” a playful, wearable character that flips between two moods and colours. Try different colour combos and expressions to create unique personalities for every hat. Share your creations and tag me on Instagram and TikTok β€” I love seeing your versions! 🧢✨

You ask,

we answer.

FAQs

What size will the finished piece be?

The finished adult-sized hat measures approximately to fit an average adult head when using worsted weight yarn and a 4mm hook; adjustments can be made by skipping increase rows for smaller sizes.

Can I use different yarn weights for this pattern?

Yes, you can change yarn weight, but your finished size will vary; use an appropriate hook for the yarn and make a tension swatch to estimate size changes.

Do I need prior crochet experience for this pattern?

This pattern is rated intermediate and assumes familiarity with double crochet, increases, working in the front loop only, and basic embroidery for facial details.

How long does this project typically take to complete?

Most crocheters finish this reversible hat in about 5-7 hours, depending on experience and how much time you spend on embroidery and finishing.

Is sewing required to join the hats?

Construction is primarily NO SEW; the two crowns are joined by crocheting HDC through both brim edges, with only the face embroidery requiring a needle and thread.