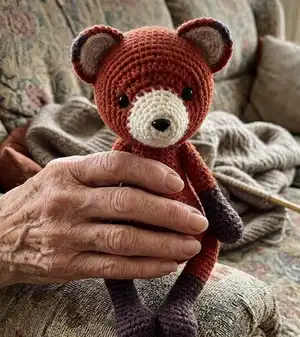
🧢 Beautiful ✨ Detailed πŸ’ Adorable

Red Fox Amigurumi Pattern

Red Fox Amigurumi Pattern
4.4β˜… Rating
5-7 Hours Time Needed
1.2K Made This
βœ‚οΈ

Intermediate Level

Ideal for those with basic crochet experience, featuring slightly more advanced stitches and techniques to expand your skills.

⏱️

Weekend Treat

Takes 5-7 hours, making it an enjoyable project to finish over a couple of days.

πŸ₯

Charming Critter

Delightful animal designs with sweet details that capture the essence of your favorite woodland and farmyard friends.

About This Red Fox Amigurumi Pattern

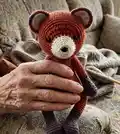
This pattern creates an adorable red fox amigurumi with contrast paws, snout and ear details. You will crochet the head, body, arms, legs and tail in rounds and then assemble them with clear photo guidance. The pattern uses DK weight yarn and small hooks to achieve a neat, dense fabric for stuffing and shaping.

Red Fox Amigurumi Pattern crochet pattern - detailed view of completed project

Includes complete round-by-round instructions, materials list and assembly tips. Ideal as a mindful weekend project for intermediate crocheters.

Why You'll Love This Red Fox Amigurumi Pattern

I absolutely love this pattern because it captures the sweet personality of a little fox while staying compact and manageable. I designed the color changes to add characterβ€”tiny white snout and inner ears make such a difference. I enjoy the shaping techniques used on the head and body; they give a lovely rounded, professional finish. As the designer, I also love the way small contrasting paws and a chunky tail transform the toy into a cherished keepsake.

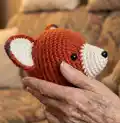
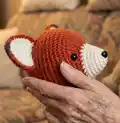
Red Fox Amigurumi Pattern step 1 - construction progress Red Fox Amigurumi Pattern step 2 - assembly progress Red Fox Amigurumi Pattern step 3 - details and accessories Red Fox Amigurumi Pattern step 4 - final assembly and finishing

Switch Things Up

I love how easy it is to customize this fox by changing yarn colors; try a pale grey and cream palette for a soft nursery friend or a deep auburn for a lifelike look.

I often switch yarn weight and hook size to make different sizes: use a bulkier yarn and a larger hook for a chunky, huggable fox, or use fingering weight for tiny keychain versions.

I like adding embroidered eyebrows and mouth details to change facial expressions; a slightly higher or lower eye placement can make the fox look curious or sleepy.

Try crocheting different paw colors or add tiny crocheted boots or a scarf for seasonal variations; a small felt heart sewn to the belly makes a sweet gift.

You can substitute safety eyes with French knots or embroidered eyes for a baby-safe toy; felt noses work well if you prefer not to use a plastic safety nose.

I suggest experimenting with stuffing levels to alter posture: firmer stuffing gives a more upright plush, while softer stuffing makes a floppy, cuddly friend.

Consider adding wire in the limbs if you want posable arms and legs; just remember to cover wire ends securely and use safe materials if the toy is for children.

I also like making a family set: small, medium and large foxes in matching colorways for a coordinated nursery display.

For texture, try a fluffier yarn for the tail tip only, or use boucle yarn for a vintage, fuzzy look on the body while keeping face details in smooth yarn.

Finally, personalize yours by sewing on tiny name tags, buttons or crocheted accessoriesβ€”these small touches make each fox truly one-of-a-kind.

Common Mistakes & How to Fix Them

βœ— Skipping stitch markers while working in spiral rounds leads to losing the beginning of the round; place a marker at the start of every round and move it up after completing each round. βœ— Forgetting to stuff gradually causes lumpy or uneven shaping; add small amounts of fiberfill after every few rounds and shape as you go for smooth results. βœ— Changing yarns by tying ends together creates bulky joins that show; pick up the new yarn at the stitch and leave short tails to weave in later for a clean finish. βœ— Not checking safety eye placement before fixing them can ruin the face symmetry; place and check eye positions between specified rounds (between rounds 9 and 10) before pushing washers on. βœ— Pulling yarn too tightly when finishing an opening can distort the shape; use even tension and tuck tails inside, using mattress or whip stitch to close neatly. βœ— Neglecting to secure doll joints or buttons firmly will cause loose limbs over time; use strong thread, double or triple the sewing thread, or use plastic doll joints locked correctly.

Red Fox Amigurumi Pattern

Make a charming handcrafted red fox amigurumi with clear step-by-step instructions. You will work in spiral rounds, change yarn colors for details, and assemble the pieces for a delightful stuffed friend. This intermediate pattern includes materials, stitch abbreviations, and helpful photos to guide you through every stage. Perfect for gifting or adding a sweet woodland companion to your collection.

Intermediate 5-7 Hours

Materials Needed for Red Fox Amigurumi Pattern

β€” Main Fabric

  • 01
    DROPS 'Lima' DK weight alpaca and wool blend, 100 m = 50 g (109 yd = 50 g) / 8 ply / 11 wpi / 3: light
  • 02
    Color A: Orange (0707 rust) - approx. 75 g
  • 03
    Color B: Brown (5610 deep taupe) - approx. 15 g
  • 04
    Color C: White (0100 off white) - approx. 15 g
  • 05
    Small amounts of contrast colors for ear tip detailing

β€” Tools Required

  • 01
    Crochet hook size 2.50 mm (or according to yarn tension)
  • 02
    Crochet hook size 2.50 - 3.00 mm (US 2/C - 3/D) as alternative
  • 03
    Polyester fiberfill, wool, wadding for stuffing
  • 04
    9 mm (3/8") safety eyes (2 pcs)
  • 05
    12 mm (1/2") safety nose or buttons/beads/felt for nose
  • 06
    Two 20 mm (4/5") and two 15 mm (3/5") doll joints or safety eyes/buttons and thread
  • 07
    Yarn needle for sewing
  • 08
    Scissors
  • 09
    Stitch marker
  • 10
    Pins for assembly (optional)

Progress Tracker

0% Complete

β€” Head :

Round 1 :

mr, sc 6 (6)

Round 2 :

inc x 6 (12)

Round 3 :

(sc3, inc) x 3 (15)

Round 4 :

sc in each st (15)

Round 5 :

(inc, sc 2) x 5 (20)

Round 6 :

sc in each st (20)

Round 7 :

(sc 3, inc) x 5 (25)

Info :

With white yarn: complete rounds 1-7 above. Then change to orange yarn for the next rounds.

Round 8 :

sc in each st (25)

Round 9 :

(inc, sc) x 3, hdc, hdc-inc x 8, hdc, (sc, inc) x 4, sc (40)

Round 10 :

sc 11, hdc, (hdc-inc, hdc) x 7, sc 14 (47)

Round 11 :

sc 8, inc, (sc 6, inc) x 4, sc 10 (52)

Round 12 :

sc 22, inc, sc 5, inc, sc 23 (54)

Round 13 :

sc, inc, sc 49, inc, sc 2 (56)

Info :

Attach safety eyes between rounds 9 and 10, leaving 13 stitches (count 12 holes) between them, and the nose between the first two rounds (see page 7).

Round 14-21 :

sc in each st (56)

Round 22 :

sc 5, dec, (sc 12, dec) x 3, sc 7 (52)

Round 23 :

(sc 11, dec) x 4 (48)

Round 24 :

sc 4, dec, (sc 10, dec) x 3, sc 6 (44)

Round 25 :

(sc 9, dec) x 4 (40)

Round 26 :

sc 3, dec, (sc 8, dec) x 3, sc 5 (36)

Info :

Start stuffing the head. Keep adding a bit of fiberfill after every few rounds, stuffing the head firmly.

Round 27 :

(sc 7, dec) x 4 (32)

Round 28 :

sc 2, dec, (sc 6, dec) x 3, sc 4 (28)

Round 29 :

(sc 5, dec) x 4 (24)

Round 30 :

(dec, sc 2) x 6 (18)

Round 31 :

(sc, dec) x 6 (12)

Round 32 :

dec x 6 (6)

Info :

Finish stuffing. Cut the yarn, leaving a long yarn tail, fasten off and close the opening (see page 7).

β€” EARS (make 2) :

Round 1 :

mr, sc 6 (6)

Round 2 :

(sc, inc3) x 3 (12)

Round 3 :

sc 2, inc3, (sc 3, inc3) x 2, sc (18)

Round 4 :

sc 3, inc3, (sc 5, inc3) x 2, sc 2 (24)

Info :

Sl st in next stitch and fasten off. Align a white and orange piece, wrong sides facing. Crochet over the edge with single crochet stitches, inserting the hook through both layers.

Info :

When you change yarns on row 5, do not tie the yarn ends together, just pick up the yarn, leaving a short tail. Locate the middle stitch of the first inc3 and attach the orange yarn with sl st.

Round 5 :

sc 7, switch to brown yarn, sc, inc3, sc, switch to orange yarn, sc 6, sc + sl st

Info :

Cut the yarn, leaving a long yarn tail for sewing, and fasten off. Bring all other yarn tails to the wrong side and knot them together inside the ear.

β€” LEFT ARM :

Round 1 :

mr, sc 6 (6)

Round 2 :

(inc3 x 2, sc) x 2 (14)

Round 3-5 :

sc in each st (14)

Round 6 :

sc 3, inc, sc 5, dec x 2, sc 3 (13)

Round 7 :

sc 2, dec, sc 5, inc, sc 3 (13)

Round 8 :

sc 10, dec, sc (12)

Info :

Stuff the hands firmly. Keep adding a bit of fiberfill after every few rounds, stuffing the arms firmly.

Round 9 :

sc, dec, sc 9 (11)

Round 10 :

sc, dec, sc 8 (10)

Round 11 :

sc in each st (10)

With orange yarn :

Rounds 12-22: sc in each st (10)

Round 23 :

sc 6, dec x 2 (8)

Info :

Attach the disk with a stem between rows 20 and 21, placing it so the stem is facing straight towards the body.

Round 24 :

dec x 3, leave rest of the sts unworked (5)

Info :

Finish stuffing. Cut the yarn, leaving a long yarn tail, fasten off and close the opening (see page 7).

β€” RIGHT ARM :

Round 1 :

mr, sc 6 (6)

Round 2 :

(inc3 x 2, sc) x 2 (14)

Round 3-5 :

sc in each st (14)

Round 6 :

sc 2, dec x 2, sc 5, inc, sc 2 (13)

Round 7 :

sc 2, dec, sc 5, inc, sc 3 (13)

Round 8 :

sc 2, dec, sc 9 (12)

Info :

Stuff the hands firmly. Keep adding a bit of fiberfill after every few rounds, stuffing the arms firmly.

Round 9 :

sc, dec, sc 9 (11)

Round 10 :

sc, dec, sc 8 (10)

Round 11 :

sc in each st (10)

With orange yarn :

Rounds 12-22: sc in each st (10)

Round 23 :

sc 6, dec x 2 (8)

Info :

Attach the disk with a stem between rows 20 and 21, placing it so the stem is facing straight towards the body.

Round 24 :

dec, sc 6, dec, sc 3 (11)

Round 25 :

sc, dec x 5 (6)

Info :

Finish stuffing. Cut the yarn, leaving a long yarn tail, fasten off and close the opening (see page 7).

β€” BODY :

Round 1 :

mr, sc 6 (6)

Round 2 :

inc x 6 (12)

Round 3 :

(sc, inc) x 6 (18)

Round 4 :

(inc, sc 2) x 6 (24)

Round 5 :

(sc 3, inc) x 6 (30)

Round 6 :

sc, inc, (sc 4, inc) x 5, sc 3 (36)

Round 7 :

sc 3, inc, (sc 8, inc) x 3, sc 5 (40)

Round 8 :

(sc 9, inc) x 4 (44)

Round 9-16 :

sc in each st (44)

Info :

Turn the body so the end of the round is at the center of the back. Attach the legs to the sides of the body, between rounds 9 and 10 (see page 10).

Round 17 :

(sc 9, dec) x 4 (40)

Round 18 :

sc 3, dec, (sc 8, dec) x 3, sc 5 (36)

Round 19 :

(sc 7, dec) x 4 (32)

Round 20 :

sc in each st (32)

Round 21 :

(dec, sc 14) x 2 (30)

Info :

Start stuffing the body. Keep adding a bit of fiberfill after every few rounds, stuffing the body firmly.

Round 22 :

sc in each st (30)

Round 23 :

sc 12, dec, sc 4, dec, sc 10 (28)

Round 24 :

sc in each st (28)

Round 25 :

(dec, sc 5) x 4 (24)

Round 26 :

sc in each st (24)

Round 27 :

sc 9, dec, sc 4, dec, sc 7 (22)

Round 28 :

sc in each st (22)

Round 29 :

sc 5, dec, sc 9, dec, sc 4 (20)

Round 30-31 :

sc in each st (20)

Round 32 :

sc 5, leave rest of the sts unworked (20)

Info :

Sl st in next stitch. Cut the yarn, leaving a long yarn tail for sewing, and fasten off. Finish stuffing the tail if attached here. Attach the arms to the sides of the body between rounds 27 and 28 (see page 10). Finish stuffing the body.

β€” LEGS (make 2) :

Round 1 :

mr, sc 6 (6)

Round 2 :

inc x 6 (12)

Round 3 :

(sc, inc) x 6 (18)

Round 4 :

(sc 3, inc, sc 4, inc) x 2 (22)

Round 5 :

sc in each st (22)

Round 6 :

sc 7, dec, sc 2, dec, sc 9 (20)

Round 7 :

sc 5, dec, (sc, dec) x 2, sc 7 (17)

Round 8 :

sc 5, dec, sc 2, dec, sc 6 (15)

Round 9 :

sc 6, dec, sc 7 (14)

Info :

Stuff the feet firmly. Keep adding a bit of fiberfill after every few rounds, stuffing the legs firmly.

Round 10 :

sc in each st (14)

Round 11 :

sc 6, dec, sc 6 (13)

Round 12-16 :

sc in each st (13)

With orange yarn :

Rounds 17-26: sc in each st (13)

Info :

On the left leg only, sc in next 6 sts. Count the last sc as the end of the round from now on. Attach the disk with a stem between rounds 25 and 26, placing it so the stem is facing straight towards the body.

Round 27 :

dec, sc 6, dec, sc 3 (11)

Round 28 :

sc, dec x 5 (6)

Info :

Finish stuffing. Cut the yarn, leaving a long yarn tail, fasten off and close the opening (see page 7).

β€” TAIL :

Round 1 :

mr, 6 (6)

Round 2 :

(sc, inc) x 3 (9)

Round 3 :

(inc, sc 2) x 3 (12)

Round 4 :

(sc 2, inc) x 4 (16)

Round 5 :

sc, inc, (sc 3, inc) x 3, sc 2 (20)

With orange yarn :

Rounds 6-9: sc in each st (20)

Round 10 :

(dec, sc 8) x 2 (18)

Info :

Start stuffing the tail. Keep adding a bit of fiberfill after every few rounds, stuffing the tail firmly.

Round 11 :

sc in each st (18)

Round 12 :

sc 4, dec, sc 7, dec, sc 3 (16)

Round 13 :

sc in each st (16)

Round 14 :

sc 7, dec, sc 7 (15)

Round 15 :

sc in each st (15)

Round 16 :

sc 7, dec, sc 6 (14)

Round 17-18 :

sc in each st (14)

Round 19 :

sc 7, dec, sc 5 (13)

Round 20-21 :

sc in each st (13)

Round 22 :

sc 7, dec, sc 4 (12)

Info :

Finish stuffing the tail and close the opening when instructed. Sew tail to the body as directed in assembly (place the tail just above round 8 of the body).

β€” Assembly & Finishing :

Infos :

Sew the ears to the head before sewing the head to the body to fasten yarn tails securely. Place safety eyes between rounds 9 and 10, leaving 13 stitches between them. Use photo guidance for shaping the head and inserting safety washers.

Item Name (P1) :

Attach head to body: place front edge of head just behind round 13 of the head and sew securely; add extra stuffing before closing seam (see pages 14-15 for sewing instructions).

Item Name (P2) :

Attach legs to either side of the body between rounds 9 and 10. Attach arms to the body between rounds 27 and 28. Place the tail above round 8 of the body and sew in place. Use strong thread or doll joints for secure attachment.

Assembly Instructions

  • Sew the ears to the head, inserting the needle through both layers, aligning each ear just behind round 17 of the head and leaving 7–8 stitches between them.
  • Attach the head to the body so the front edge of the head sits just behind round 13; sew around the seam, adding extra stuffing before closing and securing yarn tails with a knot under the head.
  • Attach the legs to the sides of the body between rounds 9 and 10, spacing them symmetrically so the fox sits evenly.
  • Attach the arms to either side of the body between rounds 27 and 28, angling them slightly forward for a natural pose, and sew securely.
  • Place the tail just above round 8 of the body and sew it to the body using small tight stitches so it sits flush and is well secured.

Important Notes

  • πŸ’‘Work in a continuous spiral; do not join rounds or turn your work unless instructed otherwise in the pattern.
  • πŸ’‘Use a stitch marker or a piece of yarn to mark the end or the beginning of a round and move the marker up after completing each round.
  • πŸ’‘Work all stitches in both loops unless instructed otherwise in the pattern.
  • πŸ’‘When changing yarns, do not tie yarn ends together; pick up the new yarn leaving a short tail and weave in ends later for a cleaner finish.

This Red Fox amigurumi is designed to be a cherished handmade companion you can finish in a weekend. The pattern includes clear photos and step-by-step instructions for shaping, color changes and assembly. Make one for a friend, a nursery or your own cozy shelfβ€”this little fox brings warmth and personality to any space. 🧢🦊

You ask,

we answer.

FAQs

What size will the finished piece be?

The finished amigurumi measures approximately 27 cm (10 2/3") from head to toe when crocheted with the recommended DK weight wool-alpaca blend and a 2.50 mm hook.

Can I use different yarn weights for this pattern?

Yes, you can use different yarn weights but it will affect the final size. Use an appropriate hook for your chosen yarn and be aware that stuffing and join sizes may need adjusting.

Do I need prior crochet experience for this pattern?

This pattern is rated intermediate and assumes you can crochet in spiral, change colors, and make increases and decreases. Familiarity with invisible decreases and sewing pieces together is helpful.

What tools are important for assembly?

You will need a yarn needle, stitch markers, scissors, polyester stuffing, safety eyes and either small doll joints or strong thread and buttons to attach limbs securely.