๐Ÿงถ Beautiful โœจ Detailed ๐Ÿ’ Adorable

Pompompurin Amigurumi Pattern

Pompompurin Amigurumi Pattern
4.5โ˜… Rating
5-7 Hours Time Needed
3.1K Made This
โœ‚๏ธ

Intermediate Level

Ideal for those with basic crochet experience, featuring slightly more advanced stitches and techniques to expand your skills.

โฑ๏ธ

Weekend Treat

Takes 5-7 hours, making it an enjoyable project to finish over a couple of days.

๐Ÿงธ

Cute Companion

An adorable friend to cherish, handcrafted with love to bring comfort and joy for years to come.

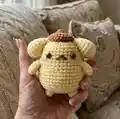
About This Pompompurin Amigurumi Pattern

This pattern creates a fluffy Pompompurin amigurumi with a round body, floppy ears, and a tiny beret detail. You will crochet the body and head in one continuous piece and make separate small parts (arms, legs, ears, beret) to sew on. The pattern uses simple single crochet rounds with increases and decreases for shaping.

Pompompurin Amigurumi Pattern crochet pattern - detailed view of completed project

Clear round-by-round instructions and assembly notes help you position each part accurately. Perfect for crafters who enjoy finishing details like felt eyes and rosy blush.

Why You'll Love This Pompompurin Amigurumi Pattern

I absolutely love this pattern because it captures that gentle Pompompurin charm in a small, huggable size. I enjoy how the one-piece body and head construction makes shaping smooth and seamless, so the finished toy looks neat and cuddly. I also appreciate the quick little beret and tail details that bring so much personality with minimal extra work. Sewing the parts together is satisfying and lets me customize placement for unique expressions.

Pompompurin Amigurumi Pattern step 1 - construction progress Pompompurin Amigurumi Pattern step 2 - assembly progress Pompompurin Amigurumi Pattern step 3 - details and accessories Pompompurin Amigurumi Pattern step 4 - final assembly and finishing

Switch Things Up

I love experimenting with colors โ€” you can swap the yellow body for pastel shades to create a sleepy or baby version of Pompompurin.

Try using bulky yarn and a larger hook if you want a super squishy, chunky friend that works up faster and feels softer to hold.

For a keychain or charm, make the pattern smaller by using fingering or light DK yarn and a tiny hook; reduce stuffing for a flatter profile.

I sometimes change the beret color or add a tiny embroidered emblem for a personalized touch that makes each piece unique.

Instead of felt eyes, try embroidering the eyes or using small safety eyes for a glossier finish โ€” just be careful when gifting to small children if using safety parts.

I like adding a thin wire inside the arms for slight posability; if you do, use floral wire or craft wire and wrap it with yarn to avoid poking through.

You can decorate the beret with a small crocheted flower or pompom to match seasonal themes like pastels for spring or rich tones for autumn.

Want a sleepy expression? Move the mouth placement and lower the felt eyes slightly, then add a tiny line of embroidery for a drowsy look.

If you prefer sewn-on fabric eyes, cut small felt shapes and glue them down before stitching edges for a durable, clean finish.

I often make a pair and vary the facial details โ€” one with blush and one plain โ€” to create a little set that shows how small changes make big character differences.

Common Mistakes & How to Fix Them

โœ— Skipping stitch markers when changing rounds can make it hard to find the start of a round; place a marker at the first stitch of every round to stay accurate. โœ— Forgetting to stuff gradually causes lumps and uneven shape; stuff small amounts as you go and adjust to keep a smooth silhouette. โœ— Pulling stitches too tight on decreases can close the head opening prematurely; maintain even tension and use stuffing to help shape before final decreases. โœ— Not pinning parts before sewing leads to misaligned limbs or ears; pin or safety-pin pieces in position and check symmetry before stitching them in place.

Pompompurin Amigurumi Pattern

Create an adorable Pompompurin amigurumi with this complete step-by-step crochet pattern. You'll work simple rounds, shape the body and head in one piece, and add cute accessories like a beret and tail. Clear instructions and helpful assembly notes guide you through each stitch so you can finish a lovable plush friend to gift or display.

Intermediate 5-7 Hours

Materials Needed for Pompompurin Amigurumi Pattern

โ€” Main Fabric

  • 01
    Yellow yarn - main color for body and limbs (approx 50-100g, worsted/light worsted depending on hook)
  • 02
    Brown yarn - small amount for beret and facial details (approx 10-20g)

โ€” Tools Required

  • 01
    Crochet hook suitable for your yarn (for example 2.5-3.5mm)
  • 02
    Tapestry needle for sewing and weaving ends
  • 03
    Scissors and glue
  • 04
    Stuffing (polyester fiberfill)
  • 05
    Brown felt for eyes and mouth details
  • 06
    Optional: pink blush for rosy cheeks
  • 07
    Stitch markers or safety pins

Progress Tracker

0% Complete

โ€” Abbreviations :

Infos :

R - Round. MR - Magic Ring. ch - chain. sc - single crochet. inc - increase. dec - decrease. slst - slip stitch. st(s) - stitch(es).

โ€” Materials :

Info :

Brown yarn. Yellow yarn. Crochet hook. Tapestry needle. Scissors and glue. Stuffing. Brown felt. Optional : pink blush.

โ€” Arms and Ears :

Item Name (P1) :

ARMS (MAKE 2) : Use yellow yarn.

Round R1 :

5sc in a MR (5)

Round R2-4 :

5sc (3 rounds) (5)

Info :

Do not stuff, fasten off and leave a long tail.

Item Name (P2) :

EARS (MAKE 2) : Use yellow yarn.

Round R1 :

5sc in a MR (5)

Round R2 :

(inc) x 5 (10)

Round R3 :

(sc, inc) x 5 (15)

Round R4 :

15sc (15)

Round R5 :

(3sc, dec) x 3 (12)

Round R6 :

12sc (12)

Info :

Stuff as you go.

Round R7 :

(2sc, dec) x 3 (9)

Round R8 :

(sc, dec) x 3 (6)

Info :

Flatten the opening and crochet 3sc through both layers of sc. Fasten off and leave a long tail.

โ€” Legs, Tail, Beret :

Item Name (P3) :

LEGS + TAIL (MAKE 3) : Use yellow yarn.

Round R1 :

6sc in a MR (6)

Round R2 :

6sc (6)

Info :

Fasten off and leave a long tail.

Item Name (P4) :

BERET : Use brown yarn.

Round R1 :

6sc in a MR (6)

Round R2 :

(inc) x 6 (12)

Round R3 :

(sc, inc) x 6 (18)

Round R4 :

(2sc, inc) x 6 (24)

Round R5 :

24slst (24)

Info :

Fasten off and leave a long tail.

Infos :

Make ch4. Start crocheting on the 3rd ch from hook : 2sc. Fasten off and leave a long tail. Sew the stalk on the beret (in the middle of MR).

โ€” Body and Head :

Info :

The body and head will be crocheted in one go, starting from the body to the head. We will start with a chain. Stitches are worked around both sides of the foundation chain.

Info :

LET'S START !

Round R1 :

Ch9, start crocheting on the 2nd ch from hook : inc, 6sc, 3sc in the last ch. Continue on the other side of the foundation chain : 7sc (18)

Round R2 :

2inc, 6sc, 3inc, 6sc, inc (24)

Round R3 :

(sc, inc) x2, 6sc, (sc, inc) x3, 7sc, inc (30)

Round R4 :

(2sc, inc) x2, 6sc, (2sc, inc) x3, 8sc, inc (36)

Round R5-6 :

36sc (2 rounds) (36)

Round R7 :

(5sc, inc) x 6 (42)

Round R8-10 :

42sc (3 rounds) (42)

Round R11 :

(5sc, dec) x 6 (36)

Round R12-14 :

36sc (3 rounds) (36)

Round R15 :

(4sc, dec) x 6 (30)

Round R16-18 :

30sc (3 rounds) (30)

Info :

Stuff as you go.

Round R19 :

(3sc, dec) x 6 (24)

Round R20 :

(sc, dec) x 8 (16)

Round R21 :

8dec (8)

Info :

Fasten off and leave a long tail. Sew the hole closed and weave in the yarn tails.

โ€” Eyes and Mouth :

Info :

Use brown felt.

Info :

EYES : I cut my felt around 2sts high, you can cut it into whatever shape or size you like. Make two.

Info :

MOUTH : I cut my felt around 3sts wide, you can cut it into whatever shape or size you like. Make one.

โ€” Assembly :

Info :

You can pin the parts with safety pins before sewing.

Info :

Sew the legs at the bottom side of the body.

Info :

Sew the arms at the side of the body (around R12-13).

Info :

Sew the ears at the side of the head (around R19-20).

Info :

Sew the beret on the top of the head.

Info :

Sew the tail at the back (around R7).

Info :

Optional : Sew a small 'x' below the tail.

Info :

Glue the eyes and mouth on the face.

Info :

Use pink blush for the rosy cheeks.

Info :

Weave in all the yarn tails and you're done !

Assembly Instructions

  • Pin the parts with safety pins before sewing to confirm placement and symmetry.
  • Sew the legs at the bottom side of the body so the amigurumi stands evenly.
  • Sew the arms to the sides of the body around rounds 12-13, angling slightly for a natural pose.
  • Attach the ears to the sides of the head around rounds 19-20, matching left and right placement.
  • Sew the beret on top of the head and attach the small crocheted stalk in the center of the MR.
  • Glue or sew the brown felt eyes and mouth onto the face and add pink blush for rosy cheeks.

Important Notes

  • ๐Ÿ’กThe body and head are crocheted in one continuous piece; follow the foundation chain instructions carefully to maintain correct stitch counts.
  • ๐Ÿ’กStuff gradually as you work to avoid lumps and to achieve a smooth, even shape.
  • ๐Ÿ’กPin and align parts before sewing to ensure balanced placement and symmetry.

Thank you for making this sweet Pompompurin amigurumi โ€” I hope it brings a smile to your day! ๐Ÿงถ Make one as a gift or keep it as a cozy handmade friend to brighten any shelf. Have fun customizing the beret and face for your own unique Pompompurin. ๐Ÿ˜Š๐Ÿงต

You ask,

we answer.

FAQs

What size will the finished piece be?

The finished amigurumi measures approximately 12-18 cm tall depending on yarn weight and hook size used.

Can I use different yarn weights for this pattern?

Yes, different yarn weights will change the final size; choose a needle/hook appropriate to your yarn and expect the toy to be larger with bulkier yarn.

Do I need prior crochet experience for this pattern?

This pattern is rated intermediate; you should be comfortable with single crochet, increases, decreases, magic ring, and working around a foundation chain.

How long does this project typically take to complete?

Most crocheters finish this pattern in 5-7 hours, depending on experience and the time spent on finishing and assembly.