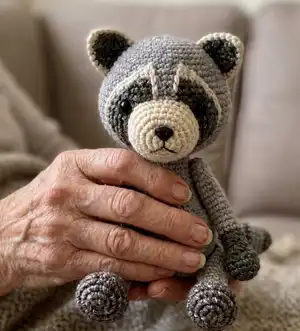
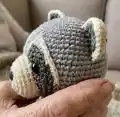
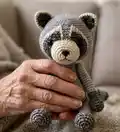
Make a charming hand-crocheted raccoon amigurumi with clear step-by-step instructions and helpful photos. This intermediate pattern guides you through shaping the head, body, limbs, ears, tail and facial details. You will learn color changes, invisible decreases and neat finishing techniques to create a cuddly woodland friend.
Progress Tracker
0% Complete
— Head :
Info :
With light gray yarn:
Round 3 :
(sc, inc) x 6 (18)
Round 4 :
(inc, sc 2) x 6 (24)
Round 5 :
(sc 3, inc) x 6 (30)
Round 6 :
sc, inc, (sc 4, inc) x 5, sc 3 (36)
Round 7 :
(sc 5, inc) x 6 (42)
Round 8 :
sc 2, inc, (sc 6, inc) x 5, sc 4 (48)
Round 9-10 :
sc in each st (48)
Round 11 :
sc 5, inc, (sc 11, inc) x 3, sc 6 (52)
Round 12 :
sc 22, with dark gray yarn: sc 2, with light gray yarn: sc 3, with dark gray yarn: sc 2, with light gray yarn: sc 23 (52)
Round 13 :
sc 12, inc, sc 8, with dark gray yarn: sc 4, with light gray yarn: inc, sc, with dark gray yarn: sc 4, with light gray yarn: sc 7, inc, sc 12, inc (56)
Round 14 :
sc 21, with dark gray yarn: sc 5, with light gray yarn: sc 3, with dark gray yarn: sc 5, with light gray yarn: sc 22 (56)
Round 15 :
sc 9, inc, sc 7, inc, sc 2, with dark gray yarn: sc 6, with light gray yarn: sc 3, with dark gray yarn: sc 6, with light gray yarn: sc 2, inc, sc 7, inc, sc 10 (60)
Round 16 :
sc 21, with dark gray yarn: sc 7, with light gray yarn: sc 3, with dark gray yarn: sc 7, with light gray yarn: sc 22 (60)
Round 17-19 :
sc 21, with dark gray yarn: sc 18, with light gray yarn: sc 21 (60)
Round 20 :
sc 22, with dark gray yarn: sc 17, with light gray yarn: sc 21 (60)
Round 21 :
sc 23, with dark gray yarn: sc 16, with light gray yarn: sc 21 (60)
Round 22 :
sc 3, (dec, sc 8) x 2, with dark gray yarn: dec, sc 8, dec, sc 3, with light gray yarn: sc 5, dec, sc 8, dec, sc 5 (54)
Round 23 :
(sc 7, dec) x 2, sc 4, with dark gray yarn: sc 3, dec, sc 6, with light gray yarn: sc, dec, (sc 7, dec) x 2 (48)
Info :
Embroider the "eyebrows" (see page 7).
Round 24 :
sc 2, dec, (sc 6, dec) x 5, sc 4 (42)
Round 25 :
(sc 5, dec) x 6 (36)
Info :
Start stuffing the head. Keep adding a bit of fiberfill after every few rounds, stuffing the head firmly.
Round 26 :
sc, dec, (sc 4, dec) x 5, sc 3 (30)
Round 27 :
(sc 3, dec) x 6 (24)
Round 28 :
(dec, sc 2) x 6 (18)
Info :
Sl st in next stitch. Cut the yarn, leaving a long yarn tail for sewing, and fasten off. Stuff the head firmly.
— Muzzle :
Round 3 :
(sc, inc x 2) x 4 (20)
Round 4 :
sc in each st (20)
Round 5 :
(sc 3, inc) x 5 (25)
Round 6 :
sc in each st (25)
Round 7 :
sc, inc, (sc 4, inc) x 4, sc 3 (30)
Info :
Sl st in next stitch. Cut the yarn, leaving a long yarn tail for sewing, and fasten off. Add a nose and mouth (see page 8).
— Ears (make 2) :
Info :
Make one with light and one with dark gray yarn:
Round 2 :
(sc, inc3) x 3 (12)
Round 3 :
sc 2, inc3, (sc 3, inc3) x 2, sc (18)
Round 4 :
sc 6, inc3, sc 5, sc + sl st
Info :
Sl st in next stitch and fasten off. Align a light and dark gray piece, wrong sides facing. Crochet over the edge with single crochet stitches through both layers. Attach the white yarn with a sl st at the middle stitch of first inc3 and continue around the edge with single crochet stitches going through both layers.
— Left Arm :
Info :
With dark gray yarn:
Round 2 :
(inc3 x 2, sc) x 2 (14)
Round 3-5 :
sc in each st (14)
Round 6 :
sc 3, inc, sc 5, dec x 2, sc (13)
Round 7 :
sc 4, inc, sc 5, dec, sc (13)
Info :
Stuff the hands firmly. Keep adding a bit of fiberfill after every few rounds, stuffing the arms firmly. Sc in next three stitches. Count the last sc as the end of the round from now on.
Round 9 :
sc in each st (12)
Round 10 :
sc 8, dec, sc 2 (11)
Info :
With light gray yarn:
Round 11-23 :
sc in each st (11)
Info :
Attach the smaller joint between rounds 22 and 23, placing it so the stem is facing straight towards the body.
Round 24 :
sc, dec x 5 (6)
Info :
Finish stuffing. Cut the yarn, leaving a long yarn tail, and fasten off. Pick up all the remaining stitches and close the opening (see page 9 - 10).
— Right Arm :
Info :
With dark gray yarn:
Round 2 :
(inc3 x 2, sc) x 2 (14)
Round 3-5 :
sc in each st (14)
Round 6 :
sc 2, dec x 2, sc 5, inc, sc 2 (13)
Round 7 :
sc 2, dec, sc 5, inc, sc 3 (13)
Round 8 :
sc 2, dec, sc 9 (12)
Info :
Stuff the hands firmly. Keep adding a bit of fiberfill after every few rounds, stuffing the arms firmly. Sc in next three stitches. Count the last sc as the end of the round from now on.
Round 9 :
sc in each st (12)
Round 10 :
sc 2, dec, sc 8 (11)
Info :
With light gray yarn:
Round 11-23 :
sc in each st (11)
Info :
Attach the smaller joint between rounds 22 and 23, placing it so the stem is facing straight towards the body.
Round 24 :
sc, dec x 5 (6)
Info :
Finish stuffing. Cut the yarn, leaving a long yarn tail, and fasten off. Pick up all the remaining stitches and close the opening (see page 9 - 10).
— Legs (make 2) :
Info :
With dark gray yarn:
Round 3 :
(sc, inc) x 6 (18)
Round 4 :
(sc 3, inc) x 4, sc 2 (22)
Round 5 :
sc in each st (22)
Round 6 :
sc 8, dec, sc 2, dec, sc 8 (20)
Round 7 :
sc 6, dec, (sc, dec) x 2, sc 6 (17)
Round 8 :
sc 6, dec, sc 2, dec, sc 5 (15)
Round 9 :
sc 7, dec, sc 6 (14)
Info :
Stuff the feet firmly. Keep adding a bit of fiberfill after every few rounds, stuffing the legs firmly.
Round 10 :
sc in each st (14)
Round 11 :
sc 7, dec, sc 5 (13)
Round 12-13 :
sc in each st (13)
Info :
With light gray yarn:
Round 14-26 :
sc in each st (13)
Info :
On the right leg only, sc in next 6 stitches. Count the last sc as the end of the round from now on. Attach the larger joint between rounds 25 and 26, placing it so the stem is facing straight towards the body.
Round 27 :
sc 4, dec, sc 3, dec, sc 2 (11)
Round 28 :
sc, dec x 5 (6)
Info :
Finish stuffing. Cut the yarn, leaving a long yarn tail, and fasten off. Pick up all the remaining stitches and close the opening (see page 9 - 10).
— Body :
Info :
With light gray yarn:
Round 3 :
(sc, inc) x 6 (18)
Round 4 :
(inc, sc 2) x 6 (24)
Round 5 :
(sc 3, inc) x 6 (30)
Round 6 :
sc, inc, (sc 4, inc) x 5, sc 3 (36)
Round 7 :
(sc 5, inc) x 6 (42)
Round 8-14 :
sc in each st (42)
Info :
Turn the body so the last stitch of round 14 is facing away from you (center of the back). Attach the legs to the sides of the body, between rounds 8 and 9 (see page 11).
Round 15 :
sc 9, dec, sc 5, dec, sc 6, dec, sc 5, dec, sc 9 (38)
Round 16 :
sc 11, dec, (sc 5, dec) x 2, sc 11 (35)
Round 17 :
sc 4, dec, sc 24, dec, sc 3 (33)
Round 18 :
(dec, sc 9) x 3 (30)
Info :
Start stuffing the body. Keep adding a bit of fiberfill after every few rounds, stuffing the body firmly.
Round 19 :
sc in each st (30)
Round 20 :
sc 4, dec, (sc 8, dec) x 2, sc 4 (27)
Round 21 :
sc in each st (27)
Round 22 :
(dec, sc 7) x 3 (24)
Round 23 :
sc in each st (24)
Round 24 :
sc 3, dec, (sc 6, dec) x 2, sc 3 (21)
Round 25 :
sc in each st (21)
Round 26 :
(dec, sc 5) x 3 (18)
Round 27-28 :
sc in each st (18)
Info :
Sl st in next stitch. Cut the yarn and fasten off. Attach the arms to the sides of the body, between rounds 23 and 24 (see page 11). Finish stuffing the body.
— Tail :
Info :
With dark gray yarn:
Round 2 :
(sc, inc) x 3 (9)
Info :
Continue shaping the tail following the pattern, alternating dark and light gray stripes as instructed in the full pattern. (See the pattern pages for full tail rounds and finishing.)
— Assembly :
Item Name (P1) :
Attach safety eyes between rounds 16 and 17, leaving 11 stitches (count 10 holes) between them. Secure washers and knot yarn tails inside the head.
Item Name (P2) :
Sew the muzzle to the head with whip stitch, placing it so the top edge is just below round 15. Use a yarn tail to shape the head if desired.
Item Name (P3) :
Sew the ears to the head just below round 5. Sew using light gray yarn and insert the needle through both layers.
Item Name (P4) :
Finish the arms and legs, insert joints if using, and close openings. Attach legs to the body between rounds 8 and 9 and arms between rounds 23 and 24.
Item Name (P5) :
Sew the head to the body with whip or mattress stitch; add a bit more stuffing before closing. Sew the tail to the body over rounds 8 - 9 using whip or mattress stitch.
This Raccoon amigurumi pattern walks you through each step to create a lovable woodland companion with personality and charm. Whether you gift it or keep it on a shelf, every stitch adds character and warmth. Happy crocheting and enjoy every little detail of making your raccoon! 🧶🐾