🧢 Beautiful ✨ Detailed πŸ’ Adorable

Pokeball Amigurumi Pattern

Pokeball Amigurumi Pattern
4.2β˜… Rating
2-4 Hours Time Needed
2.3K Made This
βœ‚οΈ

Intermediate Level

Ideal for those with basic crochet experience, featuring slightly more advanced stitches and techniques to expand your skills.

⏱️

Bite-Sized Project

Finishes in 2-4 hoursβ€”perfect for an afternoon of creative relaxation.

🎁

Tiny Treasure

Small, sweet, and gift-worthy creations that fit perfectly in the palm of your hand with detailed charm.

About This Pokeball Amigurumi Pattern

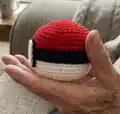
This pattern creates a round Pokeball amigurumi with a red top, white bottom, black band and a fabric-backed button. It uses basic amigurumi construction with simple increases and decreases to achieve a spherical shape. The design includes a small crocheted button and a felt band for an authentic Pokeball look.

Pokeball Amigurumi Pattern crochet pattern - detailed view of completed project

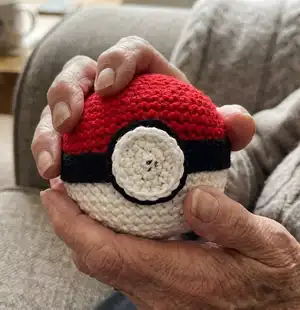
Clear, step-by-step rounds make the pattern easy to follow, and a short assembly section explains how to attach the felt and button. Perfect for gifting or creating a small collectible.

Why You'll Love This Pokeball Amigurumi Pattern

I absolutely love this pattern because it captures the iconic Pokeball look with very simple crochet techniques. I enjoy how quickly the sphere comes together using only single crochet, increases and decreases. I also love that the felt band and button let you add crisp, clean details with minimal sewing. This design is satisfying to finish and makes a perfect little handmade gift.

Pokeball Amigurumi Pattern step 1 - construction progress Pokeball Amigurumi Pattern step 2 - assembly progress Pokeball Amigurumi Pattern step 3 - details and accessories Pokeball Amigurumi Pattern step 4 - final assembly and finishing

Switch Things Up

I love that you can customize this Pokeball in so many ways by simply changing colors; try pastel shades for a cute, soft version or neon for a bold twist.

I often make mini versions by switching to fingering weight yarn and a smaller hook for keychains and charms.

I sometimes use a larger hook and bulky yarn to create a chunky, cuddly Pokeball that works great as a pillow or decor piece.

I like adding embroidery details around the button to give it a unique character and to hide any glue edges.

I sometimes substitute felt for the band with a crocheted black strip for a more handmade look and extra durability.

I recommend experimenting with different stuffing amounts to get a firmer or softer ball depending on your intended use.

I also add a loop at the top with a few chains before finishing to turn it into an ornament or hanging decoration.

I sometimes glue a small magnet behind the button and a matching piece inside the ball for novelty fridge decorations.

I enjoy mixing yarn brands for subtle texture changesβ€”cotton gives a crisp finish while acrylic is squishier and forgiving for beginners.

I often make a set in varying sizes and colors to create a playful collection or a themed gift bundle for friends.

Common Mistakes & How to Fix Them

βœ— Not keeping stitches tight enough can let stuffing show through; maintain a slightly firmer tension and check stitch density frequently. βœ— Forgetting to change yarn color at the correct round will misalign the black band; mark the transition round and change yarn exactly after the designated round. βœ— Cutting the felt band too short or too narrow causes poor coverage; measure around the ball and cut a long inch-wide strip to cover the seam fully. βœ— Not leaving a long enough tail to sew the final stitches can make closure difficult; leave a generous tail when fastening off to sew into the last 6 stitches securely.

Pokeball Amigurumi Pattern

Make a charming Pokeball amigurumi that is perfect for gifting or display. This pattern walks you through every round so you can create a neat, round Pokeball with a sewn-on button and felt band. You will enjoy the clean color changes and the quick, satisfying shaping that makes this project feel accomplished fast.

Intermediate 2-4 Hours

Materials Needed for Pokeball Amigurumi Pattern

β€” Main Fabric

  • 01
    Worsted weight yarn (#4) - Vanna's Choice 'Cranberry' (top color) - amount as needed
  • 02
    Worsted weight yarn (#4) - Vanna's Choice 'White' (bottom color) - amount as needed
  • 03
    Worsted weight yarn (#4) - Vanna's Choice 'Black' (band and trim) - small amount
  • 04
    Polyester fiberfill for stuffing, quantity as needed
  • 05
    Black felt sheet for band and small felt circle (approx. 1 inch wide strip and a small circle)

β€” Tools Required

  • 01
    Crochet hook size D/3.25 mm
  • 02
    Polyester stuffing (fiberfill)
  • 03
    Black felt sheet
  • 04
    Darning needle (tapestry needle) for sewing
  • 05
    Scissors
  • 06
    Hot glue (to attach felt pieces, optional for extra security)

Progress Tracker

0% Complete

β€” Base :

Info :

The printed diagram shows the base rounds for working in the round from a magic ring, using single crochet and increases. Symbol legend shown: O = CHAIN (CH). X = SINGLE CROCHET (SC). V symbol = INCREASE 2 IN 1 STITCH (INC).

β€” Head :

Info :

Create a "magic ring" using "cranberry" yarn

Round 1 :

[SC] x6 inside ring and tighte loop (6)

Round 2 :

[INC] x6 (12)

Round 3 :

[SC, INC] x6 (18)

Round 4 :

[SC2, INC] x6 (24)

Round 5 :

[SC3, INC] x6 (30)

Round 6 :

[SC4, INC] x6 (36)

Round 7 :

[SC5, INC] x6 (42)

Round 8 :

[SC6, INC] x6 (48)

Round 9 :

[SC7, INC] x6 (54)

Round 10-14 :

[SC] around (54)

Info :

* I cut a long inch wide band of black felt and cover where these two colors meet. I then also cut a small felt circle for behind the button and I use hot glue to attach both of these to the amigurumi.

Round 15-19 :

With white yarn, [SC] around (54)

Round 20 :

[SC7, DEC] x6 (48)

Round 21 :

[SC6, DEC] x6 (42)

Round 22 :

[SC5, DEC] x6 (36)

Round 23 :

[SC4, DEC] x6 (30)

Round 24 :

[SC3, DEC] x6 (24)

Round 25 :

[SC2, DEC] x6 (18)

Round 26 :

[SC1, DEC] x6 (12)

Round 27 :

[DEC] x6 (6)

Info :

Slip stitch off, and make sure you leave enough yarn to sew into last 6 stitches. Weave in tails

β€” Button :

Info :

Create a "magic ring" using White yarn

Round 1 :

[SC] x6 inside ring and tighten loop. (6)

Round 2 :

[INC] x6 (12)

Round 3 :

[SC1, INC] x6 (18)

Round 4 :

[SC2, INC] x6 (24)

Round 5 :

[SC3, INC] x6 (30)

Info :

Sl st. and attach to front of ball.

Assembly Instructions

  • Attach a 1-inch wide strip of black felt around the ball where the red and white meet, ensuring it fully covers the color seam; secure with hot glue or by sewing.
  • Cut a small black felt circle and a white felt circle (or use the crocheted button) and place the black circle behind the button for contrast, then glue both felt pieces to the ball.
  • Slip stitch the crocheted white button to the front of the ball in the center of the black felt band and sew through remaining tail into the last 6 stitches for security.
  • Weave in all yarn tails neatly into the inside of the ball to hide ends and secure stuffing.
  • Stuff the ball firmly as you work the rounds and before finishing decreases so the final shape is round and even.
  • Pin the felt band and button into position to confirm placement before gluing or sewing for best alignment.

Important Notes

  • πŸ’‘Hook size is not as important as keeping stitches tight so stuffing does not show through the fabric.
  • πŸ’‘Leave enough yarn tail when finishing the decreases to sew into the last 6 stitches for a secure closure.
  • πŸ’‘Use hot glue to attach felt pieces for a clean, fast finish or hand-sew for added durability.
  • πŸ’‘Stuff evenly and firmly but do not overstuff, which can distort the spherical shape of the Pokeball.

This Pokeball amigurumi pattern makes a delightful collectible or gift that is quick to crochet and full of charm. The felt band and button add crisp, authentic detail to the finished ball. Whether you keep it or give it away, it brings a handmade smile to any Pokemon fan. 🧢 🧡 ✨

You ask,

we answer.

FAQs

What size will the finished piece be?

The finished Pokeball measures approximately the size of a small ornament when using worsted weight yarn and a 3.25mm hook; exact size varies with tension.

Can I use different yarn weights for this pattern?

Yes, you can change yarn weight, but your final Pokeball size will change; use an appropriate hook for your chosen yarn and adjust stuffing amount.

Do I need prior crochet experience for this pattern?

This pattern is rated intermediate; you should be comfortable working in the round, making increases and decreases, and changing colors mid-project.

How do I attach the felt band and button?

Cut a 1-inch wide felt strip to wrap the seam and a small felt circle for behind the button; attach both using hot glue or stitch them in place for durability.

How should I finish and close the last rounds?

After completing the final decrease rounds, slip stitch off leaving a long tail, sew through the last six stitches to close, and weave in tails securely.