About This Plush snuggler BUNNY Amigurumi Pattern
This pattern teaches you how to crochet a Plush Snuggler Bunny amigurumi using plush/chenille yarn and a 4 mm hook. It includes step-by-step round instructions for legs, body, arms, head, ears, tail and full assembly. You will also find notes on yarn alternatives, embroidery placement for facial features, and finishing techniques.
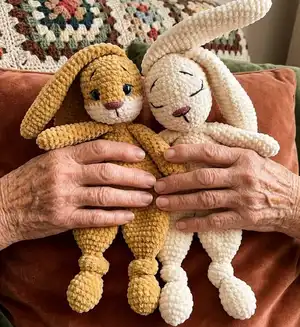
The toy measures approximately 41 cm / 16" when made with the recommended yarn and hook. Clear photos and assembly instructions help place eyes, ears and sew parts neatly for a professional finish.
Why You'll Love This Plush snuggler BUNNY Amigurumi Pattern
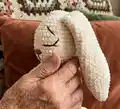
I absolutely love this pattern because the plush yarn creates a wonderfully soft, huggable texture that feels like a real snuggler. I enjoy how the construction uses simple amigurumi techniques to achieve a large, charming shape without complicated colorwork. The pattern allows for personalization — you can change eye styles, nose color or even make a mini version with thinner yarn. Finishing with embroidered lashes and brows gives each bunny a gentle, expressive face that I always find satisfying to stitch.
Switch Things Up
I love how easy it is to change this pattern by swapping yarn colors — try pastel shades for a baby-friendly version or two contrasting colors for a playful look.
You can make a mini keychain by using a thinner plush yarn and a smaller hook for a tiny, portable buddy.
I often switch the eyes: 16 mm safety eyes give a sparkling finish, while embroidered eyes make it safer for young children.
Change the nose color or make an embroidered heart-shaped nose for a cute alternative expression.
For a poseable bunny, consider inserting lightweight wire into the arms before stuffing to create bendable limbs.
I sometimes add a tiny crocheted scarf or bow to personalize gifts and add seasonal flair.
To make a plush family, vary hook size and yarn weight: bulky plush for a large snuggler, and sport-weight plush for a tiny sibling.
Embroider different eyebrow shapes to change the bunny’s expression from sleepy to surprised or playful.
Swap the tail for a pom-pom in a contrasting color to give the bunny extra character.
If you want a reversible look, crochet the head in two colors and embroider different features on each side so you can flip for a new expression.
Common Mistakes & How to Fix Them
✗ Not using stitch markers during rounds causes you to lose the start of the round; place a marker at the first stitch and move it each round to stay accurate.
✗ Skipping gradual stuffing during shaping leads to lumps or a misshapen head; stuff a little at a time and shape as you go for smooth contours.
✗ Cutting the leg thread too early prevents joining correctly during assembly; leave the tail on the second leg until after assembling the body.
✗ Attaching safety eyes too close or too far apart will change expression; follow the instruction to place eyes between rounds 10 and 11 with 8 stitches between them.
✗ Pulling embroidery threads too tight can distort the muzzle and face; anchor threads and tighten slowly, checking placement frequently.