🧢 Beautiful ✨ Detailed πŸ’ Adorable

Plush Booties with Pompoms Pattern

Plush Booties with Pompoms Pattern
4.1β˜… Rating
2-3 Hours Time Needed
2.0K Made This
βœ‚οΈ

Intermediate Level

Ideal for those with basic crochet experience, featuring slightly more advanced stitches and techniques to expand your skills.

⏱️

Bite-Sized Project

Finishes in 2-4 hoursβ€”perfect for an afternoon of creative relaxation.

🧣

Snug Essential

Everyday comfort with practical charm, designed for both functionality and style through changing seasons.

About This Plush Booties with Pompoms Pattern

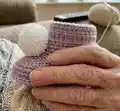
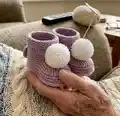
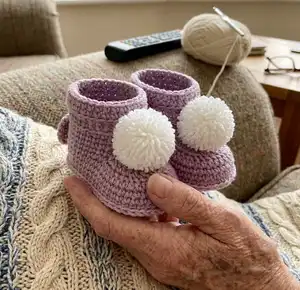
This pattern teaches you how to crochet plush velvet baby booties decorated with soft pompoms. The design uses super bulky velvet yarn worked in single crochet with simple shaping to form the sole and muzzle. The finished booties are cozy, textured, and ideal for babies or newborn photo props. Detailed photos and step-by-step instructions guide you through assembly and finishing.

Plush Booties with Pompoms Pattern crochet pattern - detailed view of completed project

You will make the sole, add a contrasting cuff worked in back loops, shape the front muzzle, and attach pompoms and ties. The pattern accommodates slight variations in stitch counts depending on your tension and foundation chain.

Why You'll Love This Plush Booties with Pompoms Pattern

I absolutely love this pattern because it turns a few simple stitches into a plush, snuggly pair of booties. The velvet yarn makes each pair feel luxurious and soft against tiny feet, and the pompoms add a playful finishing touch. I enjoy how quickly a single pair comes together β€” it is satisfying to see the sole, muzzle, and cuff form into a bootie in just a few rounds. Sharing this pattern lets me help others make beautiful handmade gifts with clear, photo-backed instructions. I also love that you can easily customize colors and details to match any nursery or outfit.

Plush Booties with Pompoms Pattern step 1 - construction progress Plush Booties with Pompoms Pattern step 2 - assembly progress Plush Booties with Pompoms Pattern step 3 - details and accessories Plush Booties with Pompoms Pattern step 4 - final assembly and finishing

Switch Things Up

I love how easy it is to customize these booties by switching yarn colors; try a neutral sole with a bright cuff for contrast.

You can make the booties larger by increasing your foundation chain and using a 4 mm hook with the same bulky yarn.

If you prefer a more secure pompom, sew a small felt circle inside the bootie and stitch the pompom through the felt for extra reinforcement.

I sometimes substitute faux fur pom-poms for a different texture and a luxury look; they sew on the same way.

For a baby-safe option, skip dangling ties and use a shorter decorative tab sewn to the heel instead.

I often experiment with alternate stitch patterns on the cuff β€” try half double crochet or ribbing for a different stretchy finish.

Want a mini keychain version? Use thinner yarn and a smaller hook to make a tiny bootie charm for a bag or gift tag.

I recommend trying a striped version by alternating colors every two rows for a playful look that still follows the same rounds.

To make them extra warm, add a lining of felt or a thin fabric glued inside the sole before attaching the cuff.

I encourage you to personalize the pompoms with small sewn beads or embroidered initials for a custom baby gift.

For durability, reinforce the heel seam with an extra row of single crochet or by sewing with matching yarn after assembling.

Common Mistakes & How to Fix Them

βœ— Skipping the recommended foundation chain length can make the booties too small or too wide; follow the suggested chain range and adjust hook size to match desired length. βœ— Not weaving in the starting tail at the sole can cause unraveling and messy edges; weave the yarn tail into the first stitches as you work the sole. βœ— Forgetting to fold and mark the muzzle center results in uneven shaping; always fold the bootie and place stitch markers to identify the middle before crocheting the muzzle. βœ— Working through both loops when the pattern requests back loop only will change the cuff texture; switch to back loop only stitches for the cuff rows as instructed. βœ— Sewing pompoms on with weak thread can cause them to fall off; use strong sewing thread and reinforce stitches when attaching pompoms. βœ— Pulling yarn too tightly on decreases makes the muzzle collapse; maintain even tension and count decreases carefully to preserve shape.

Plush Booties with Pompoms Pattern

Create adorable plush baby booties with fluffy pompoms using super bulky velvet yarn. This pattern walks you through the sole, muzzle shaping, and finishing touches so you can make cozy, charming booties for newborns or little ones. Clear step-by-step instructions and photos help you follow along easily. Perfect for gift-making or adding a handmade touch to baby wardrobes.

Intermediate 2-3 Hours

Materials Needed for Plush Booties with Pompoms Pattern

β€” Main Fabric

  • 01
    Super Bulky / Super Chunky / 14-ply velvet yarn - Himalaya Dolphin Baby (100g/120m) - main color (use approx one skein depending on size)
  • 02
    Super Bulky / Super Chunky / 14-ply velvet yarn - Yarn Art Dolce (100g/120m) - contrast color for cuff (use approx one skein depending on size)
  • 03
    Pom-poms size 3.5-5 cm (2 pieces) for pair

β€” Tools Required

  • 01
    Crochet hook size 3.5 mm (recommended)
  • 02
    Crochet hook size 4.0 mm (optional alternative)
  • 03
    Scissors
  • 04
    Needle for sewing pompoms
  • 05
    Strong sewing thread for attaching pompoms
  • 06
    Lighter to singe tie ends
  • 07
    Stitch markers
  • 08
    Yarn needle for weaving ends

Progress Tracker

0% Complete

β€” Sole :

Round 1 :

ch14. Starting on the second chain from the hook: 12 sc; 4 sc in the last chain; on the other side of the chain: 11 sc (weave in the yarn tail into the stitches); inc in the first chain (29)

Round 2 :

12 sc, 4 inc, 11 sc, 2 inc (35)

Round 3 :

Sc, inc, 9 sc, (sc, inc)*4, 12 sc, inc , 2 sc, inc, sl st (42) Cut the yarn. The sole is ready.

β€” Change color and work in back loops :

Round 4 :

attach the yarn to the heel and crochet around with sc in back loops (42 sc)

Round 5-6 :

42 sc (42)

β€” Crochet the front part of the bootie (muzzle) :

Info :

Fold the bootie in half. Then in half again. With a hook find the middle and mark it with stitch markers on both sides. And crochet this part from marker to marker. IMPORTANT: you may get a different number of stitches, I have 22sc. Just crochet this part alternating sc and dec.

Round 7 :

I have: (sc, dec)*7, sc (15)

Round 8 :

ch1, crochet decreases along the inner side to the end of row (7 dec and 1sc) - you can have another number of decreases. (8)

Round 9 :

ch1, sc8tog.

β€” Top of the bootie :

Round 10-16 :

sc around (7 rounds) (25)

Info :

Crochet the sole around with sl st in front loops.

β€” Assembly :

Item Name (P1) :

Now sew on pompoms: position pompoms on the front/top of each bootie and sew securely using a strong sewing thread and needle until firmly attached.

Item Name (P2) :

Ties (make 2): Ch65. Singe the ends with a lighter and attach it to the booties as shown in the photo, using a hook, threading through 1 stitch and tying it on a bow on the heel.

Info :

That's all, your booties are ready! Thank you for crocheting with me! I will be very pleased if you share the result of your work) for me it is very important

Assembly Instructions

  • Attach the pompom to the front/top of the bootie using strong sewing thread; sew through the center of the pompom multiple times and knot securely on the inside.
  • Fold the bootie to find the muzzle center and sew closed any small opening at the tip if needed, using matching yarn and whipstitch for a neat finish.
  • Make two ties by chaining 65, singe the ends with a lighter to prevent fraying, then attach each tie at the heel by threading through one stitch and tying a bow.
  • Weave in all yarn ends on the inside of the bootie and trim any excess threads, ensuring no loose ends are exposed for safety.

Important Notes

  • πŸ’‘According to this pattern booties will be from 8 to 13 cm depending on crochet density and hook size; do not make a foundation chain less than 10 or more than 18 chains.
  • πŸ’‘My booties fit a leg up to 10 cm when using hook size 3.5 mm and ch14 foundation; adjust hook or chain length for larger or smaller sizes.
  • πŸ’‘Work the cuff rows in the back loops only to achieve the textured cuff; this creates the neat rolled edge shown in photos.
  • πŸ’‘Use stitch markers to mark the muzzle center after folding the sole twice to ensure symmetrical shaping.
  • πŸ’‘Cut and singe tie ends carefully with a lighter and test the tie length before final attaching to avoid too-long or too-short ties.

These plush booties are a quick, rewarding project that makes a beautiful handmade gift for a newborn or baby shower. The velvet yarn creates a luxurious, cozy texture while pompoms add a playful accent. Choose soft pastels or bold colors to personalize each pair β€” happy crocheting! πŸ§ΆπŸ’

You ask,

we answer.

FAQs

What size will the finished piece be?

According to the pattern, booties will measure approximately 8 to 13 cm depending on your crochet tension, hook size, and foundation chain length.

Which hook size should I use?

The designer used a 3.5 mm hook and suggests 3.5 mm or 4 mm as alternatives; choose the size that gives you the correct fabric density.

Can I make larger or smaller booties?

Yes β€” change your foundation chain within the recommended range and adjust hook size; smaller hooks and fewer chains produce smaller booties, while larger hooks and more chains produce bigger ones.

Are the pompoms securely attached for baby use?

Use strong sewing thread and sew pompoms through the center multiple times, knotting on the inside; for baby-safe versions, consider securely tacking the pompom and checking attachment regularly.