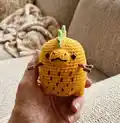
🧢 Beautiful ✨ Detailed πŸ’ Adorable

Pineapple Rex Amigurumi Pattern

Pineapple Rex Amigurumi Pattern
4.9β˜… Rating
5-7 Hours Time Needed
3.0K Made This
βœ‚οΈ

Intermediate Level

Ideal for those with basic crochet experience, featuring slightly more advanced stitches and techniques to expand your skills.

⏱️

Weekend Treat

Takes 5-7 hours, making it an enjoyable project to finish over a couple of days.

🧸

Cute Companion

An adorable friend to cherish, handcrafted with love to bring comfort and joy for years to come.

About This Pineapple Rex Amigurumi Pattern

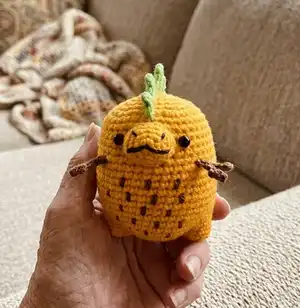
This pattern makes a charming Pineapple Rex amigurumi with a textured belly, sewn-on arms and spikes, and a freestanding tail. You will use DK weight yarn and a small hook to achieve a dense fabric suitable for stuffing. The design includes small details like embroidered nostrils and belly stitches for personality.

Pineapple Rex Amigurumi Pattern crochet pattern - detailed view of completed project

Includes complete round-by-round instructions, special stitch explanations, and step-by-step assembly notes. Photographic references are indicated in the text to help you place parts accurately.

Why You'll Love This Pineapple Rex Amigurumi Pattern

I absolutely love this pattern because it combines simple amigurumi shaping with delightful pineapple-themed details that make the character unique. I enjoy how the spikes and tiny embroidered belly details bring personality without requiring complex techniques. I also appreciate that the pattern is written with clear join-and-attach steps so the finished toy is sturdy and freestanding. Sewing the snout and adding the embroidered mouth is one of my favorite finishing touches that really brings the Pineapple Rex to life.

Pineapple Rex Amigurumi Pattern step 1 - construction progress Pineapple Rex Amigurumi Pattern step 2 - assembly progress Pineapple Rex Amigurumi Pattern step 3 - details and accessories Pineapple Rex Amigurumi Pattern step 4 - final assembly and finishing

Switch Things Up

I love how easy it is to customize the Pineapple Rex by changing yarn colors; try pastel yellows and mint greens for a soft, nursery-friendly version.

If you want a bigger, cuddlier toy use a bulkier yarn and a larger hook β€” the shape will be the same but more plush.

I sometimes switch the safety eyes for embroidered eyes using embroidery floss for a fully child-friendly toy safe for all ages.

Try adding tiny felt accessories like a bow tie or scarf for personality; felt pieces are quick to glue or stitch on.

I enjoy varying the spike sizes and spacing β€” add more small spikes and fewer large ones for a spikier silhouette.

For a realistic pineapple look, stitch a criss-cross texture on the belly using contrasting brown yarn instead of vertical stitches.

I often change the mouth expression by adjusting the angle or length of the embroidered mouth to give different personalities.

Consider adding a loop at the top using a chain if you want to turn your Pineapple Rex into an ornament or keychain.

Use variegated DK yarn for a playful multicolor body that gives the toy a unique textured appearance without extra sewing.

I sometimes stuff lightly for a squishier toy or more firmly for a sturdier, freestanding sculpture depending on the intended use.

To make a pocket-sized version, use fingering weight yarn and a smaller hook, adjusting stitch tension as needed; perfect for keyrings and charms.

Consider sewing on tiny beads or sequins sparingly for a sparkle effect, but keep safety in mind for items intended for children.

Common Mistakes & How to Fix Them

βœ— Skipping stitch markers when joining the legs to the body leads to misaligned joins; place markers and count carefully before joining to ensure even spacing. βœ— Not stuffing gradually causes lumps or an irregular shape; stuff slowly while you decrease and shape the body for a smooth finish. βœ— Placing safety eyes too high or too low can distort facial placement; follow the instruction to insert eyes between rounds 19 - 20 and check placement with the legs as a guide. βœ— Pulling tension too tight on the spikes or snout chain can change the shape; keep an even, relaxed tension and block spikes if you want them pointy. βœ— Failing to leave long tails when finishing pieces makes assembly harder; always leave long tails for sewing and use photos as a placement guide.

Pineapple Rex Amigurumi Pattern

Bring a playful Pineapple Rex to life with this detailed amigurumi pattern. You will enjoy the cute details like embroidered belly stitches, spikes, and a freestanding tail. The pattern includes full round-by-round instructions, photos referenced in the text, and clear assembly notes to guide you.

Intermediate 5-7 Hours

Materials Needed for Pineapple Rex Amigurumi Pattern

β€” Main Fabric

  • 01
    Stylecraft Special DK - Sunshine (main color) - DK weight yarn
  • 02
    Stylecraft Special DK - Grass Green (for spikes) - DK weight yarn
  • 03
    Stylecraft Special DK - Gingerbread (for arms and belly stitches) - DK weight yarn

β€” Tools Required

  • 01
    Crochet hook size 2.5 mm
  • 02
    Two 6 mm safety eyes
  • 03
    Stitch markers
  • 04
    Yarn needle
  • 05
    Fibrefill (polyester stuffing)
  • 06
    Black embroidery floss

Progress Tracker

0% Complete

β€” Techniques :

Info :

How to close amigurumi invisibly: 1. Insert needle in the FLO of each stitch around. 2. Pull tight to close. 3. Insert needle through centre exiting a few rounds down. 4. Weave in the end and admire your work!

Info :

How to decrease invisibly: 1. Insert hook into FLO of first stitch. 2. Insert hook into FLO of next stitch. 3. Yarn over and pull through two loops. 4. Yarn over and pull through two loops again. Invisible decrease complete!

β€” Legs (make two) :

Info :

Using Sunshine

Round 1 :

6 sc in MR (6)

Round 2 :

inc each st around (12)

Round 3 :

in BLO sc each st around (12)

Round 4 :

sc each st around (12)

Info :

Cut yarn and weave in ends. Legs shown in (photo 1).

β€” Body :

Info :

Using Sunshine ch9

Round 1 :

sc in second ch from hook, 6sc, 3sc in next st, working down the other side of the ch, 6sc, inc (18)

Round 2 :

inc, 6sc, 3inc, 6sc, 2inc (24)

Round 3 :

sc, inc, 6sc, *sc, inc* rep 3 times, 6sc, *sc, inc* rep 2 times (30)

β€” Body Cont... :

Round 4 :

2sc, inc, 2sc, with the body still on your hook (photo 2) insert hook through any st in leg 1 and through the next st of rnd 3 (photo 3) complete sc, complete a further 2sc in this way, sc, *2sc, inc* rep 3 times, 2sc, 3sc through leg 2, sc, *2sc, inc* rep 2 times (36)

Round 5 :

6sc, 9sc around leg 1, 15sc, 9sc around leg 2, 9sc (48)

Round 6-22 :

sc each st around (48) (17 rnds)

Round 23 :

*6sc, dec* rep 6 times (42)

Round 24 :

*5sc, dec* rep 6 times (36)

Info :

Insert safety eyes between rnds 19 - 20 six visible sts apart.

Info :

Although at this stage it does not matter which is the front or back, please use the legs as a guide to ensure the eyes are in the correct place. Start stuffing and continue to stuff while we decrease.

Round 25 :

*4sc, dec* rep 6 times (30)

Round 26 :

*3sc, dec* rep 6 times (24)

Round 27 :

*2sc, dec* rep 6 times (18)

Round 28 :

*1sc, dec* rep 6 times (12)

Round 29 :

dec 6 times (6)

Info :

Fasten off and leave a long tail. Complete invisible close and weave in ends. Completed body shown (photo 6).

β€” Tail :

Info :

Using Sunshine

Round 1 :

6sc in MR (6)

Round 2 :

*sc, inc* rep 3 times (9)

Round 3 :

sc each st around (9)

Round 4 :

*2sc, inc* rep 3 times (12)

Round 5 :

sc each st around (12)

Round 6 :

*3sc, inc* rep 3 times (15)

Round 7 :

sc each st around (15)

Round 8 :

6sc, 3inc, 6sc (18)

Round 9 :

sc each st around (18)

Info :

Cut yarn leaving a long tail.

β€” Snout :

Info :

Using Sunshine

Round 1 :

6sc in MR (6)

Round 2 :

sc, 3sc in same st, 2sc, 3 sc in same st, sc (10)

Round 3 :

2sc, 3sc in same st, 4sc, 3 sc in same st, 2sc (14)

Round 4-5 :

sc each st around (14) (2 rnds)

Info :

Cut yarn leaving a long tail. Using black embroidery floss, stitch a mouth and nostrils onto the snout. Completed snout and tail shown (photo 7).

β€” Arms (make 2) :

Info :

Using Gingerbread

Item Name (P1) :

Row 1 Ch6, slst in 2nd ch from hook, slst, ch3, slst in 2nd chain from hook, slst, now working up the original ch, 3slst

Info :

Cut yarn leaving a long tail. Arms shown in (photo 8).

β€” Spikes :

Info :

Special stitches: Large Spike (LS) = Ch5, sc in 2nd ch from hook, hdc, dc, tr. Medium Spike (MS) = ch4, sc in 2nd ch from hook, hdc, dc. Small Spike (SS) = ch3, sc in 2nd ch from hook, hdc.

Info :

Using Grass green Row 1 SS, MS, 4LS, MS, SS, ch2, 3SS

Info :

Cut yarn leaving a long tail. If you want your spikes extra pointy you can block them as I have done, but this is optional. Spikes shown in (photo 9).

β€” Assembly :

Infos :

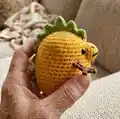
We will use the long tails to attach everything to the body. Please use photos on the following page for reference. Attach the arms between rounds 16 - 17 eleven visible sts apart. Lightly stuff the tail and join over rnds 3 - 10; the tail should allow your Pineapple Rex to be freestanding so make any adjustments to your positioning if necessary. Lightly stuff the snout and sew between the eyes over rnds 17 - 21. Starting from the centre of the snout, attach the spikes over the top of the head, down the back and onto the tail; the ch2 should fall where the body meets the tail. Finally, using Gingerbread add five rows of stitches to the belly for added detail.

Assembly Instructions

  • Attach the arms between rounds 16 - 17, spaced eleven visible stitches apart, and sew securely using the long tails.
  • Lightly stuff the tail and join it to the body over rounds 3 - 10 so that the tail is freestanding; adjust placement before securing.
  • Lightly stuff the snout and sew it between the eyes to sit across rounds 17 - 21, using long tail to sew and secure.
  • Start from the centre of the snout and attach the spikes over the top of the head, down the back and onto the tail; ensure the ch2 sits where the body meets the tail.
  • Using Gingerbread yarn, embroider five rows of small stitches on the belly for added pineapple detail.

Important Notes

  • πŸ’‘Use stitch markers to keep track of your rounds, particularly when joining the legs to the body and during decreases.
  • πŸ’‘Stuff gradually while you decrease to maintain a smooth, even shape and prevent lumps in the finished piece.
  • πŸ’‘Leave long tails when finishing parts so you have enough yarn to sew pieces in securely during assembly.
  • πŸ’‘Insert safety eyes between rounds 19 - 20 and double-check placement using the legs as a guide to ensure symmetry.

This playful Pineapple Rex is a sweet handmade companion that blends cute character design with pineapple charm. Add spikes, embroidered belly detail, and a proud little tail to make each toy unique. Perfect for gifting or brightening your desk with handmade fun. 🧢🍍🧡

You ask,

we answer.

FAQs

What size will the finished piece be?

The finished amigurumi measures approximately 11 cm tall when using the suggested Stylecraft Special DK yarn and a 2.5 mm crochet hook.

Can I use different yarn weights for this pattern?

Yes, you can use different yarn weights, but the final size and stitch counts will change; adjust your hook size accordingly and expect a different finished size.

Do I need prior crochet experience for this pattern?

This pattern is rated intermediate, so basic knowledge of amigurumi techniques, invisible decreases, and joining pieces is recommended for best results.

How long does this project typically take to complete?

Most crocheters complete this project in 5-7 hours, depending on experience and how much time you spend on assembly and embroidery details.