🧶 Beautiful ✨ Detailed 💝 Adorable

Festive Gnomes Amigurumi Pattern

Festive Gnomes Amigurumi Pattern
4.0★ Rating
5-7 Hours Time Needed
2.4K Made This
✂️

Intermediate Level

Ideal for those with basic crochet experience, featuring slightly more advanced stitches and techniques to expand your skills.

⏱️

Weekend Treat

Takes 5-7 hours, making it an enjoyable project to finish over a couple of days.

🧸

Cute Companion

An adorable friend to cherish, handcrafted with love to bring comfort and joy for years to come.

About This Festive Gnomes Amigurumi Pattern

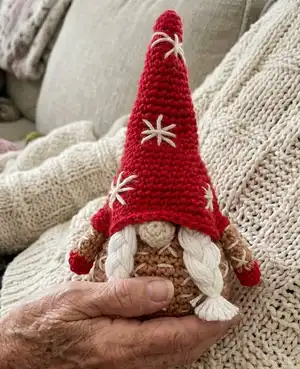
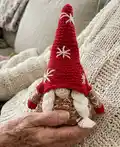
This pattern creates two small festive gnomes with a rounded body, pointy hat and either a looped beard or braided hair. It uses Paintbox Yarns Cotton DK and simple amigurumi shaping techniques for a neat, sturdy finish. Youll embroider star details and choose between braids or a textured beard to personalise each gnome.

Festive Gnomes Amigurumi Pattern crochet pattern - detailed view of completed project

The pattern includes step-by-step rounds for body, hands, nose, hat, beard and braids, plus clear assembly and embroidery notes. Finished gnomes measure approximately 6 1/4 in / 16 cm tall.

Why You'll Love This Festive Gnomes Amigurumi Pattern

I absolutely love this pattern because it brings together simple amigurumi shaping with playful textured details that make each gnome unique. I enjoy stitching the tiny embroidered stars — theyre such a quick way to add personality and charm. Making the braided or looped beards feels so rewarding and instantly transforms the small shapes into adorable characters. I also love how little time each gnome takes, so you can make several in different colourways for gifts or seasonal decor.

Festive Gnomes Amigurumi Pattern step 1 - construction progress Festive Gnomes Amigurumi Pattern step 2 - assembly progress Festive Gnomes Amigurumi Pattern step 3 - details and accessories Festive Gnomes Amigurumi Pattern step 4 - final assembly and finishing

Switch Things Up

I love swapping yarn colours to create different personalities for each gnome; try pastel hats for a soft look or bold reds for a classic festive feel.

You can make the gnome larger or smaller by changing yarn weight and hook size; bulky yarn with a bigger hook will create a chunky gnome while fingering weight yields a tiny collectible.

I sometimes replace the loop beard with embroidery or felt mustaches for variety and a unique character on each gnome.

Change the hat shape by adding fewer rounds for a short hat or more increases for a wider brim — experiment until youre happy with the silhouette.

Swap the braid for two short pigtails or add tiny crocheted accessories like a star or bell to the hat for extra charm.

Try metallic or sparkly yarn for the embroidered stars to give a festive shimmer that catches the light on your display.

I recommend adding a small weight inside the base if you want the gnome to be more stable on wobbly surfaces; a few coins or a small washer wrapped in scrap yarn works well.

For kid-friendly versions, embroider the nose on instead of sewing a separate nose to avoid small parts, and keep decorations soft and secure.

If you want a family set, make varying heights by changing the number of hat rounds and the amount of stuffing in the body for visual interest on a mantel.

I often mix yarn brands for texture contrasts — use a fluffier yarn for the beard or braid to create a different tactile look while keeping the body in cotton for structure.

Common Mistakes & How to Fix Them

✗ Skipping the cardboard circle insertion can make the base unstable and floppy; insert the cardboard disc into the base at the instructed round to create a flat stable bottom. ✗ Not working into the back loop only when instructed will change the texture of the body; be sure to work BLO where specified to achieve the correct ridged effect. ✗ Overstuffing the body results in a misshapen gnome top and harder sewing; stuff gradually and check shape often, adding small amounts until the silhouette looks correct. ✗ Forgetting to leave long tails when breaking yarn makes sewing pieces together difficult; always leave a tail for sewing at the breaks stated in the pattern. ✗ Not counting stitches after increases and decreases causes mismatched shaping; count your stitches at the end of each round, especially after rounds with multiple changes.

Festive Gnomes Amigurumi Pattern

Make a charming pair of Festive Gnomes to decorate your home or give as handmade gifts. This intermediate amigurumi pattern guides you through crocheting a rounded body, braided hair or a looped beard, tiny hands, a pointy hat and embroidered stars. Youll enjoy personalising colors and embroidery for a festive touch.

Intermediate 5-7 Hours

Materials Needed for Festive Gnomes Amigurumi Pattern

— Main Fabric

  • 01
    Paintbox Yarns Cotton DK (50g balls): 1 ball Soft Fudge 410 (A) for body
  • 02
    Paintbox Yarns Cotton DK (50g balls): 1 ball Red Wine 416 (B) for hat and mitts
  • 03
    Paintbox Yarns Cotton DK (50g balls): 1 ball Vanilla Cream 408 (C) for nose and braid/beard details
  • 04
    Paintbox Yarns Cotton DK (50g balls): 1 ball Champagne White 403 (D) for loop beard and braid highlights
  • 05
    Cardboard circle 2¼-2¾ in / 6-7 cm diameter to make a flat bottom

— Tools Required

  • 01
    US D-3 (3mm) crochet hook
  • 02
    Toy stuffing (polyester fiberfill)
  • 03
    Scissors
  • 04
    Yarn needle for sewing and embroidery
  • 05
    Cardboard circle 2¼-2¾ in / 6-7 cm diameter to make flat bottom

Progress Tracker

0% Complete

— Notes :

Infos :

Size: Height 6¼in/16cm. You will need: Yarn available at lovecrafts.com. 1¾oz/50g balls of Paintbox Yarns Cotton DK: 1 ball in Soft Fudge 410 (A). 1 ball in Red Wine 416 (B). 1 ball in Vanilla Cream 408 (C). 1 ball in Champagne White 403 (D). US D-3 (3mm) crochet hook. Toy stuffing. Scissors. Yarn needle. Cardboard circle 2¼-2¾in/6-7cm in diameter to make flat bottom. Gauge (TENSION): Not essential.

Infos :

Good to know: Paintbox Yarns cannot accept responsibility for the finished item if any yarn other than the recommended yarn is used. Yarn quantities are based on average requirements and are therefore approximate. Instructions are written using US terminology with UK terminology given in italics in round brackets () afterwards. Repeat figures in square brackets [] the number of times stated afterwards. Instructions are given for the smallest size, with changes for the larger sizes given in round brackets () afterwards. Where only one figure is given, this relates to all sizes. Where the figure 0 appears, no stitches, times or rows are worked for this size.

Info :

Special stitch: lp st loop st working from wrong side, wrap yarn from back to front around and over the index finger holding the yarn, pull out a loop approx ¾in/2cm long (or desired length), insert hook in next stitch, grab the yarn from behind your index finger and draw the yarn through the stitch. With the loop still on your finger, yrh hook and draw through both loops on hook. Try to ensure all loops are equal size.

— Abbreviations :

Info :

blo working into back loop only. cm centimetres. dec decrease by working 2 sc(dc) together. g grams. in inches. inc increase by working 2 sc(dc) in next stitch or space. mm millimetres. oz ounces. sc(dc) single (double) crochet. st/s stitch/es. yrh yarn round hook.

— Body :

Round 1 :

6 sc(dc) in ring (6 sts)

Round 2 :

Inc in each st around (12 sts)

Round 3 :

[1 sc(dc), inc] 6 times (18 sts)

Round 4 :

[2 sc(dc), inc] 6 times (24 sts)

Round 5 :

[3 sc(dc), inc] 6 times (30 sts)

Round 6 :

[4 sc(dc), inc] 6 times (36 sts)

Round 7 :

[5 sc(dc), inc] 6 times (42 sts)

Round 8 :

[6 sc(dc), inc] 6 times (48 sts)

Round 9 :

Sc(dc) blo around

Round 10 - 14 :

Sc(dc) around

Info :

Insert cardboard circle into bottom of work.

Round 15 :

[6 sc(dc), dec] 6 times (42 sts)

Round 16 :

Sc(dc) around

Round 17 :

[5 sc(dc), dec] 6 times (36 sts)

Round 18 :

Sc(dc) around

Round 19 :

[4 sc(dc), dec] 6 times (30 sts)

Round 20 - 22 :

Sc(dc) around

Round 23 :

[3 sc(dc), dec] 6 times (24 sts)

Round 24 :

[2 sc(dc), dec] 6 times (18 sts)

Info :

Add stuffing.

Round 25 :

[1 sc(dc), dec] 6 times (12 sts)

Round 26 :

[Dec] 6 times (6 sts)

Info :

Cut yarn. Fasten off. Using C embroider the pattern on the body.

— Hands (Make 2) :

Round 1 :

6 sc(dc) in ring (6 sts)

Round 2 :

Sc(dc) around

Round 3 :

[1 sc(dc), inc] 3 times (9 sts)

Info :

Break B, join in A.

Round 4 - 9 :

Sc(dc) around

Info :

Break yarn leaving a tail for sewing. Using C embroider the pattern on the arms.

Info :

Sew hands between 17th and 18th rounds of body leaving 14 sts between them.

— Beard :

Round 1 :

Ch 4. 1 sc(dc) in 2nd ch from hook and in each of next 2 ch, turn (3 sts)

Round 2 :

3 lp st, turn

Round 3 :

Inc, 1 sc(dc), inc, turn (5 sts)

Round 4 :

5 lp st, turn

Round 5 :

Inc, [1 sc(dc), inc] twice, turn (8 sts)

Round 6 :

8 lp st, turn

Round 7 :

[Inc, 1 sc(dc)] 4 times, turn (12 sts)

Round 8 :

12 lp st, turn

Round 9 :

[Inc, 2 sc(dc)] 4 times, turn (16 sts)

Round 10 :

16 lp st

Info :

Break yarn leaving a tail for sewing. Sew between arms on 12th - 21st rounds.

— Braids :

Info :

Using D cut 27 pieces of yarn each 12in/30cm long. Divide into 3 even parts and make a braid. Cut 2 pieces 2in/5cm long and tie the braid from each side to keep them together. Cut the ends leaving ½in/1cm long tassels. Fold braid in half and place it on front of the gnome so it will form both braids. Connect the middle (at point of fold) to the 25th - 26th rounds of body with a 2–3in/5–7cm piece of yarn.

— Nose :

Round 1 :

6 sc(dc) in ring (6 sts)

Round 2 :

[1 sc(dc), inc] 3 times (9 sts)

Round 3 :

Sc(dc) around

Info :

Break yarn leaving a tail for sewing. For bearded gnome sew nose on top of the beard. For braided gnome sew nose between braids on 17th - 19th rounds.

— Hat :

Round 1 :

6 sc(dc) in ring (6 sts)

Round 2 :

Sc(dc) around

Round 3 :

[1 sc(dc), inc] 3 times (9 sts)

Round 4 - 6 :

Sc(dc) around

Round 7 :

[2 sc(dc), inc] 3 times (12 sts)

Round 8 - 10 :

Sc(dc) around

Round 11 :

[3 sc(dc), inc] 3 times (15 sts)

Round 12 - 14 :

Sc(dc) around

Round 15 :

[4 sc(dc), inc] 3 times (18 sts)

Round 16 - 17 :

Sc(dc) around

Round 18 :

[5 sc(dc), inc] 3 times (21 sts)

Round 19 - 20 :

Sc(dc) around

Round 21 :

[6 sc(dc), inc] 3 times (24 sts)

Round 22 :

Sc(dc) around

Round 23 :

[7 sc(dc), inc] 3 times (27 sts)

Round 24 :

Sc(dc) around

Round 25 :

[8 sc(dc), inc] 3 times (30 sts)

Round 26 :

[9 sc(dc), inc] 3 times (33 sts)

Round 27 :

[10 sc(dc), inc] 3 times (36 sts)

Round 28 :

[11 sc(dc), inc] 3 times (39 sts)

Round 29 :

[12 sc(dc), inc] 3 times (42 sts)

Round 30 :

[13 sc(dc), inc] 3 times (45 sts)

Round 31 :

[14 sc(dc), inc] 3 times (48 sts)

Round 32 :

[15 sc(dc), inc] 3 times (51 sts)

Info :

Break yarn leaving a tail for sewing. Using C embroider big stars randomly. Place hat on top of the body and position at beginning of the arms and nose. Sew to back of body and around arms.

Assembly Instructions

  • Insert the cardboard circle into the bottom of the body after Round 14 to create a flat base before closing the body.
  • Sew the beard between the arms on rounds 12 to 21, centering it under the hat opening and securing with the tail left when breaking yarn.
  • Attach hands between rounds 17 and 18 of the body leaving 14 stitches between them and sew securely with the tail left when breaking yarn.
  • Fold the braid in half and position the fold at the centre front; attach the braid middle to rounds 25-26 of the body using a 2–3in/5–7cm piece of yarn.
  • Place the hat on the finished body aligning it with the beginning of the arms and nose, then sew the hat to the back of the body and around the arms with the tail left at the hat break.

Important Notes

  • 💡Insert the cardboard circle before closing the base to ensure a neat flat bottom and stability for display.
  • 💡Work loop stitches (lp st) evenly to keep the beard loops similar in length and appearance across the face.
  • 💡Leave long tails when breaking yarn so you have enough for sewing pieces together and embroidering details.
  • 💡Use consistent tension and stuff gradually to maintain the gnomes rounded silhouette without overfilling.

These Festive Gnomes make the sweetest handmade decoration for mantelpieces, shelves or gift bundles. Personalise each gnome with different hat colours, embroidered stars and braid or looped beards for a charming holiday set. Small, quick to make and endlessly customisable — theyre perfect for gifting and decorating. 🎄🧶✨
You ask,

we answer.

FAQs

What size will the finished piece be?

The finished gnome measures approximately 6¼ in / 16 cm tall when made with the recommended Paintbox Cotton DK and a 3 mm hook.

Can I use different yarn weights for this pattern?

Yes, but changing yarn weight will affect the finished size; choose an appropriate hook for your yarn and expect size and texture differences.

Do I need prior crochet experience for this pattern?

This pattern is rated intermediate, so basic knowledge of single crochet, increases, decreases and working in the round is recommended.

How long does this project typically take to complete?

Most crocheters complete a single gnome in about 5-7 hours, though time may vary depending on experience and how much embroidery or finishing you do.

How do I make the beard or braids?

The looped beard is made using loop stitches across rows as instructed, while braids are formed by cutting yarn lengths, dividing them into three and plaiting, then folding and attaching at rounds 25-26.