๐Ÿงถ Beautiful โœจ Detailed ๐Ÿ’ Adorable

Chubby Milky Cow Amigurumi Pattern

Chubby Milky Cow Amigurumi Pattern
4.1โ˜… Rating
5-7 Hours Time Needed
3.4K Made This
โœ‚๏ธ

Intermediate Level

Ideal for those with basic crochet experience, featuring slightly more advanced stitches and techniques to expand your skills.

โฑ๏ธ

Weekend Treat

Takes 5-7 hours, making it an enjoyable project to finish over a couple of days.

๐Ÿงธ

Cute Companion

An adorable friend to cherish, handcrafted with love to bring comfort and joy for years to come.

About This Chubby Milky Cow Amigurumi Pattern

This pattern creates a chubby milky cow amigurumi using plush chenille yarn for a soft, huggable toy. You will make a head, ears, horns, nose, body (sitting or standing), arms, legs, tail and fun accessories like a cookie bag and ice cream cone. Techniques include magic ring, increases/decreases, color changes and sewing pieces together for a polished finish.

Chubby Milky Cow Amigurumi Pattern crochet pattern - detailed view of completed project

Detailed round-by-round instructions and clear photos are included to guide you through each step. Suitable for crocheters who know basic stitches and want to practice shaping and assembly.

Why You'll Love This Chubby Milky Cow Amigurumi Pattern

I absolutely love this pattern because it turns plush chenille yarn into an irresistibly squishy toy that feels like a hug. I enjoy the playful shaping that gives the cow its chubby, friendly character and the little accessories make each finished piece unique. Making the standing or sitting body options lets me personalize every cow for different displays and gifts. Sewing the tiny details like the nose and cookie bag really brings the character to life and I love how rewarding that finishing work is.

Chubby Milky Cow Amigurumi Pattern step 1 - construction progress Chubby Milky Cow Amigurumi Pattern step 2 - assembly progress Chubby Milky Cow Amigurumi Pattern step 3 - details and accessories Chubby Milky Cow Amigurumi Pattern step 4 - final assembly and finishing

Switch Things Up

I love how easy it is to customize this cow by changing colors; try pastel tones or high-contrast spots for different personalities.

If you want a smaller cow, use a finer yarn and a smaller hook; for a jumbo cuddly version, use bulky yarn and a larger hook.

I often change eye optionsโ€”safety eyes, embroidered eyes, or felt pieces all give different expressions and safety profiles.

Switch up the accessories: make a tiny scarf, a hat, or different bags (cookie, ice cream) to tell a story with your cow.

Try embroidering different mouth shapes or adding freckles for extra character; small changes to placement can totally change the expression.

I like to add contrasting soles to the feet or tiny claws using a darker yarn to define features on the hooves.

For a poseable version, you can insert thin craft wire into the limbs before stuffing so the cow can hold poses gently.

Make a whole family by varying yarn colors and sizes โ€” a tiny keyring version made with fine yarn is a lovely gift set.

Use felt shapes instead of crochet for decorations like chocolate chips or strawberries if you want crisp, flat details.

I sometimes add a small bell or a safety-stitched loop to hang the cow as an ornament; always secure attachments well for safety.

Experiment with different stuffing amounts for a squishier or firmer toy; I prefer a slightly overstuffed body for that chubby look.

Common Mistakes & How to Fix Them

โœ— Skipping stitch markers during rounds leads to losing the start of the round; place a marker at the first stitch and move it after each round. โœ— Understuffing the head and body creates a floppy shape; stuff gradually and firmly to achieve the chubby look, adding small amounts at a time. โœ— Changing colors without securing the tail can cause loose ends; carry the yarn neatly or weave in ends as you go to hide tails. โœ— Not counting stitches after increases and decreases creates uneven shaping; count your stitches at the end of each round to confirm the stitch count. โœ— Pulling stitches too tight when using chenille yarn makes the fabric stiff; maintain an even, relaxed tension to keep the plush texture soft.

Chubby Milky Cow Amigurumi Pattern

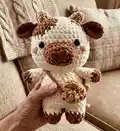
Make an adorable chubby milky cow amigurumi using soft, plush yarn and simple shaping techniques. This pattern guides you through each piece step-by-step so you can create a cuddly toy with personality. Perfect as a gift or a cozy handmade keepsake you will love to make and share.

Intermediate 5-7 Hours

Materials Needed for Chubby Milky Cow Amigurumi Pattern

โ€” Main Fabric

  • 01
    Himalaya Dolphin Baby (bulky chenille) - less than one skein per color for this project
  • 02
    Cream/White (main color) - less than one skein
  • 03
    Brown (darker spots and hooves) - less than one skein
  • 04
    Light brown (nose, horns, bag) - small amount, less than one skein
  • 05
    Pink - small amount for cheeks
  • 06
    Additional small scraps for cookie chips, strawberry details and accessories

โ€” Tools Required

  • 01
    Crochet hook size 4-5mm for chunky yarn
  • 02
    Stitch markers
  • 03
    Scissors
  • 04
    Polyester stuffing (fiberfill)
  • 05
    Safety eyes 10mm and 12mm (optional) or felt for eyes
  • 06
    Yarn needle for sewing pieces
  • 07
    Pins for assembly
  • 08
    Optional: felt and glue or darker yarn for chocolate chips and small details

Progress Tracker

0% Complete

โ€” Head :

Round 1 :

Mr 6sc (6)

Round 2 :

6inc (12)

Round 3 :

Sc, inc, Brown [sc, inc, sc], inc, (sc, inc)*3 (18)

Round 4 :

Sc, inc, sc, [sc, inc, 2sc, inc], 2sc, inc, [2sc, inc], 2sc, inc, sc (24)

Round 5 :

3sc, inc, [3sc, inc, 3sc], inc, 2sc [sc, inc, 3sc], inc, 3sc, inc (30)

Round 6 :

2sc, inc, 3sc, [sc, inc, 4sc, inc] 4sc, inc, [4sc] inc, 4sc, inc, 2sc(36)

Round 7 :

5sc, inc, 2sc, [3sc, inc, 3sc] 2sc, inc, 5sc [inc, sc] 4sc, inc, 5sc, inc (42)

Round 8 :

10sc, [6sc], 26sc (42)

Round 9-13 :

42sc (42)

Round 14 :

(5sc, dec)*6 (36)

Round 15 :

2sc, dec (4sc, dec)*5, 2sc (30)

Round 16 :

(3sc, dec)*6 (24)

Round 17 :

sc, dec (2sc, dec)*5, sc (18)

Info :

Fasten off & cut the yarn.

Info :

Try to stuff the head enough with filling to get a chubby head.

Info :

Insert the eyes ( I used both 10mm & 12mm, it's more personal preference) between r.10-11, 6-7 stitches between (it vary on how we sew the nose).

โ€” Ears :

Round 1 :

Mr 8sc (8)

Round 2 :

8inc (16)

Round 3 :

16sc (16)

Info :

Fasten off & leave a long tail to sew them between r.6-7 of the head.

โ€” Horn :

Round 1 :

Mr 4sc (4)

Round 2 :

4inc (8)

Round 3 :

8sc (8)

Info :

Fasten off & leave a long tail for sewing. Sew them between r.3-4 of the head.

โ€” Nose :

Round 1 :

Ch 8, 2nd ch from hook, crochet 6sc, inc, on the other side of ch 5sc, inc (15) (take a look at the chart below)

Round 2 :

inc, 5sc, 3inc, 5sc, inc (20)

Round 3 :

20sc (20)

Info :

Fasten off and leave a long tail for sewing.

Info :

Stuff it a little bit, and sew it between r.11-14 of the head.

โ€” Arms :

Round 1 :

Mr 8sc (8)

Round 2 :

8sc (8)

Round 3-7 :

cream 8sc (8)

Info :

Fasten off & leave a long tail for sewing on the body r.16.

โ€” Legs - sitting :

Round 1 :

Mr 6sc (6)

Round 2 :

6inc (12)

Round 3-4 :

12sc (12)

Info :

Fasten off & leave a long tail for sewing.

Info :

Stuff the legs & sew them between r.4-6 of the body - sitting.

โ€” Body - sitting :

Round 1 :

Mr 8sc (8)

Round 2 :

8inc (16)

Round 3 :

(sc, inc)*8 (24)

Round 4 :

(3sc, inc)*6 (30)

Round 5-10 :

30sc (30)

Round 11 :

(3sc, dec)*6 (24)

Round 12 :

24sc (24)

Round 13 :

(2sc, dec)*6 (18)

Info :

Fasten off & leave a long tail for sewing.

Info :

Stuff filling while crochet. You did a good job so far *v* Stretch your body โ‰ˆ*v*โ‰ˆ

โ€” Body - standing :

Round 1 :

Mr 6sc (6)

Round 2 :

6inc (12)

Round 3-4 :

12sc (12)

Round 5 :

cream 12sc (12)

Info :

Fasten off and make another leg but don't cut off the yarn. Continue making ch 2 and join the first leg.

Round 6 :

12sc + 2sc (first side of the chains) + 12sc + 2sc (other side of the chains) (28)

Round 7 :

3sc, inc (6sc, inc)*3, 3sc (32)

Round 8-11 :

32sc (32)

Round 12 :

(14sc, dec)*2 (30)

Round 13-14 :

30sc (30)

Round 15 :

Sc, (5sc, dec)*4, sc (26)

Round 16 :

Sc, (4sc, dec)*4, sc (22)

Round 17 :

sc, (3sc, dec)*4, sc (18)

Info :

Fasten off & leave a long tail and sew it to the head.

Info :

Don't forget to feed the body with alotttt of filling. He wants to be chubbyyyy.

โ€” Tiny Heart :

Info :

Make ch 3, crochet everything into the first ch: 2 dc, 2 hdc, 1 dc, 2 hdc, 2 dc, ch 2 and slst. Leave a long tail of yarn. Sew it on the body :X (video crochet the heart posted on my tiktok rin.meow21)

โ€” Tail :

Round 1 :

Start with brown yarn mr 5sc (5)

Round 2 :

5inc (10)

Round 3-4 :

10sc (10)

Round 5 :

5dec (5)

Info :

Weave in the rest of yarn and hide the yarn.

Info :

Start with white/cream yarn Make a long 6 chains. Don't forget to leave a long tail of yarn for both end. Sew one tail of yarn to the brown part, and the other to the body of the cow, between r.8-9, or r.3-4 of the sitting body.
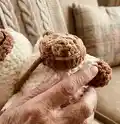
โ€” Cookie bag :

Round 1 :

Mr 8sc (8)

Round 2 :

8 hdc inc (16)

Info :

Make 2 pieces and sew them together but let it open otherwise cowie can't use it as a bag :P

Info :

Use another darker felt or yarn so make the chocolate on cookie.

โ€” Ice cream bag (cone) :

Round 1 :

Mr 4sc (4)

Round 2 :

4inc (8)

Round 3 :

8sc (8)

Round 4 :

(sc, inc)*4 (12)

Round 5 :

Change to another color 12sc (12)

Round 6 :

BLO (2sc, inc)*4 (16)

Round 7 :

16sc (16)

Round 8 :

(2sc, dec)*4 (12)

Round 9 :

(sc, dec)*4 (8)

Round 10 :

4dec (4)

Info :

Fasten off & weave in the rest. Insert your hook at FLO (r.6) Make ch 2, sc to the next stitch, repeat until done. Make a tiny strawberry for topping if you want.

โ€” Strawberry - red :

Round 1 :

Mr 4sc (4)

Round 2 :

4inc (8)

Round 3 :

8sc (8)

Round 4 :

4dec (4)

Info :

Fasten off & cut the yarn.

โ€” Strawberry leaf - green :

Round 1 :

Mr 4sc (4)

Round 2 :

sc, make ch 3, 2nd ch from hook and crochet 2 slst. Sc to the next two stitches. sc, make ch 3, 2nd ch from hook and crochet 2 slst.

Info :

Fasten off & leave a long tail for sewing.

Info :

Video of making the horn and leaf as a strawberry is posted on my TikTok account rin.meow21

Assembly Instructions

  • Insert safety eyes between rounds 10-11 of the head, spacing them about 6-7 stitches apart before sewing the nose in place.
  • Sew ears to the head between rounds 6-7 and sew horns between rounds 3-4 of the head with long tails for secure attachment.
  • Attach the nose between rounds 11-14 of the head and embroider the mouth if desired, securing with a yarn needle.
  • Sew the arms to the body around round 16 so they align naturally; use pins to position them before stitching.
  • For the sitting version, sew legs between rounds 4-6 of the body; for the standing version, join legs with chains and continue as instructed, then stuff firmly and sew the body to the head.

Important Notes

  • ๐Ÿ’กUse stitch markers to mark the beginning of each round, especially when doing increases or decreases for shaping.
  • ๐Ÿ’กStuff firmly and evenly as you work โ€” understuffing will flatten the shape while overstuffing can distort stitches.
  • ๐Ÿ’กPin parts into position before sewing to ensure symmetry and correct placement of features like eyes, nose and accessories.
  • ๐Ÿ’กWeave in ends as you go to keep the finishing neat and prevent long tails from getting trapped inside the toy.

This chubby milky cow is designed to be squishy, sweet, and full of charm for gifting or display. Bring out your softest chenille yarn and lose yourself in the cozy crochet process. Share your finished cow with friends and enjoy every stitch! ๐Ÿงถ๐Ÿฎ

You ask,

we answer.

FAQs

What size will the finished piece be?

The finished amigurumi measures approximately 18-20 cm tall when using Himalayan Dolphin Baby yarn and a 4-5mm hook; final size will vary with yarn and hook choice.

Can I use different yarn weights for this pattern?

Yes, you can use different yarn weights but this will affect the final size and texture; choose the appropriate hook for your yarn and adjust stuffing and eye size accordingly.

Do I need prior crochet experience for this pattern?

This pattern is rated intermediate, so basic knowledge of single crochet, increases, decreases and working in the round is recommended for best results.

How long does this project typically take to complete?

Most crocheters complete this project in 5-7 hours, though time may vary based on experience level, the number of accessories you make, and working pace.

Can I make both sitting and standing versions?

Yes, the pattern includes instructions for both a sitting and a standing body โ€” choose the body section you prefer and follow the assembly instructions.