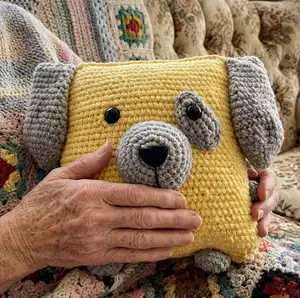
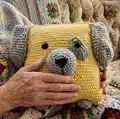
Make a soft, cuddly Pillow-Dog that doubles as a decorative cushion and a friendly plush companion. This pattern walks you through a square pillow body and simple amigurumi details — ears, nose, legs and arms — using plush yarn for a cozy finish. You can customize colors and size by changing yarn and hook, making it a perfect handmade gift for kids or a cute accent for your home.
Progress Tracker
0% Complete
— Materials :
Info :
I use Kamtex Velor yarn. (95 m /100 g.). Colors: yellow, gray. (You can crochet any other plush yarn - Himalaya Dolphin Baby or YarnArt Dolce). Acryl yarn (for sewing). Colors: yellow, gray, black. Filler (I use hollofayber). Hook № 4-5 mm (The size of the hook is specified on the package of yarn). black beads for eyes (20-22 mm). Needle. Do not forget to fix the beginning of each new circle with a pin or thread.
— Symbols :
Info :
sc - single crochet. inc - increase. dec - invisible decrease (single crochet 2 together): (We knit two loops together behind the front wall of the loop). sl st - slip stitch. ch – chain.
— Pillow :
Info :
Use yellow plush yarn
Round 1 :
90 ch, connect with the first loop
Info :
Sew the pillow top with 45 sc (or sew with acryl yellow yarn and needle). We fasten the thread and hide inside the pillow
— Ear (2 details) :
Info :
Use gray plush yarn
Round 1 :
6 sc in magic Ring (6)
Round 2 :
(inc) - repeat 6 times (12)
Round 3 :
(1 sc, inc) - repeat 6 times (18)
Round 4 :
(2 sc, inc) - repeat 6 times (24)
Round 5 :
(3 sc, inc) - repeat 6 times (30)
Round 6 :
(4 sc, inc) - repeat 6 times (36)
Round 12 :
19 sc, dec, 13 sc, dec (34)
Round 14 :
19 sc, dec, 11 sc, dec (32)
Round 15 :
18 sc, dec, 10 sc, dec (30)
Round 17 :
17 sc, dec, 9 sc, dec (28)
Info :
Sew two halves with 14 sc and Leave a long thread for sewing.
— Leg (2 details) :
Info :
Use gray plush yarn
Round 1 :
6 sc in magic Ring (6)
Round 2 :
(inc) - repeat 6 times (12)
Round 3 :
(1 sc, inc) - repeat 6 times (18)
Info :
Leave a long thread for sewing.
— Arm (2 details) :
Info :
Use gray plush yarn
Round 1 :
6 sc in magic Ring (6)
Round 2 :
(inc) - repeat 6 times (12)
Info :
Leave a long thread for sewing.
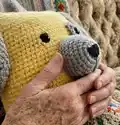
— Nose :
Info :
Use gray plush yarn
Round 1 :
6 sc in magic Ring (6)
Round 2 :
(inc) - repeat 6 times (12)
Round 3 :
(1 sc, inc) - repeat 6 times (18)
Round 4 :
(2 sc, inc) - repeat 6 times (24)
Round 5 :
(3 sc, inc) - repeat 6 times (30)
Round 6 :
(4 sc, inc) - repeat 6 times (36)
Round 7 :
(5 sc, inc) - repeat 6 times (42)
Info :
Leave a long thread for sewing.
Info :
Use black acryl yarn and embroider the nose and leave a long thread.
— Spot :
Info :
Use gray plush yarn
Round 1 :
9 ch, we begin to knit from the second loop from the hook 7 sc, in the first loop of the chain we knit 3 sc. Continue to crochet on the other side of the chain: 7 sc, inc
Round 2 :
inc, 6 sc, (inc) - repeat 3 times, 7 sc, inc, 1 sc
Round 3 :
inc, 9 sc, inc, 2 sc, sl st
Info :
Leave a long thread for sewing.
— Assembly :
Info :
Fill the pillow loosely. Sew the nose to the 12-22 rounds (see photo) in the center of the pillow, fill it. make the seam of the black thread down and fasten it and hide inside the nose. Sew a spot to the right of the nose.
Info :
We fix the eyes (or sew) on the 24 round, the distance between the eyes is 13 sc (we sew one eye on the spot).
Info :
Fill the pillow tightly, evenly, so that there are no "balls". Sew one edge of the ear to 6 sc from the beginning of the pillow, and bend the other edge back. Hands sew between 10-13 rounds from the side. We fill, sew the bottom of the pillow with a yellow acryl yarn and needle. Sew legs at a distance of 17-18 sc.
This Pillow-Dog pattern makes a soft, huggable cushion that doubles as a lovable plush friend. Perfect for gifting or adding a playful touch to your home decor. Make it in your favorite color combo and enjoy the cozy texture of plush yarn. 🧶🐶✨