🧢 Beautiful ✨ Detailed πŸ’ Adorable

Pillow-Cat Amigurumi Pattern

Pillow-Cat Amigurumi Pattern
4.1β˜… Rating
5-7 Hours Time Needed
3.3K Made This
βœ‚οΈ

Intermediate Level

Ideal for those with basic crochet experience, featuring slightly more advanced stitches and techniques to expand your skills.

⏱️

Weekend Treat

Takes 5-7 hours, making it an enjoyable project to finish over a couple of days.

🧸

Cute Companion

An adorable friend to cherish, handcrafted with love to bring comfort and joy for years to come.

About This Pillow-Cat Amigurumi Pattern

This pattern teaches you how to crochet a plush cat-shaped pillow with striped body, ears, nose and small limbs. It uses plush yarn for a soft, cuddly texture and is sized roughly 30x33 cm depending on your yarn and hook. The design includes clear rounds and small assembly steps so you can sew parts on precisely.

Pillow-Cat Amigurumi Pattern crochet pattern - detailed view of completed project

Ideal as a unique gift for children and adults, the pillow is made from simple crochet stitches with step-by-step photos. Change colors or yarn to personalize the look and size easily.

Why You'll Love This Pillow-Cat Amigurumi Pattern

I absolutely love this pattern because it turns simple stitches into a charming, huggable pillow that feels like a toy and decor in one. I enjoy how quickly the striped body grows with repetitive rounds β€” it's relaxing and rewarding. The plush yarn creates a luxurious texture that kids adore and adults will still find stylish. Sewing on the details like the nose, lip and ears lets me add personality each time I make one, which keeps the process fun and creative.

Pillow-Cat Amigurumi Pattern step 1 - construction progress Pillow-Cat Amigurumi Pattern step 2 - assembly progress Pillow-Cat Amigurumi Pattern step 3 - details and accessories Pillow-Cat Amigurumi Pattern step 4 - final assembly and finishing

Switch Things Up

I love how easy it is to customize this pillow by changing the stripe colors β€” try pastel shades for a nursery-friendly version or bold brights for a playful look.

I often swap the plush yarn for a standard worsted acrylic to make a firmer, more structured pillow; adjust your hook accordingly for neat stitch definition.

I like to make mini versions as keychains by using thinner yarn and a smaller hook to create tiny pocket pals.

I sometimes embroider different facial expressions or add freckles to make each pillow unique and expressive.

Try using safety eyes for a child-safe option or felt cutouts for a softer, toddler-friendly face instead of beads.

If you want a more posable look, add small pieces of wire inside the arms to gently bend them into cute poses.

Mix and match ear shapes β€” pointy for a classic cat, rounded for a softer, bear-like look β€” by changing the ear pattern slightly.

I also enjoy creating seasonal versions: add a tiny crocheted bow, a Santa hat, or mini scarves to make holiday-themed pillows.

To change the pillow size, simply increase or decrease the starting chain and adjust stripe repeats so you keep the same proportions and stitch counts on each round.

Finally, I recommend experimenting with textured stitches like bobbles or puff stitches on one stripe for a tactile, decorative accent that makes each pillow extra special.

Common Mistakes & How to Fix Them

βœ— Starting rounds without fixing the beginning can cause uneven joins and visible gaps; always secure the start of each new circle with a pin or a piece of thread as instructed. βœ— Stuffing too little or unevenly can make the pillow sag or lose its square shape; stuff tightly and evenly, paying attention to the corners and angles for a neat finish. βœ— Skipping counts during striped rounds leads to mismatched stripes and poor edge alignment; count your 90 stitches every round and use stitch markers if needed to track the beginning. βœ— Forgetting to hide and fasten threads leaves loose ends visible after sewing; fasten off and hide all ends inside the pillow or parts as you finish each piece to keep the exterior neat.

Pillow-Cat Amigurumi Pattern

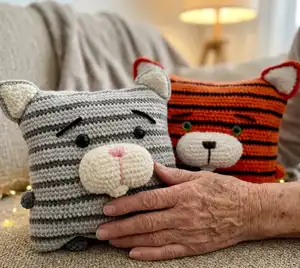
Make a sweet, plush cat pillow perfect for kids or adult decor with this cozy crochet pattern. You will create a soft striped pillow body, cute ears, a padded nose and lip, plus small arms and legs for personality. The pattern uses plush yarn for a velvety finish and clear step-by-step instructions so you can follow along with confidence. A heartfelt handmade gift that you can customize with colors and details to suit your style.

Intermediate 5-7 Hours

Materials Needed for Pillow-Cat Amigurumi Pattern

β€” Main Fabric

  • 01
    Himalaya Dolphin Baby plush yarn (120 m / 100 g) - Light gray: 2 skeins
  • 02
    Himalaya Dolphin Baby plush yarn (120 m / 100 g) - Gray: 1 skein
  • 03
    Himalaya Dolphin Baby plush yarn (120 m / 100 g) - White: 1 skein
  • 04
    Pink yarn - small amount for nose embroidery
  • 05
    Black yarn - small amount for eyebrows
  • 06
    Hollofayber (fiberfill) - filler for pillow and parts

β€” Tools Required

  • 01
    Crochet hook size 3.5 mm (recommended; hook size on yarn package may vary)
  • 02
    Optional crochet hook size 4.5 mm (pattern suggests 3.5-4.5 mm range)
  • 03
    Black beads or buttons for eyes (22 mm)
  • 04
    Tapestry/needle for sewing parts and weaving ends
  • 05
    Scissors
  • 06
    Stitch markers or pins to mark round beginnings
  • 07
    Polyester stuffing (hollofayber)
  • 08
    Pins for assembly and positioning

Progress Tracker

0% Complete

β€” Pillow :

Round 1 :

90 ch, connect with the first loop

Round 2 – 3 :

90 sc

Info :

We will change colors

Round 4 :

gray: 90 sc {90}

Round 5 – 7 :

light gray: 90 sc {90}

Round 8 :

gray: 90 sc {90}

Round 9 – 11 :

light gray: 90 sc {90}

Round 12 :

gray: 90 sc {90}

Round 13 – 15 :

light gray: 90 sc {90}

Round 16 :

gray: 90 sc {90}

Round 17 – 19 :

light gray: 90 sc {90}

Round 20 :

gray: 90 sc {90}

Round 21 – 23 :

light gray: 90 sc {90}

Round 24 :

gray: 90 sc {90}

Round 25 – 27 :

light gray: 90 sc {90}

Round 28 :

gray: 90 sc {90}

Round 29 – 31 :

light gray: 90 sc {90}

Round 32 :

gray: 90 sc {90}

Round 33 – 35 :

light gray: 90 sc {90}

Round 36 :

gray: 90 sc {90}

Round 37 – 39 :

light gray: 90 sc {90}

Info :

Leave a long thread and sew the top of the pillow. We fasten the thread and hide inside the pillow. Fill tightly and evenly. Fill the angle of the pillow well. Sew the bottom of the pillow and fasten the thread and hide inside the pillow.

β€” Ear :

Row 1 :

Make 11 ch

Row 2 :

we begin to work from the second loop from the hook: 10 sc, 1 ch, turn

Row 3 :

we begin to work from the second loop from the hook: dec, 6 sc, dec, 1 ch, turn

Row 4 :

we begin to work from the second loop from the hook: dec, 4 sc, dec, 1 ch, turn

Row 5 :

we begin to work from the second loop from the hook: dec, 2 sc, dec, 1 ch, turn

Row 6 :

we begin to work from the second loop from the hook: dec, dec, 1 ch, turn

Row 7 :

we begin to work from the second loop from the hook: dec

Info :

We crochet around the ear.

Info :

Make 7 sc, make inc in the left bottom angle, then make 8 sc, inc in the right bottom angle, 8 sc, sl st

Info :

We fasten the thread and cut it off

Row 1 :

Make 11 ch (use light gray yarn for outer detail)

Row 2 :

we begin to work from the second loop from the hook: 10 sc, 1 ch, turn

Row 3 :

we begin to work from the second loop from the hook: dec, 6 sc, dec, 1 ch, turn

Row 4 :

we begin to work from the second loop from the hook: dec, 4 sc, dec, 1 ch, turn

Row 5 :

we begin to work from the second loop from the hook: dec, 2 sc, dec, 1 ch, turn

Row 6 :

we begin to work from the second loop from the hook: dec, dec, 1 ch, turn

Row 7 :

we begin to work from the second loop from the hook: dec

Info :

We crochet around the ear. Make 7 sc, make inc in the left bottom angle, then make 8 sc, inc in the right bottom angle, 8 sc, sl st. We fasten the thread and cut it off.

Info :

We put together white and light gray details and crochet ears together (use light gray yarn). We start from the bottom right corner and make: 10 sc, inc (in the upper corner), inc, 10 sc (hide all the ends inside ears). Leave a long thread for sewing.

Info :

We put ears on the angles of the pillow and sew (the angle of the pillow should be inside the ear). Fasten the thread and hide it inside the pillow.

β€” Nose :

Round 1 :

Make 14 ch

Round 2 :

we begin to work from the second loop from the hook: 12 sc, 3 sc in 1 loop, 12 sc {27}

Round 3 :

3 in 1 loop, 12 sc, inc, inc, inc, 12 sc {33}

Round 4 :

inc, inc, inc, 13 sc, inc, sc, inc, sc, inc, 12 sc {39}

Round 5 :

sc, inc, sc, inc, sc, inc, 13 sc, inc, 2 sc, inc, 2 sc, inc, 13 sc {45}

Round 6 :

8 sc, hdc, (dc) – repeat 5 times, hdc, sc, hdc, (dc) – repeat 5 times, hdc, 22 sc {45}

Round 7 :

10 sc, inc, 10 sc, inc, 23 sc {45}

Info :

Fasten the thread, leave a long tail for sewing, fill and sew nose between rounds 12 and 22 of the pillow. Use pink yarn to embroider the pink nose detail.

β€” Lip :

Round 1 :

6 sc in magic Ring {6}

Round 2 :

(inc) – repeat 6 times {12}

Info :

Sew 2 halves with 6 sc. Leave a long thread for sewing. Sew lip onto pillow and fasten thread, hide inside the pillow.

β€” Leg (2 details) :

Round 1 :

6 sc in magic Ring {6}

Round 2 :

(inc) – repeat 6 times {12}

Round 3 :

(1 sc, inc) – repeat 6 times {18}

Round 4 :

18 sc

Info :

Leave a long thread for sewing. Make 2 legs and sew to bottom of pillow as shown.

β€” Arm (2 details) :

Round 1 :

6 sc in magic Ring {6}

Round 2 :

(inc) – repeat 6 times {12}

Round 3 :

12 sc

Info :

Leave a long thread for sewing. Make 2 arms and sew between rounds 11 and 15 of the pillow. Fill arms before sewing.

β€” Assembly :

Info :

Sew nose between 12 and 22 rounds of the pillow and fill. Use pink yarn and make pink nose embroidery on top of the nose.

Info :

Sew lip, fasten the thread and hide it inside the pillow.

Info :

Fill arms and sew between rounds 11 and 15. Sew legs and fasten the thread, hide inside the pillow.

Info :

Sew eyes (black beads or buttons) between rounds 24 and 25. Distance between eyes: 11 sc. Use black yarn to embroider eyebrows as shown.

Info :

Fasten all threads and hide ends inside the pillow for a neat finish.

Assembly Instructions

  • Sew the stuffed nose between rounds 12 and 22 of the pillow and fill it before final sewing; use pink yarn to embroider the nose detail on top.
  • Sew the lip to the pillow where indicated (between rounds 11 and 15), fasten the thread and hide the ends inside the pillow.
  • Attach the ears to the four top corners, ensuring the pillow angle sits inside each ear, then fasten the thread and hide ends inside the pillow.
  • Fill arms and sew them to the sides between rounds 11 and 15; sew legs to the bottom and hide thread ends inside the pillow for a tidy finish.
  • Sew eyes (22 mm beads or buttons) between rounds 24 and 25 with 11 sc distance between them, then embroider eyebrows with black yarn.

Important Notes

  • πŸ’‘Do not forget to fix the beginning of each new circle with a pin or thread to keep round joins tidy and aligned.
  • πŸ’‘Use stitch markers to keep track of the start of each round and maintain consistent stitch counts across 90-stitch rounds.
  • πŸ’‘Stuff the pillow and parts tightly and evenly and pay special attention to filling the corners so the pillow keeps its square shape.
  • πŸ’‘Hide and fasten all thread ends inside the pillow or parts after sewing for a clean professional finish.

This adorable Pillow-Cat pattern makes a cozy, huggable friend with plush texture and sweet facial details. Perfect as a gift or a cheery home accent you can customize with your favorite colors. Try different stripes or yarns to create a whole family of cuddly pillows. 🧢😊

You ask,

we answer.

FAQs

What size will the finished piece be?

The finished pillow measures approximately 30 x 33 centimeters using the recommended plush yarn and a 3.5 mm hook; size will vary with yarn weight and hook size.

Can I use different yarn weights for this pattern?

Yes, you can change yarn weight, but the finished size and texture will change; choose an appropriate hook for your yarn and expect a different final dimension.

Do I need prior crochet experience for this pattern?

This pattern is rated intermediate β€” basic knowledge of single crochet, increases and decreases and sewing amigurumi parts is recommended.

How long does this project typically take to complete?

Most crocheters finish this pillow in about 5-7 hours, depending on experience, yarn choice, and time spent on assembly and finishing.