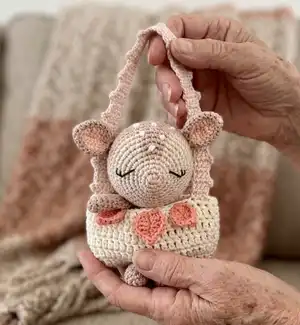
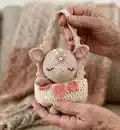
Make a sweet little fawn with its tiny baby carrier using a 2.5 mm hook and cotton yarn. This pattern guides you step-by-step through crocheting the head, body, legs, arms, ears, carrier and decorative leaves. With detailed shaping, color changes and finishing notes, you can create a delicate amigurumi perfect for gifting or decorating a nursery.
Progress Tracker
0% Complete
— Tips :
Info :
Invisible decrease: to crochet an invisible decrease, insert the hook into the front loop of the first stitch. Then insert the hook into the front loop of the next stitch. Yarn over and draw through the 2 loops on the hook. There are now two loops left on the hook. Yarn over, draw through both loops on the hook. One loop remains, your invisible decrease is complete.
Info :
Color change: Crochet the last stitch before color change like this: insert the hook in the next stitch, yarn over with the current color, and draw through the stitch. There are now two loops of the current color on the hook. Take your new color and draw it through both loops on the hook. There is now one loop with the new color on the hook. Work the next stitches as usual using the new color.
— Head :
Info :
Head - nude, ivory, beige (crochet hook 2,5 mm). For a better readability, the colors beige and nude are here highlighted. Please change the color on the last stitch as mentioned in the section "tips" (page 3). Crochet in spiral rounds. Insert the stitch marker into the first stitch of each round. Start with the color nude for the little nose.
Round 1 :
nude 6 sc in mr (6)
Round 2 :
ivory 6 inc (12)
Round 3 :
(2 sc, 1 inc) x4 (16)
Round 4 :
(3 sc, 1 inc) x4 (20)
Round 5 :
(3 sc, 1 inc) x3, 2 sc. beige 1 sc, 1 inc, 1 sc. ivory 2 sc, 1 inc (25)
Round 6 :
1 sc, 1 inc, (4 sc, 1 inc) x3. beige 4 sc. ivory 1 inc, 3 sc (30)
Round 7 :
(5 sc, 1 inc) x3, 3 sc. beige 2 sc, 1 inc, 1 sc. ivory 4 sc, 1 inc (35)
Round 8 :
2 sc, 1 inc, (6 sc, 1 inc) x3. beige 5 sc. ivory 1 sc, 1 inc, 4 sc (40)
Round 9 :
3 sc, 1 inc, 14 sc, 1 inc, 5 sc, 1 inc, 3 sc. beige 2 sc, 1 inc, 2 sc. ivory 3 sc, 1 inc, 3 sc (45)
Round 10 :
31 sc. beige 6 sc. ivory 8 sc (45)
Round 11 :
12 sc. beige 33 sc (45)
Round 12-16 :
45 sc (5 rds) (45)
Round 17 :
(7 sc, 1 dec) x5 (40)
Round 18 :
(3 sc, 1 dec, 3 sc) x5 (35)
Round 19 :
(5 sc, 1 dec) x5 (30)
Round 20 :
(3 sc, 1 dec) x6 Start stuffing firmly and continue as you crochet. (24)
Round 21 :
(1 sc, 1 dec, 1 sc) x6 (18)
Round 22 :
(1 sc, 1 dec) x6 (12)
Info :
Fasten off, leave a 20 cm-long tail and weave it with a needle through the front loops of the next 6 stitches. Pull the yarn tail to close and weave in the end.
— Left leg :
Info :
Left leg - beige (crochet hook 2,5 mm). Crochet in spiral rounds. Insert the stitch marker into the first stitch of each round.
Round 3 :
(3 sc, 1 inc) x3 (15)
Round 5 :
2 sc, 4 dec, 5 sc (11)
Round 6 :
1 sc, 3 dec, 4 sc (8) Stuff the little foot.
Round 7-8 :
8 sc (2 rds) (8)
Info :
Crochet 1 ch. Fold the leg (with the ch on the right), then crochet the two edges together with 4 sc through both edges (first sc through 1 and 1', second sc through 2 and 2', and so on). Fasten off and weave in the yarn end.
— Right leg and body :
Info :
Right leg and body - beige (crochet hook 2,5 mm). Crochet in spiral rounds. Insert the stitch marker into the first stitch of each round.
Round 3 :
(3 sc, 1 inc) x3 (15)
Round 5 :
2 sc, 4 dec, 5 sc (11)
Round 6 :
3 dec, 7 sc, 1 dec (11) (as shown in pattern photos)
Round 6 (alternative) :
2 dec, 5 sc, 1 dec (8) Stuff the little foot.
Round 7-8 :
8 sc (2 rds) (8)
Info :
Crochet 1 ch and turn the right leg: the back side is facing upwards (the ch and the hook are on the right). Continue with rd 9 (insert the stitch marker into the first stitch of rd 9):
Round 9 :
- 4 sc in flo (photo a), 2 ch (photo b), - with the back of the left leg facing upwards: 4 sc in flo (photos c and d), - turn your work (the front side of the left leg is facing upwards) (photo e): 4 sc in flo, - 2 sc on the foundation chain, - 4 sc in flo of the front side of the right leg (photo f) (20)
Round 10 :
(skip the ch crocheted before rd 9) 1 inc, 2 sc, 1 inc, 2 sc in the foundation chain, (take care not to skip the next stitch), 1 inc, 2 sc, 2 inc, (2 sc, 1 inc) x3 (28)
Round 11 :
19 sc, 1 inc, 3 sc, 1 inc, 4 sc (30)
Round 12-17 :
30 sc (6 rds) (30)
Round 18 :
(3 sc, 1 dec) x6 (24)
Round 19 :
(1 sc, 1 dec, 1 sc) x6 (18)
Info :
End with a slst and fasten off. Leave a long tail (30 cm) to sew and stuff the body.
— Arms (X2) :
Info :
Arms (x2) - beige (crochet hook 2,5 mm). Crochet in spiral rounds. Insert the stitch marker into the first stitch of each round.
Round 2 :
(1 sc, 1 inc) x3 (9)
Round 3-9 :
9 sc (7 rds) (9)
Info :
End with a slst and fasten off. Leave a long tail (30 cm) to sew. Do no stuff. Fold the arm and close it by sewing the two edges together. Do not cut yarn, as it will be needed to sew the arm to the body.
— Ears (X2) :
Info :
Ears (x2) - nude, beige (crochet hook 2,5 mm). With nude, make a chain of 10 ch.
Row 1 :
Starting in the 3rd ch from the hook: 1 dc, 4 tr, 1 dc, 1 hdc, 3 sc in the last ch, on the other side of the foundation chain: 1 hdc, 1 dc, 4 tr, 1 dc
Info :
End with 1 ch and 1 slst in the same stitch. Fasten off and weave in the ends. With beige, make a chain of 10 ch and repeat row 1 as for the first nude part (stop after the last dc). Do not fasten off. Crochet 1 ch.
Row 2 :
join the two parts by working 17 sc through both the nude and the beige parts.
Info :
Fasten off, leave a 20 cm-long tail and weave it with a needle through the first sc of row 2 and back through the blo of the last sc of row 2 (from the inside to the outside). Pull the yarn tail in order to fold the bottom part of the ear. Do not cut yarn as it will be needed to sew the ear to the head.
— Assembly :
Info :
Sew the body to the head: for this purpose, use pins to place the body at the right position and sew the two parts together. Sew the arms on each side between head and body. Sew the ears on each side of the head upon rds 15 and 16, about 15 stitches apart. With black embroidery yarn: embroider the eyes as shown in the photos.
Info :
Cut a long yarn in cream and embroider the dots on the body and on the head with French knot stitches: Bring up the yarn in the selected hole. Place the needle flat behind the yarn next to the selected hole. Wind the yarn around the needle twice. Continue the tension of the yarn to prevent it from uncoiling. Pull the needle carefully out, while maintaining the two loops in place. Tighten carefully to form the knot. Insert the needle in the same hole and bring it up to the next "dot" place.
— Baby carrier :
Info :
Baby carrier - cream, pastel pink, papaya (crochet hooks 2,5 mm and 4 mm). The first part of the baby carrier (the seat) is crocheted in the round, i.e. each round will be closed by a slst in the first stitch of the round, followed by 2 ch to start the next round (the 2 ch are not included in the total number of stitches at the end of a round). Tips: In order to avoid crocheting additional stitches, mark the first and the last stitch of each round with a stitch marker (not including the slst and the 2 ch). After crocheting the slst and the 2 ch, the first stitch of the row will be crocheted in the same stitch as the slst. Mark this first stitch with a stitch marker. With cream and a 4 mm hook, make a chain of 18 ch.
Round 1 :
Starting in the 2nd ch from the hook: 3 sc in the same stitch, 15 sc, 3 sc in the last ch, on the other side of the foundation chain: 2 sc, 5 ch, skip 5, 1 sc, 5 ch, skip 5, 2 sc (photo a) Close with a slst and 2 ch. (36)
Round 2 :
1 dc, 1 dcinc, 17 dc, 1 dcinc, 3 dc, 5 dc around the foundation chain (do not insert the hook in the loop of the ch, but in the space under the ch, see photo b), 1 dc, 5 dc around the foundation chain, 2 dc (photo c) Close with a slst and 2 ch. (38)
Round 3 :
1 dc, 2 dcinc, 17 dc, 2 dcinc, 16 dc Close with a slst and 2 ch. (42)
Round 4-6 :
42 dc, close with a slst and 2 ch. (3 rds) (42)
Info :
Close with a slst in the first sc of rd 7, fasten off and weave in the ends (photo d).
— Straps :
Info :
Straps - pastel pink (crochet hook 2,5 mm). Place the first part with the front side facing upwards (the front side is where the dc stitches of row 2 have been crocheted around the foundation chains). Four small straps will be crocheted on the seat (2 on each side) and joined to form a long closed strap. The small straps have a width of 3 stitches, labeled as "1", "2" and "3" on the photos. Mark the 4 stitches named "1" corresponding to the first stitch of each small strap: - start with the right hand side of the seat (photo a): identify the 3 sc situated on the right folded edge (blue loops shown by arrows on photo a) and place a stitch marker on the previous and the next stitch (the two stitches named "1" on photo a), - continue with the left hand side of the seat (photo b): identify the 3 sc situated on the left folded edge (blue loops shown by arrows on photo b). Place a stitch marker 3 stitches apart from them, both on the front and on the back edge of the carrier seat (the two stitches named "1" on photo b). Four stitches have been marked (photo c) and correspond to the first st of each strap.
Info :
The straps are crocheted in rows with the 2,5 mm hook. Start with the back right strap:
Row 1 :
- the front side of the baby carrier is facing upwards, - make a slip knot and remove the hook from the loop (photo d), - insert the hook into the stitch where the stitch marker was, - insert the loop of the slip knot onto the hook (photo e) and pull the loop through the stitch (photo f), - make 2 ch, the 2nd one will be the first stitch of row 1 (photo g) - crochet 2 sc (photo h) (3) - 1 ch and turn
Row 2 :
3 sc, 4 ch, turn (3)
Row 3-5 :
3 sc, 1 ch, turn (3 rows) (3)
Row 6-9 :
Repeat rows 2-5 (4 rows) (3)
Row 10-12 :
Repeat rows 2-4 (3 rows) (3)
Info :
Fasten off and weave in the ends (photo i). Continue with the front right strap and crochet rows 1 to 12 just as for the back right strap. Continue by joining the two right straps together:
Row 13 :
3 sc through both straps (photo j) (3) 1 ch, turn
Row 14-69 :
Repeat rows 2-5 until 17 little picots are obtained on the right strap (56 rows) (3) Fasten off and weave in the ends.
Info :
Continue with the back left strap: repeat the same steps as the right strap (mirror). Fasten off and weave in the ends. Continue with the front left strap and crochet rows 1 to 12 just as for the back left strap. Continue by joining the two left straps together:
Row 13 :
3 sc through both straps (photo j) 4 ch, turn (3)
Row 14-69 :
Repeat rows 2-5 until 18 little picots are obtained on the left strap (the 18th picot corresponds to the last 4 ch of row 69) (56 rows) (3) Fasten off and leave a 20 cm-long tail. Sew the last rows of the left and right straps together and weave in the ends.
— Leaves :
Info :
Leaves - papaya (crochet hook 2,5 mm).
Item Name (Big leaf) :
Make a chain of 8 ch. Row 1: Starting in the 3rd ch from the hook: 1 dc, 2 tr, 1 dc, 1 hdc, 3 sc in the last ch, on the other side of the foundation chain: 1 hdc, 1 dc, 2 tr, 1 dc. End with 2 ch and 1 slst in the same stitch. Fasten off and leave a 20 cm-long tail to sew.
Item Name (Small leaf x2) :
Make a chain of 6 ch. Row 1: Starting in the 2nd ch from the hook: 1 hdc, 2 dc, 1 hdc, 3 sc in the last ch, on the other side of the foundation chain: 1 hdc, 2 dc, 1 hdc. End with 1 ch and 1 slst in the same stitch. Fasten off and leave a 20 cm-long tail to sew.
Info :
Assembly: Sew the 3 leaves on the front side of the baby carrier between rds 6 and 7. The big leaf is centered and the two small leaves are sewn on each side of the big leaf, 2 stitches apart.
Thank you for choosing this little fawn pattern — I hope it brings a smile to your face and warmth to the hands you gift it to. This tiny companion combines delicate shaping with cute finishing details to become a treasured keepsake. Happy crocheting and enjoy every stitch! 🧶🧵