🧢 Beautiful ✨ Detailed πŸ’ Adorable

Bunny Amigurumi Pattern

Bunny Amigurumi Pattern
4.3β˜… Rating
5-7 Hours Time Needed
1.2K Made This
βœ‚οΈ

Intermediate Level

Ideal for those with basic crochet experience, featuring slightly more advanced stitches and techniques to expand your skills.

⏱️

Weekend Treat

Takes 5-7 hours, making it an enjoyable project to finish over a couple of days.

🧸

Cute Companion

An adorable friend to cherish, handcrafted with love to bring comfort and joy for years to come.

About This Bunny Amigurumi Pattern

This pattern guides you through crocheting a plush chenille bunny amigurumi with a cute muzzle, floppy ears and a bobtail. It includes step-by-step rounds for all pieces and clear assembly notes to help you attach parts accurately. The finished doll measures approximately 35 cm tall when made with the recommended materials.

Bunny Amigurumi Pattern crochet pattern - detailed view of completed project

Worked in continuous spiral rounds using US terms, this design uses chenille yarn for an ultra-soft texture. You will also make small accessories like a bow, hair tuft and felt eyes to finish the face.

Why You'll Love This Bunny Amigurumi Pattern

I absolutely love this pattern because the chenille yarn gives the bunny a plush, irresistible texture that feels cozy to hold. I designed the shaping to be fun and satisfying β€” you can see the character appear round by round. The pattern lets me add little personality touches like the bow and muzzle which always make each bunny unique. I enjoy how the assembly comes together; sewing the pieces in place is the most rewarding step for me.

Bunny Amigurumi Pattern step 1 - construction progress Bunny Amigurumi Pattern step 2 - assembly progress Bunny Amigurumi Pattern step 3 - details and accessories Bunny Amigurumi Pattern step 4 - final assembly and finishing

Switch Things Up

I love customizing this pattern by changing colors and small details to give each bunny its own personality.

You can swap the yellow chenille for pastel shades to make a nursery-friendly version or bright tones for a playful look.

Make a mini version by using a lighter yarn and smaller hook for a keychain or zipper charm.

I often modify the bow color or make a scarf to give the bunny seasonal outfits and extra charm.

Try embroidering different facial expressions β€” a slightly angled mouth or different felt eye shapes changes the whole mood of the toy.

For a posable version, consider inserting thin wire into the arms before stuffing so they can be positioned.

I sometimes add a weighted pellet bag to the bottom for stability if the bunny is top-heavy from a large head.

Use contrasting inner-ear colors or stripes to make each ear really pop and create visual interest.

If you want a sturdier finish, hand-stitch the felt eyes and details rather than gluing them, especially for toys for older children.

I also recommend experimenting with different stuffing levels β€” slightly firmer for a more sculpted look, lighter for a cuddly plush feel.

Common Mistakes & How to Fix Them

βœ— Skipping stitch markers during seam joins makes alignment difficult; mark your starting point and key joining stitches to keep parts symmetrical and aligned. βœ— Stuffing too tightly will distort the plush texture and make seams stand out; stuff gradually and evenly to maintain the soft chenille look. βœ— Changing colors without securing tails neatly results in messy finishes; weave in color change ends as you go or leave long tails for sewing to hide them inside seams. βœ— Forgetting to count stitches after increases or decreases causes shape errors; count your stitches at the end of each round and adjust immediately if the count is off. βœ— Using a larger hook than recommended will make the amigurumi floppy and larger than intended; use the specified 6 mm hook for chenille yarn and a 2.5 mm hook for the cotton nose to match gauge.

Bunny Amigurumi Pattern

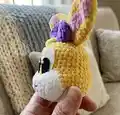
Create a cuddly chenille bunny with this detailed crochet pattern. You will make a soft, 35 cm tall amigurumi with charming details like a white muzzle, inner-ear pink, and a little purple bow. The pattern uses chenille yarn and step-by-step instructions for legs, body, head, ears, tail and finishing. Perfect for gifting or keeping as a cozy handmade friend.

Intermediate 5-7 Hours

Materials Needed for Bunny Amigurumi Pattern

β€” Main Fabric

  • 01
    Chenille yarn (main) - yellow (body, head, arms, legs)
  • 02
    Chenille yarn - white (muzzle, belly, feet, tail)
  • 03
    Chenille yarn - pink (inner ear accents)
  • 04
    Chenille yarn - purple (bow)
  • 05
    Cotton yarn - pink (nose)

β€” Tools Required

  • 01
    Crochet hook size 6 mm
  • 02
    Crochet hook size 2.5 mm (for nose)
  • 03
    Sewing needle
  • 04
    Scissors
  • 05
    Fabric glue / hot glue gun
  • 06
    Fiberfill for stuffing
  • 07
    Felt in black and white for eyes (used as safety eyes)
  • 08
    Yarn needle for sewing pieces together

Progress Tracker

0% Complete

β€” ARMS :

Round 1 :

Start with white yarn 6 sc (6)

Round 2 :

6 inc (12)

Round 3 :

12 sc (12)

Round 4 :

5 sc, 1 bobble, 6 sc. Change to yellow color yarn (12)

Round 5 :

(sc, dec) * 4 times (8)

Round 6-7 :

8 sc (8)

Round 8 :

3 sc, inc, 4 sc (9)

Round 9-11 :

9 sc (9)

Round 12 :

4 sc, inc, 4 sc (10)

Round 13-15 :

10 sc (10)

Info :

Stuff firmly, cut the yarn and leave a long tail for sewing

β€” LEGS (make 2) AND BODY :

Round 1 :

Start with white yarn Chain 5: start to crochet on the 2nd chain from the hook: 3 sc, 4 sc in the same stitch, continue to work on the other side of foundation chain: 2 sc, inc inc, 2 sc, 4 inc, 2 sc, 2 inc 18 sc 4 sc, 5

Round 2 :

dec, 4 sc Change to yellow color 6 sc, dec, 5 sc 12 sc (18)

Round 3-5 :

18 sc (18)

Round 6 :

13 sc (13)

Round 7 :

12 sc (12)

Round 8-11 :

12 sc (12)

Info :

Stuff firmly, cut the yarn Do the 2nd leg the same way, do not cut the yarn, chain 2 and join 2 legs together in the next round and crochet the body

β€” BODY :

Round 12 :

12 sc on the 1st leg, 2 sc on the chain 2, 12 sc on the 2nd leg, 2 sc on the chain 2 (3 sc, inc) * 7 times (28)

Round 13 :

(4 sc, inc) * 7 times (35)

Round 14 :

(inc, 2 sc) * 3 times, 24 sc, (inc, 2 sc) * 3 times (42)

Round 16 :

48 sc (48)

Round 16-18 :

48 sc (48)

Round 19 :

(6 sc, dec) * 6 times (42)

Round 20 :

42 sc (42)

Round 21 :

(5 sc, dec) * 6 times (36)

Round 22 :

36 sc (36)

Round 23 :

(4 sc, dec) * 6 times (30)

Round 24-26 :

30 sc (30)

Round 27 :

(3 sc, dec) * 6 times (24)

Round 28-30 :

24 sc (24)

Round 31 :

(2 sc, dec) * 6 times (18)

Round 32 :

4 sc on the body, 5 sc through body and arm 1, 4 sc on the body, 5 sc through body and arm 2 (sc, dec) * 6 times (18)

Round 33 :

12 sc (12)

Info :

Stuffed firmly, do not cut the yarn, we will continue to crochet the head

β€” HEAD :

Round 34 :

12 inc (24)

Round 35 :

(sc, inc) * 12 times (2 sc, inc) * 12 times (3 sc, inc) * 12 times 60 sc

Round 36 :

continue to crochet to the middle of the head back (9 sc, you may need to add or omit one sc to reach the midpoint), place marker. This will be the new starting point of the round 5 (48)

Round 37 :

60 sc (60)

Round 38-40 :

sc, 10 dec, 10 sc, 10 dec, 5 sc. (3 sc, dec) * 8 times 32 sc. Stuff as you go (2 sc, dec) * 8 times (sc, dec) * 8 times (60)

Round 41 :

8 dec (40)

Round 42 :

32 (32)

Round 43-49 :

32 sc (32)

Round 50 :

24 sc (24)

Round 51 :

16 sc (16)

Round 52 :

8 sc (8)

Info :

Stuffed firmly, cut the yarn and weave the end

β€” TAIL (Use white color yarn) :

Round 1 :

6 sc in the MR (6)

Round 2 :

6 inc (12)

Round 3 :

(sc, inc) * 6 times (18)

Round 4 :

18 sc (18)

Round 5 :

(sc, dec) * 6 times (12)

Info :

Fasten off and leave a long tail for sewing

β€” EARS :

Round 1 :

5 sc in the MR (5)

Round 2 :

2 inc, inc, 2 inc (10)

Round 3 :

4 sc, 2 sc, 4 sc (10)

Round 4 :

(sc, inc) * 2 times, sc, inc, (sc, inc) * 2 times (15)

Round 5-9 :

6 sc, 3 sc, 6 sc (15)

Round 10 :

(2 sc, inc) * 2 times, 2 sc, inc, (2 sc, inc) * 2 times (20)

Round 11-17 :

8 sc, 4 sc, 8 sc (20)

Round 18 :

20 sc (20)

Info :

Fold in half, cut the yarn and leave a long tail for sewing

β€” BELLY (Use white color yarn) :

Round 1 :

Chain 14, start to crochet on the 2nd chain from the hook: 12 sc, 5 sc in the same stitch, 12 sc on the other side of the foundation chain. Chain 1 and turn (27)

Round 2 :

6 sc, 5 hdc, dc, 5 dc inc, dc, 5 hdc, 6 sc (34)

Info :

Cut the yarn and leave a long tail for sewing

β€” MOUTH (Use white color yarn) :

Round 1 :

Chain 11, start to crochet on the 2nd chain from the hook: inc, 8 sc, 4 sc in the same stitch, 8 sc on the other side of the foundation chain, inc, slst (24)

Round 2 :

Chain 1, 2 inc, 8 sc, 4 inc, 8 sc, 2 inc, slst (32)

Round 3 :

Chain 1, (sc, inc) * 2 times, 8 sc, (sc inc) * 4 times, 8 sc, (sc, inc) * 2 times, slst (40)

Round 4 :

Chain 2, 5 dc, 2 hdc, 2 sc, 2 slst, 2 sc, 2 hdc, 7 dc, 2 hdc, 12 slst, 2 hdc, 2 dc (40)

Info :

Cut the yarn and leave a long tail for sewing

β€” NOSE (Use cotton yarn in pink and 2.5mm hook) :

Round 1 :

MR: 4 sc in the MR, close the hole and cut the yarn (do not slst). Leave a long tail for sewing

β€” WOOLYMAGICS / EYES / HAIR / BOW :

Info :

Use black and white felt to cut the eyes

HAIR :

Use yellow color yarn Chain 10: start to crochet on the 2nd chain from the hook: 2 slst, 2 sc, 2 hdc, 3 dc, slst and fasten off. Leave a long tail for sewing

BOW :

Use purple color yarn Chain 5: 4 treble crochet on the 1st chain, chain 4 and slst into the 1st chain, chain 4 + 4 treble crochet on the 1st chain, chain 4 and slst. Cut the yarn and leave a long tail to wrap around the middle of the bow.

β€” ASSEMBLY :

Info :

Sew the belly on the body over round 16-33

Info :

Sew the ears to the head on round 47-51

Info :

Sew the bow next to ears, sew the hair close to the bow

Info :

Sew the mouth to the head over round 35-42

Info :

Sew the tail to the back of body over round 15-18

Info :

Use hot glue to attach the eyes on the face

Assembly Instructions

  • Sew the belly on the body over rounds 16-33, centering it on the front and using small whipstitches to secure it flat and smooth.
  • Sew the ears to the head at rounds 47-51, folding each ear in half and matching the seam so they sit symmetrically on top of the head.
  • Sew the bow next to the ears, then sew the hair close to the bow using the long tails left from each piece to stitch them securely.
  • Sew the mouth to the head aligning it over rounds 35-42 and stitch the muzzle edges to sit flush with the face.
  • Sew the tail to the back of the body over rounds 15-18 and secure it firmly so it holds its shape.
  • Use hot glue to attach the felt eyes to the face, positioning them inside the muzzle area and leaving space for the muzzle and nose details.

Important Notes

  • πŸ’‘This pattern uses US crochet terminology and is worked in spiral rounds; do not slip stitch unless stated.
  • πŸ’‘Work with even tension and stuff gradually to keep the chenille yarn soft and the shape smooth.
  • πŸ’‘Leave long tails when cutting pieces to make sewing parts together easier and more secure.
  • πŸ’‘Place a marker at the start of rounds when joining or changing shaping to keep track of your position.

This sweet chenille bunny pattern makes a warm, huggable handmade friend for gift-giving or decorating a nursery. The plush texture and charming facial details bring personality to every stitch. Enjoy making your own cuddly companionβ€”happy crocheting! 🧢🐰

You ask,

we answer.

FAQs

What size will the finished piece be?

The finished amigurumi measures approximately 35 cm tall when using chenille yarn and a 6 mm hook as recommended.

Can I use different yarn weights for this pattern?

Yes, you can use different yarn weights but this will change the final size; if you switch weights, adjust the hook size accordingly and expect a different finished height.

Do I need prior crochet experience for this pattern?

This pattern is rated intermediate, so basic knowledge of amigurumi techniques, increases, decreases and sewing pieces together is recommended for best results.

How long does this project typically take to complete?

Most crocheters complete this project in 5-7 hours, although time may vary depending on experience level and how detailed you are with assembly and finishing.