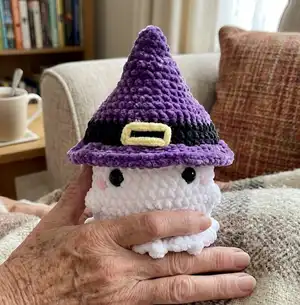
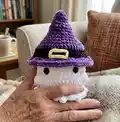
Make adorable no-sew ghost amigurumi that wear three interchangeable hats: witch, candy corn, and cowboy. This pattern walks you through each hat and the ghost in clear, photographed steps so you can create a cute collectible or gift. Youll learn bobble stitches, simple shaping, and how to finish details like blush and smiles.
Progress Tracker
0% Complete
— Hats: Witch Hat :
Round 4 :
(1 SC, INC) X 4 (12)
Round 5 :
(1 SC, INC) X 6 (18)
Round 7 :
(2 SC, INC) X 6 (24)
Round 9 :
(3 SC, INC) X 6 (30)
Round 10 :
(4 SC, INC) X 6 (36)
Round 11 :
(5 SC, INC) X 6 (42)
Round 12 :
(6 SC, INC) X 6 (48)
Info :
~Switch to black yarn.~
Round 13-15 :
48 SC (48) [3 rounds]
Info :
~Switch back to purple yarn.~ Note: You can cut off the black yarn now and it may be useful to work over the black yarn tail in the next round so that it is hidden within the hat.
Round 16 :
Using front loops only: (1 SC, INC) X 24 (72)
Round 17 :
Using both loops: 72 SC (72)
Info :
Finish off and weave in any ends.
Info :
Use yellow yarn to embroider on a rectangular buckle to the black stripe of the witch's hat. The horizontal part of the yellow buckle should be across 4 horizontal stitches on Round 13 and Round 15. The vertical part of the yellow buckle should be across 3 vertical stitches (the height of the black stripe).
— Hats: Candy Corn Hat :
Round 4 :
(1 SC, INC) X 4 (12)
Round 5 :
(1 SC, INC) X 6 (18)
Info :
~Switch to orange yarn.~ Note: You can cut off the white yarn now and it may be useful to work over the yarn tails in the next round so that they are hidden within the hat.
Round 7 :
(2 SC, INC) X 6 (24)
Round 9 :
(3 SC, INC) X 6 (30)
Round 10 :
(4 SC, INC) X 6 (36)
Info :
~Switch to yellow yarn.~ Note: You can cut off the orange yarn now and it may be useful to work over the yarn tails in the next round so that they are hidden within the hat.
Round 11 :
(5 SC, INC) X 6 (42)
Round 12 :
(6 SC, INC) X 6 (48)
Round 13-15 :
48 SC (48) [3 rounds]
Round 16 :
Using front loops only: INC X 48 (96)
Round 17 :
Using both loops: 96 SC (96)
Info :
Finish off and weave in any ends. The edge of the hat should be naturally wavy.
Info :
Go to page 8 to crochet your ghost next!
— Hats: Cowboy Hat :
Round 3 :
(1 SC, INC) X 6 (18)
Round 4 :
(2 SC, INC) X 6 (24)
Round 5 :
(3 SC, INC) X 6 (30)
Round 6 :
(4 SC, INC) X 6 (36)
Round 7 :
(5 SC, INC) X 6 (42)
Round 8 :
(6 SC, INC) X 6 (48)
Round 9 :
Using back loops only: 48 SC (48)
Round 10-16 :
48 SC (48) [7 rounds]
Info :
~Switch to dark brown yarn.~
Info :
~Switch back to the light brown yarn.~ Note: You can cut off the dark brown yarn now and it may be useful to work over the dark brown yarn tail in the next round so that it is hidden within the hat.
Round 18 :
Using front loops only: (7 SC, INC) X 6 (54)
Round 19 :
Using both loops: (3 SC, INC) X 2, 3 HDC, 5 DC, 3 HDC, (3 SC, INC) X 4, 3 HDC, 5 DC, 3 HDC, (3 SC, INC) X 2 (62)
Round 20 :
(10 SC, 3 HDC, 5 DC, 3 HDC, 10 SC) X 2 (62)
Round 21 :
(5 SC, INC) X 2, 1 HDC, 5 DC, 1 HDC, (5 SC, INC) X 4, 1 HDC, 5 DC, 1 HDC, (5 SC, INC) X 2 (70)
Info :
Finish off and weave in any ends. Go to the next page for how to shape/fold the hat to look more like a cowboy hat!
— Hats: Cowboy Hat (Cont.) :
Info :
SHAPING THE COWBOY HAT: After crocheting the cowboy hat, we'll need to shape/fold the hat to look more like a cowboy hat. There are three main finishing touches we'll do. Refer to the pictures in the pattern for a useful visual.
Step 1 :
Fold the sides of the hat's rim up. Each side of the hat's rim should form a natural curve because of how we crocheted them.
Step 2 :
Push the front of the hat's rim down so that the hat's rim dips slightly at the center. After pushing the front rim down, the hat's rim should form a slight 'U' shape. Note: The back of the cowboy hat is where you started/ended each round and the front is the opposite side.
Step 3 :
Push down the top of the hat so that it indents inwards along the front loops of Round 8. After this, push the front of the hat top down so the front of the top part forms a slight 'U' shape.
— Ghost :
Round 3 :
(1 SC, INC) X 6 (18)
Round 4 :
(2 SC, INC) X 6 (24)
Round 5 :
(3 SC, INC) X 6 (30)
Round 6 :
(4 SC, INC) X 6 (36)
Round 7 :
(5 SC, INC) X 6 (42)
Round 8-14 :
42 SC (42) [7 rounds]
Round 15 :
13 SC, BO, 14 SC, BO, 13 SC (42)
Round 16-19 :
42 SC (42) [4 rounds]
Info :
~Add the ghost's facial expression!~ EYES (safety eyes): Insert safety eyes at Rounds 12-13 in between the bobble stitches on the opposite side of where your hook currently is, since the first/last stitch of each round are at the backside of the ghost. The eyes should be ~6 stitches apart.
Info :
BLUSH (pink bulky weight yarn): Use pink yarn to embroider on blush between Rounds 13-14, just below and to the sides of the ghost's eyes. Each blush should be across 2 stitches.
Round 20 :
Using front loops of Round 19: [(in same stitch: 1 SC, 1 DC, 1 SC), SLST in next stitch] X 21 (84)
Info :
Note: It may be useful to put a stitch marker in the back loops of Round 19 since we'll use them in the next round!
Round 21 :
Using back loops of Round 19: (5 SC, DEC) X 6 (36)
Round 22 :
Using both loops: (4 SC, DEC) X 6 (30)
Info :
~Begin stuffing the ghost's body! Continue stuffing as you go along. Try on the ghost's hat as you stuff it to make sure you do not overstuff or understuff the top part of the ghost.~
Round 23 :
(3 SC, DEC) X 6 (24)
Round 24 :
(2 SC, DEC) X 6 (18)
Round 25 :
(1 SC, DEC) X 6 (12)
Info :
Finish stuffing. Finish off and leave a yarn tail to close the hole. Weave the yarn tail through the front loops of the last round and pull tightly to close the hole. Weave in the remaining end.
— Finishing Touches :
Info :
Try on the hat(s) you made for your ghost! The hats are removable so you can interchange them or choose when/if you want your ghost to wear a hat. You can also choose to sew the hats down to the ghost's head if you don't want them to be removable.
Info :
You can add a smile (or any other facial expression) to your ghost if you would like - use black felt for a glued smile or embroider with black yarn. If you made a smile, it should be glued/embroidered on at Rounds 13-14, centered between the ghost's eyes and ~3 stitches wide.
You did it! Your cute no-sew ghost wearing a hat is ready to charm anyone who sees it. Swap hats, change colors, and make a whole set for gifting or decorating your space. Keep creating and experimenting — these little ghosts are perfect for seasonal decor or year-round smiles. 🧶🎃😊