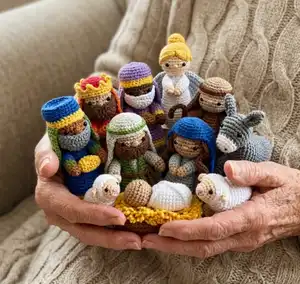
Create a charming nativity scene with this complete crochet pattern for a full set of tiny amigurumi figures. Youll make Mary, Joseph, Baby Jesus, three wise men, a shepherd, an angel, a lamb and a manger using simple stitches and clear step-by-step rounds. This pattern is packed with helpful photos and finishing notes so you can assemble a beautiful handcrafted set for gifts or holiday decor.
Progress Tracker
0% Complete
— Joseph :
Head :
R1: Using light brown, sc 6 into a magic ring. (6)
Round 2 :
R2: 2 sc in each st around. (12)
Round 3 :
R3: (Sc, 2 sc) 6x around. (18)
Round 4 :
R4: (Sc in next 2 sts, 2 sc) 6x around. (24)
Round 5 :
R5: (Sc in next 3 sts, 2 sc) 6x around. (30)
Round 6-9 :
R6-R9: Sc in each st around. (30)
Round 10 :
R10: (Sc in next 3 sts, invdec) 6x around. (24)
Round 11 :
R11: (Sc in next 2 sts, invdec) 6x around. (18)
Round 12 :
R12: (Sc, invdec) 6x around. (12)
Info :
Attach the safety eyes between rows 7 and 8, about 6 sts apart. Using light brown yarn and a yarn needle, stitch repeatedly over the sc mid-way between the eyes so the yarn bumps up like a nose. Use a pink crayon to make rosy cheeks. Then stuff the head.
Round 13 :
R13: Sc2tog around until closed. Fasten off, using yarn tail to pull final stitches completely shut.
— Joseph Body :
Info :
Note: For Joseph’s body and others in this pattern, use plastic mesh screens at the base of the body. Cut a circle about 2" in diameter to fit.
Round 1 :
R1: Using linen, sc 6 into a magic ring. (6)
Round 2 :
R2: 2 sc in each st around. (12)
Round 3 :
R3: (Sc, 2 sc) 6x around. (18)
Round 4 :
R4: (Sc in next 2 sts, 2 sc) 6x around. (24)
Round 5 :
R5: (Sc in next 3 sts, 2 sc) 6x around. (30)
Round 6 :
R6: (Sc in next 4 sts, 2 sc) 6x around. (36)
Round 7 :
R7: In back loops only, sc in each st around.
Round 8-11 :
R8-R11: Sc in each st around, insert mesh screen.
Round 12 :
R12: (Sc in next 4 sts, invdec) 6x around. (30)
Round 13-16 :
R13-R16: Sc in each st around, begin stuffing as you go.
Round 17 :
R17: (Sc in next 3 sts, invdec) 6x around. (24)
Round 18-20 :
R18-R20: Sc in each st around.
Round 21 :
R21: (Sc in next 2 sts, invdec) 6x around. (18)
Round 22-24 :
R22-R24: Sc in each st around.
Round 25 :
R25: (Sc, invdec) 6x around. (12)
Round 26 :
R26: Sc in each st around.
Info :
Fasten off, leaving tail long enough to sew head and body together. Stuff body completely, then match up with head and attach.
— Joseph Arms :
Info :
Arms (make two): Stuff lightly as you go.
Round 1 :
R1: Using light brown, sc 6 into a magic ring. (6)
Round 2 :
R2: (Sc, 2 sc) 3x around. (9)
Round 3 :
R3: Sc in each st around, switch to linen.
Round 4 :
R4: In front loops only, sc in each st around.
Round 5-9 :
R5-R9: Sc in each st around.
Round 10 :
R10: (Sc, invdec) 3x around. (6)
Round 11-12 :
R11-R12: Sc in each st around.
Info :
Fasten off, leaving long tail. Stuff more if necessary. Bend the arm gently into a curve, then sew shut. Attach to the sides of the body as pictured.
— Joseph Beard :
Beard R1 :
Using dark brown, ch 16. R1: Sc in 2nd ch from hook and in each st across. Ch 1. Turn. (15)
Beard R2 :
R2: Sc in first 2 sts, hdc in next 2 sts, dc in next st, tr in next 5 sts, dc in next st, hdc in next 2 sts, sc in last 2 sts. Ch 1. Turn.
Beard R3 :
R3: Sc in each st across. Ch 1. Turn.
Beard R4 :
R4: Sc in first 6 sts, ch 3, skip 3 sts, sc in last 6 sts.
Info :
Fasten off, leaving tail for attaching. You should have a tail on each end of the beard from the beginning chain and from fastening off. Pin beard into place, then use these tails to secure the sides of the beard as pictured. Then, sew across the top of the beard, keeping stitches even under the nose.
— Joseph Tunic :
Tunic R1 :
Using green, ch 21. R1: Sc in 2nd st from hook and in each ch across. Ch 1. Turn. (20)
Tunic R2-R4 :
R2-R4: Sc in each st across. Ch 1. Turn.
Tunic R5 :
R5: Sc2tog, sc in next 16 sts, sc2tog. Ch 1. Turn. (18)
Tunic R6-R8 :
R6-R8: Sc in each st across.
Tunic R9 :
R9: Sc2tog, sc in next 14 sts, sc2tog. Ch 1. Turn. (16)
Tunic R10-R12 :
R10-R12: Sc in each st across.
Tunic R13 :
R13: Sl st in first 3 sts, sc in next 10 sts. Ch 1. Turn (skipping last 3 sts).
Tunic R14-R17 :
R14-R17: Sc in next 10 sts. Ch 1. Turn. You now have the back section of the tunic.
Tunic R18-R22 :
As you begin Row 18 you'll be making the portion of the tunic that will go over one shoulder. R18-R22: Sc in next 2 sts. Ch 1. Turn. (2)
Tunic R23 :
R23: Sc, 2 sc. Ch 1. Turn. (3)
Tunic R24 :
R24: 2 sc, sc, 2 sc. Ch 1. Turn. (5)
Tunic R25-R26 :
R25-R26: Sc in each st across.
Tunic R27 :
R27: 2 sc, sc in next 3 sts, 2 sc. (7)
Tunic R28-R34 :
R28-R34: Sc in each st across. Fasten off, leaving long tail.
Info :
To make the other side, attach yarn to the other side of Row 17 as pictured then repeat instructions for rows 18-34, making the other side of the tunic. Sc around the inside edge of the tunic – up one side, around the back of the neck, and down the other side. Weave in all ends.
— Joseph Head covering :
Round 1 :
R1: Using linen, sc 6 into a magic ring. (6)
Round 2 :
R2: 2 sc in each st around. (12)
Round 3 :
R3: (Sc, 2 sc) 6x around. (18)
Round 4 :
R4: (Sc in next 2 sts, 2 sc) 6x around. (24)
Round 5 :
R5: (Sc in next 3 sts, 2 sc) 6x around. (30)
Round 6-8 :
R6-R8: Sc in each st around.
Info :
You will now begin working in rows around just part of the circular shape to extend the head covering down.
Round 9 :
From where you are, ch1 and turn the work. R9: Sc in each of the next 20 sts across. Ch 1. Turn.
Round 10-26 :
R10-R26: Repeat Row 9, turning after each row.
Info :
Attach to head by stitching around with linen yarn and yarn needle. To make border, ch 30 using green. Wrap around head covering and secure using yarn needle.
— Mary :
Head :
R1: Using light brown, sc 6 into a magic ring. (6)
Round 2 :
R2: 2 sc in each st around. (12)
Round 3 :
R3: (Sc, 2 sc) 6x around. (18)
Round 4 :
R4: (Sc in next 2 sts, 2 sc) 6x around. (24)
Round 5 :
R5: (Sc in next 3 sts, 2 sc) 6x around. (30)
Round 6-9 :
R6-R9: Sc in each st around. (30)
Round 10 :
R10: (Sc in next 3 sts, invdec) 6x around. (24)
Round 11 :
R11: (Sc in next 2 sts, invdec) 6x around. (18)
Round 12 :
R12: (Sc, invdec) 6x around. (12)
Info :
Attach the safety eyes between rows 7 and 8, about 6 sts apart. Using black embroidery thread, stitch 2-3 eyelashes on the outside corners of both eyes as pictured. Using light brown yarn and a yarn needle, stitch repeatedly over the sc mid-way between the eyes so the yarn bumps up like a little nose. Use a pink crayon to make rosy cheeks. Then stuff the head.
Round 13 :
R13: Sc2tog around until closed. Fasten off, using yarn tail to pull final stitches completely shut.
— Mary Body :
R1 :
R1: Using light blue, sc 6 into a magic ring. (6)
R2 :
R2: 2 sc in each st around. (12)
R3 :
R3: (Sc, 2 sc) 6x around. (18)
R4 :
R4: (Sc in next 2 sts, 2 sc) 6x around. (24)
R5 :
R5: (Sc in next 3 sts, 2 sc) 6x around. (30)
R6 :
R6: (Sc in next 4 sts, 2 sc) 6x around. (36)
R7 :
R7: In back loops only, sc in each st around.
R8-10 :
R8-R10: Sc in each st around, insert mesh screen.
R11 :
R11: (Sc in next 4 sts, invdec) 6x around. (30)
R12-R15 :
R12-R15: Sc in each st around, begin stuffing as you go.
R16 :
R16: (Sc in next 3 sts, invdec) 6x around. (24)
R17-R19 :
R17-R19: Sc in each st around.
R20 :
R20: (Sc in next 2 sts, invdec) 6x around. (18)
R21-R23 :
R21-R23: Sc in each st around.
R24 :
R24: (Sc, invdec) 6x around. (12)
R25 :
R25: Sc in each st around.
Info :
Fasten off, leaving tail long enough to sew head and body together. Stuff body, then match up with head and attach.
— Mary Hair and Curls :
Hair Info :
To make Mary's hair, first make and attach a few curls that will show from the front. Then use a yarn needle to sew on "bangs". Mary will look a little odd but when her head covering is attached it will look right.
Curls :
Using dark brown, ch 20. 2 hdc in 2nd ch from hook and in each ch across (will begin to curl into loose spiral). Make four and pin in place as pictured, then use yarn tails to attach. If you'd like to add more curls to the back you can.
Bangs :
Use yarn needle and long length of brown yarn to stitch "bangs." At the center point of the forehead, sew multiple strands to each side of Mary's face as pictured.
— Mary Head covering :
Head covering R1 :
Using dark blue, sc 6 into a magic ring. (6)
R2 :
R2: 2 sc in each st around. (12)
R3 :
R3: (Sc, 2 sc) 6x around. (18)
R4 :
R4: (Sc in next 2 sts, 2 sc) 6x around. (24)
R5 :
R5: (Sc in next 3 sts, 2 sc) 6x around. (30)
R6-7 :
R6-R7: sc in each st around.
Info :
You will now begin working in rows around just part of the circular shape to extend the head covering down.
R8 :
From where you are, ch1 and turn the work. R8: Sc in each of the next 20 sts across. Ch 1. Turn.
R9-R28 :
R9-R28: Repeat Row 8, turning after each row.
Info :
To finish the edges, sc up the side where your last row ended, across the top, and down the other side. Fasten off, weaving in ends. Using dark blue yarn and a yarn needle, attach the head covering by stitching around the top of the head.
— Baby Jesus :
Head :
R1: Using light brown, sc 6 into a magic ring. (6)
R2 :
R2: 2 sc in each st around. (12)
R3 :
R3: (Sc, 2 sc) 6x around. (18)
R4 :
R4: (Sc in next 2 sts, 2 sc) 6x around. (24)
R5-8 :
R5-R8: Sc in each st around.
R9 :
R9: (Sc in next 2 sts, invdec) 6x around. (18)
R10 :
R10: (Sc, invdec) 6x around. (12)
Info :
Using black embroidery thread, stitch two curves for closed eyes (Youtube has great tutorials if you'd like to learn more about embroidering a curved line). Alternatively, you could attach safety eyes between rows 5 and 6, about 3 sts apart. Using light brown yarn and a yarn needle, stitch repeatedly over the sc mid-way between the eyes so the yarn bumps up like a little nose. Use a pink crayon to make rosy cheeks. Then stuff the head.
R11 :
R11: Sc2tog around until closed. Fasten off, using yarn tail to pull final stitches completely shut.
— Baby Jesus Body :
R1 :
R1: Using white, sc 6 into a magic ring. (6)
R2 :
R2: 2 sc in each st around. (12)
R3 :
R3: (Sc, 2 sc) 6x around. (18)
R4 :
R4: Sc in each st around.
R5 :
R5: (Sc in next 2 sts, 2 sc) 6x around. (24)
R6-R12 :
R6-R12: Sc in each st around.
R13 :
R13: (Sc in next 2 sts, invdec) 6x around. (18)
R14 :
R14: Sc in each st around.
R15 :
R15: In back loops only, (sc, sc2tog) 6x around. (12)
Info :
Slip stitch to fasten off, leaving long tail. To add "seams", ch 35. Pull yarn through and cut, leaving long tail. Sew onto body as pictured, starting at the mid-point of the body, wrapping around the back, and then down at a diagonal angle. Then stuff body, match up with head, and attach.
— Manger :
To make base/top :
To make the base/top, using medium brown, ch 24. R1: Hdc in 3rd chain from hook and in each ch across. Ch 2. Turn. (22) R2-R9: Hdc in each st across. Ch 2. Turn. Fasten off, weaving in ends. Make two.
To make long sides :
To make the long sides, ch 22. R1: Hdc in 3rd chain from hook and in each ch across (20), ch 2, turn. R2-R3: Hdc in each st across (20), ch 2, turn. Fasten off, weaving in ends. Make two.
To make short sides :
To make the short sides, ch 12. R1: Hdc in 3rd chain from hook and in each ch across. Ch 2. Turn. (10) R2-R3: Hdc in each st across. Ch 2. Turn. Fasten off, weaving in ends. Make two.
Assembly :
To make manger, use a yarn needle to attach the long and short sides to the base so you have a box shape. Then, stuff lightly and attach the top around each edge.
Hay :
To add "hay", first cut a number of lengths of gold yarn approximately 5" long. Fold strands in half, and using your crochet hook, pull yarn through stitches as shown. Do this in layers, beginning by hooking yarn in a rectangle shape as pictured, again in a smaller rectangle, and then hooking yarn again from the middle of the manger. Once you think you have enough "hay", trim up the ends to the length you desire.
— Wise Man 1 :
Head :
Using dark brown, follow the instructions for Joseph's head, rounds 1-13.
Body :
Using purple, follow the instructions for Rounds 1-7 of Joseph's body. Then continue as follows:
R8 :
R8: Sc in each st around, switch to gold. (36)
R9-R10 :
R9-R10: Sc in each st around, switch back to purple.
R11 :
R11: Sc in each st around, insert mesh screen.
R12 :
R12: (Sc in next 4 sts, invdec) 6x around, switch to gold. (30)
R13-R14 :
R13-R14: Sc in each st around, switch back to purple.
R15-R16 :
R15-R16: Sc in each st around, begin stuffing as you go.
R17 :
R17: (Sc in next 3 sts, invdec) 6x around. (24)
R18-R20 :
R18-R20: Sc in each st around.
R21 :
R21: (Sc in next 2 sts, invdec) 6x around. (18)
R22-R24 :
R22-R24: Sc in each st around.
R25 :
R25: (Sc, invdec) 6x around. (12)
R26 :
R26: Sc in each st around. Fasten off, leaving tail long enough to sew head and body together. Stuff body, then match up with head and attach.
Beard :
Using white, follow directions for Joseph's beard. Attach as instructed.
Arms :
Arms (make two): Stuff lightly as you go. R1: Using dark brown, sc 6 into a magic ring. (6) R2: (Sc, 2 sc) 3x around. (9) R3: Sc in each st around, switch to gold. R4: In front loops only, sc in each st around. R5: Sc in each st around, switch to purple. R6-R9: Sc in each st around. R10: (Sc, invdec) 3x around. (6) R11-R12: Sc in each st around. Fasten off, leaving long tail. Attach to body.
— Wise Man 2 :
Head :
Using light brown, follow the instructions for Joseph's head, rounds 1-13.
Body :
Using red, follow the instructions for Rounds 1-10 of Joseph's body. Then continue as follows:
R11 :
R11: Switch to gold, sc in each st around, insert mesh screen. (36)
R12 :
R12: (Sc in next 4 sts, invdec) 6x around. (30)
R13 :
R13: Sc in each st around, switch back to red.
R14-R16 :
R14-R16: Sc in each st around, begin stuffing as you go.
R17 :
R17: (Sc in next 3 sts, invdec) 6x around. (24)
R18-R20 :
R18-R20: Sc in each st around.
R21 :
R21: (Sc in next 2 sts, invdec) 6x around. (18)
R22-R24 :
R22-R24: Sc in each st around.
R25 :
R25: (Sc, invdec) 6x around. (12)
R26 :
R26: Sc in each st around. Fasten off, leaving tail long enough to sew head and body together. Stuff body, then match up with head and attach.
Beard :
Using dark brown, follow directions for Joseph's beard. Attach as instructed.
Arms :
Arms (make two): Stuff lightly as you go. R1: Using light brown, sc 6 into a magic ring. (6) R2: (Sc, 2 sc) 3x around. (9) R3: Sc in each st around, switch to orange. R4: In front loops only, sc in each st around. R5-6: Sc in each st around, switch to red. R7-R9: Sc in each st around. R10: (Sc, invdec) 3x around. (6) R11-R12: Sc in each st around. Fasten off, leaving long tail. Attach to body.
— Wise Man 3 :
Head :
Using medium brown, follow the instructions for Joseph's head, rounds 1-13.
Body :
Using gold, follow the instructions for Joseph's body. Switch to dark blue at round 11 and continue following instructions through round 26. Attach head to body.
Beard :
Using gray, follow instructions for Joseph's beard and attach as instructed.
— Shepherd :
Head :
Using beige, follow instructions for Joseph's head, rounds 1-13.
Body :
Using medium brown, follow instructions for Mary's body. Attach body to head.
Arms :
Using beige, then medium brown, follow instructions for Joseph's arms. Attach to body.
Head covering :
Using light brown, follow instructions for Joseph's head covering. Use dark brown for border.
Belt :
Ch 50, fasten off and weave in ends. Tie around waist. Secure with a few stitches around with yarn needle and dark brown yarn if desired.
Staff :
Cut a brown pipe cleaner to 6" in length. Sc around the length of the pipe cleaner. Fasten off, weave in ends. Bend into a curve.
— Angel :
Head :
Using beige, follow directions for Mary's head.
Body :
Using white, follow directions for Mary's body. Attach head to body.
Arms :
Follow the directions for Mary's arms, using beige for the hands and white for the remainder of each arm. Attach securely as pictured.
Hair :
Using gold, first make a hair cap as follows: R1: Sc 6 into a magic ring. (6) R2: 2 sc in each st around. (12) R3: (Sc, 2 sc) 6x around. (18) R4: (Sc in next 2 sts, 2 sc) 6x around. (24) R5: (Sc in next 3 sts, 2 sc) 6x around (30) R6-R9: Sc in each st around. Fasten off, leaving long tail. Use yarn needle to attach hair cap to angel's hair.
Bun :
R1: Sc 6 into a magic ring. (6) R2: 2 sc in each st around. (12) R3: (Sc in next 3 sts, 2 sc) 3x around. (15) R4-R5: Sc in each st around. Fasten off, leaving long tail. Use yarn needle to attach bun to hair cap (stuff a bit as you attach).
Bangs :
Using a yarn needle, sew gold yarn around angel's hairline as pictured. Draw needle up through the center of hairline and to each side repeatedly.
Wings (make two) :
Using light blue, chain 7. R1: Sc in 2nd ch from hook and in each ch across. Ch 1. Turn. (6) R2: Sc in first 2 sts, 2 sc in next st, sc in next 2 sts. Ch 3. Turn. (9) R3: Sc in 2 ch sts (work into them as you would into a foundation chain), sc in next 3 sts, 2 sc, sc in last 2 sts. Ch 1. Turn. R4: Sc in first 3 sts, 2 sc, sc in next 4 sts. Ch 3. Turn. (12) R5: Sc in 2 ch sts, sc in next 5 sts, 2 sc, sc in last 3 sts. Ch 1. Turn. R6: Sc in first 2 sts, 2 sc, sc in next 8 sts. Ch 3. Turn. (15) R7: Sc in 2 ch sts, sc in next 8 sts, 2 sc, sc in last 3 sts. Ch 1. Turn. R8: Sc in first 3 sts, 2 sc in each of next 2 sts, sc in next 9 sts. Ch 2. Turn. (18) R9: Sc in 1 ch st, sc in next 11 sts, 2 sc, sc in last 4 sts. (Continue shaping as written in pattern.)
Info :
Fasten off, leaving long tail for attaching. If your wings are curling, you may want to block them. Using yarn needle, attach wings to back of angel as pictured.
— Lamb :
Ears (make two) :
Using beige, sc 6 into a magic ring. Slip stitch into first sc and pull yarn through. Fasten off, leaving tail to attach.
Head :
R1: Using beige, sc 6 into a magic ring. (6) R2: (Sc, 2 sc) 3x around. (9) R3: 2 sc in each of first 3 sts, sc in next 6 sts. (12) R4: (Sc, 2 sc) 6x around. (18) R5: (Sc in next 2 sts, 2 sc) 6x around. (24) R6-R9: Switch to white. Sc in each st around. R10: (Sc in next 2 sts, invdec) 6x around. (18) R11: (Sc, invdec) 6x around. (12)
Info :
Place safety eyes between rows 4 and 5, about 6 stitches apart. To embroider the nose as pictured, first use gray yarn to make a Y shape. Then, use pink yarn to fill in the top of the Y. Then attach the ears between at row 8, about 10 stitches apart. Stuff the head and then move on to round 12.
Round 12 :
R12: Sc2tog around until closed.
This adorable Nativity Amigurumi set brings the Christmas story to life in handmade form with tiny details and cozy yarn textures. Each figure is designed to be compact, sturdy, and full of character — perfect for gift-giving or a special holiday display. Whether youre making one figure or the whole set, enjoy the process and treasure the finished scene. 🧶✨🎁