🧢 Beautiful ✨ Detailed πŸ’ Adorable

Mochi-Mouse Loves Cheese Amigurumi Pattern

Mochi-Mouse Loves Cheese Amigurumi Pattern
4.1β˜… Rating
5-7 Hours Time Needed
3.5K Made This
βœ‚οΈ

Intermediate Level

Ideal for those with basic crochet experience, featuring slightly more advanced stitches and techniques to expand your skills.

⏱️

Weekend Treat

Takes 5-7 hours, making it an enjoyable project to finish over a couple of days.

🧸

Cute Companion

An adorable friend to cherish, handcrafted with love to bring comfort and joy for years to come.

About This Mochi-Mouse Loves Cheese Amigurumi Pattern

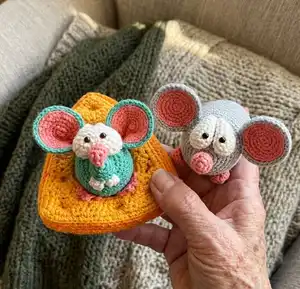
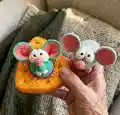
This pattern creates a small amigurumi mouse (Mochi-Mouse) that fits inside a crocheted cheese slide. The design combines tiny stuffed parts, layered ears and a hollow cheese piece for playful assembly. It uses simple shaping, color changes and small finishing details.

Mochi-Mouse Loves Cheese Amigurumi Pattern crochet pattern - detailed view of completed project

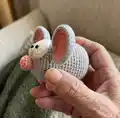
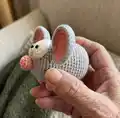
Youll make the mouse body, eyes, ears, teeth, feet and tail, then crochet two cheese pieces to join together into a slide. The pattern includes clear photos and step notes for assembly and finishing.

Why You'll Love This Mochi-Mouse Loves Cheese Amigurumi Pattern

I absolutely love this pattern because it combines tiny amigurumi charm with a clever interactive cheese slide that makes playtime delightful. I enjoy the challenge of mini shaping β€” the little ears, teeth and feet give so much personality. The step-by-step photos and clear round instructions make it satisfying to follow and finish. I also love how versatile the design is: you can change colors and make a whole family of mice for gifts.

Mochi-Mouse Loves Cheese Amigurumi Pattern step 1 - construction progress Mochi-Mouse Loves Cheese Amigurumi Pattern step 2 - assembly progress Mochi-Mouse Loves Cheese Amigurumi Pattern step 3 - details and accessories Mochi-Mouse Loves Cheese Amigurumi Pattern step 4 - final assembly and finishing

Switch Things Up

I love how easy it is to customize the Mochi-Mouse colors; try pale pastels for a nursery-friendly toy or bold brights for a playful look.

If you want a larger mouse, use a thicker yarn and a larger hookβ€”this creates a chunkier, cuddlier version without changing the stitch counts.

For a mini keychain, use thinner cotton and a smaller hook, sew in a keyring loop at the top of the head and you have a portable charm.

I often add embroidered freckles, tiny felt props, or a little crocheted bow tie to give each mouse its own personalityβ€”tiny props change the story instantly.

To make the cheese slide more realistic, experiment with different dent placements or add small embroidered holes and texture using surface slip stitch or french knots for detail.

If you want a poseable version, insert thin wire into the tail or limbs before stuffing and closing to allow slight movement.

Try mixing yarn textures: a bit of fuzzy yarn for the inner ears or a sparkly thread for a whimsical finish creates delightful accents.

I like assembling two mice in one cheese for a sibling setβ€”make two matching mice in complementary colors to create a set that tucks together.

Change the eye size or use embroidered eyes for a softer, child-safe toy where safety eyes are not appropriate.

Finally, make themed variations (holiday colors, tiny hats or scarves) to turn this pattern into a seasonal collectible or giftable charm.

Common Mistakes & How to Fix Them

βœ— Skipping stitch markers at the start of each round can cause losing track of round starts; place a marker at the first stitch and move it each round. βœ— Forgetting to stuff gradually results in lumpy or misshapen pieces; stuff a little at a time and check the shape frequently while crocheting. βœ— Not counting stitches after increases or decreases may cause incorrect shaping and mismatch when joining pieces; count stitches at the end of each round to confirm totals. βœ— Pulling your tension too tight on small parts makes sewing and joining difficult; keep a relaxed, consistent tension to allow stitching and assembly.

Mochi-Mouse Loves Cheese Amigurumi Pattern

Make an adorable Mochi-Mouse tucked inside a cheesy slice with this complete crochet pattern. Youll learn small amigurumi shaping, ears, feet, tiny teeth and how to assemble a hollow cheese slide to tuck the mouse into. Clear round-by-round instructions and helpful assembly photos guide you step-by-step so you can create a playful handmade gift.

Intermediate 5-7 Hours

Materials Needed for Mochi-Mouse Loves Cheese Amigurumi Pattern

β€” Main Fabric

  • 01
    Color A: pink Gazzal Baby Cotton 3435 (50g, 165m)
  • 02
    Color B: grey YarnArt Jeans 80 (50g, 160m)
  • 03
    Color C: white YarnArt Jeans 03 (50g, 160m)
  • 04
    Color D: yellow YarnArt Jeans 35 (50g, 160m)
  • 05
    Color E: orange Alize Cotton Gold 550 (100g, 330m)
  • 06
    Small amounts of accent colors (pink/orange) for nose and feet

β€” Tools Required

  • 01
    Crochet hook size 2.5mm
  • 02
    1 pair of 5mm safety eyes (black)
  • 03
    Tapestry needles
  • 04
    Brown thread for embroidery
  • 05
    Pins for positioning
  • 06
    Stitch markers
  • 07
    Scissors
  • 08
    Polyester fiberfill stuffing

Progress Tracker

0% Complete

β€” Body (yarn A) :

Round 1 :

sc 6 into a magic loop (6)

Round 2 :

inc 6 (12)

Round 3-4 :

sc 12 (2 rnds) (12)

Round 5 :

dec 6, stuff slightly, change to yarn B (6)

Round 6 :

sc 2, inc 2, sc 2 (8)

Round 7 :

sc 3, inc 2, sc 3 (10)

Round 8 :

sc 4, inc 2, sc 4 (12)

Round 9 :

sc 5, inc 2, sc 5 (14)

Round 10 :

sc 6, inc 2, sc 6 (16)

Round 11 :

sc 7, inc 2, sc 7 (18)

Round 12 :

sc 3, [sc 1, inc] 6x, sc 3 (24)

Round 13 :

sc 3, [sc 1, inc, sc 1] 6x, sc 3 (30)

Round 14 :

sc 3, [sc 3, inc] 6x, sc 3 (36)

Round 15 :

sc 3, [sc 2, inc, sc 2] 6x, sc 3 (42)

Round 16 :

sc 14, [sc 3, inc, sc 3] 2x, sc 14 (44)

Round 17-30 :

sc 44 (14 rnds) (44)

Round 31 :

[sc 20, dec] 2x (42)

Round 32 :

[sc 5, dec] 6x (36)

Round 33 :

[sc 4, dec] 6x (30)

Round 34 :

[sc 3, dec] 6x, stuff firmly (24)

Round 35 :

[sc 2, dec] 6x (18)

Round 36 :

[sc 1, dec] 6x (12)

Round 37 :

dec 6 (6)

Info :

Break the yarn, weave in the last 6 sts, stuff firmly (pic 1).

β€” Eyes (yarn C, X2) :

Round 1 :

sc 4 into a magic loop (4)

Round 2 :

sc 1, inc 2, sc 1 (6)

Round 3 :

sc 2, inc 2, sc 2 (8)

Round 4 :

sc 3, inc 2, sc 3 (10)

Round 5 :

sc 4, inc 2, sc 4 (12)

Round 6 :

sc 5, inc 2, sc 5 (14)

Round 7-9 :

sc 14 (3 rnds), stuff slightly (14)

Round 10 :

dec 7 (7)

Info :

Break the yarn with a long rest to sew later, weave in the last 7 sts (pic 2). Use a pin to locate 2 pieces together (pic 3), sew 2 pieces together (pic 4&5). Insert 5mm safety eyes like pic 6 (use glue to stick the eyes). Sew the eyes on the body (pic 7).

β€” Tail (yarn A) :

Round 1 :

ch 15, start on the 2nd st, slst 14 (14)

Info :

Break the yarn with a long rest to sew later.

β€” Teeth (yarn C, X2) :

Round 1 :

ch 4, start on the 2nd st, sc 3, ch 1, turn (3)

Round 2 :

sc 3 (3)

Info :

Break the yarn with a long rest to sew later. Sew the teeth under the nose (pic 8&9).

β€” Ears (yarn A-X2, Yarn B-X2) :

Note :

We will make 2 pieces of yarn A first

Round 1 :

sc 6 into a magic loop (6)

Round 2 :

inc 6 (12)

Round 3 :

[sc 1, inc] 6x (18)

Round 4 :

[sc 1, inc, sc 1] 6x (24)

Round 5 :

[sc 3, inc] 6x (30)

Round 6 :

[sc 2, inc, sc 2] 6x (36)

Info :

Break the yarn for 2 pieces of yarn A, make other 2 pieces with yarn B but do not break the yarn (pic 10). Hold 2 pieces as pic 11 (right side on the front), crochet sc across the edges (pic 12). Fold the ear in half (pic 13), sc 3 across the edges (pic 14), leave a long rest to sew later (pic 15). Sew the ears on the body (pic 16&17).

β€” Feet (yarn A, X4) :

Round 1 :

[ch 5, start on the 2nd st, slst 4] 4x (16) (pic 18), yarn over other 3 small feet (pic 19) and pull through all loops (pic 20)

Info :

Break the yarn with a long rest to sew later, make other 3 feet the same way (pic 21). Sew the feet & the tail on the body (pic 22&23).

β€” Cheese (yarn D) Part 1 :

Round 1 :

Magic loop, sc 2, ch 1, turn (2)

Round 2 :

inc 2, ch 1, turn (4)

Round 3 :

inc, sc 2, inc, ch 1, turn (6)

Round 4 :

sc 6, ch 1, turn (6)

Round 5 :

inc, sc 4, inc, ch 1, turn (8)

Round 6 :

inc, sc 6, inc, ch 1, turn (10)

Round 7 :

sc 10, ch 1, turn (10)

Round 8 :

inc, sc 8, inc, ch 1, turn (12)

Round 9 :

inc, sc 10, inc, ch 1, turn (14)

Round 10 :

sc 14, ch 1, turn (14)

Round 11 :

inc, sc 12, inc, ch 1, turn (16)

Round 12 :

sc 3, ch 1, turn (3)

Round 13 :

dec, inc, ch 1, turn (3)

Round 14 :

sc 1, dec, ch 1, turn (2)

Round 15 :

sc 2, ch 1, turn (2)

Round 16 :

inc, sc 1, ch 1, turn (3)

Round 17 :

sc 3, ch 1, turn (3)

Round 18 :

inc, dec, ch 1, turn (3)

Round 19 :

sc 3, ch 1, turn (3)

Round 20 :

sc 2, inc, ch 1, turn (4)

Round 21 :

sc 4, ch 1, turn (4)

Round 22 :

inc, sc 2, inc, ch 1, turn (6)

Round 23 :

sc 6, ch 1, turn (6)

Round 24 :

sc 5, inc, ch 1, turn (7)

Round 25 :

sc 7, ch 1, turn (7)

Info :

Break the yarn, hold the piece as pic 24, join the yarn on the rnd 11, repeat rnd 12-25 (pic 25), do not break the yarn, continue to crochet the following rnds:

Round 26 :

inc, sc 5, inc, ch 12, inc, sc 5, inc, ch 1, turn (30) (pic 27)

Round 27-28 :

sc 30 (2 rnds), ch 1, turn (30)

Info :

Do not break the yarn, continue to crochet sc across the edge, (sc 3) on the 3 pivots (pic 29): sc 28 + (sc 3) + sc 28 + (sc 3) + sc 30 + (sc 3)=95 (sts)

Round 31 :

(blo) sc 95 (pic 30) (95)

Round 32-36 :

sc 95 (5 rnds) (95)

Info :

Break yarn E (pic 31&32). Place the cheese as pic 33, join yarn D as pic 34, crochet sc across the inner ring (sc 12+14+10+14=50 stst (pic 35)), do not break the yarn, continue to crochet the inner part:

Inner Round 1 :

(blo) sc 50 (50)

Inner Round 2-6 :

sc 50 (5 rnds) (50)

Info :

Break the yarn with a long rest to sew later (pic 36&37).

β€” Cheese Part 2 & Assembly :

Part 2 Instructions :

Make another cheese slide (repeat rnd 1-30), and sc cross the edges as well (total 95 sts) (pic 38). Join yarn D on any st of the inner ring, crochet sc 50 across the inner ring (total 50 sts) (pic 39), do not break the yarn, continue to crochet to join 2 pieces together. Slst across the edge of the 1st piece (pic 41-42-43), break the yarn. Cut a long piece of yarn D to sew 2 rings together (pic 44), stuff firmly as long as sewing (pic 45).

Info :

Break the yarn, leave a long rest to make the dents on both side of the cheese (pic 46). Use tapestry needle to pull through both sides (pic 48-49-50-51) to create the dents (both sides). Put the mouse inside the cheese (pic 52&53), we have finished crocheting the Mochi-Mouse Loves Cheese!

Assembly Instructions

  • Insert 5mm safety eyes into the joined eye pieces before sewing the eyes to the body; place them as shown in the photos and secure with glue if needed, then sew the eye cluster to the body between the indicated rounds.
  • Sew the teeth under the nose, then sew the nose and the head piece onto the front of the body, using the long tails left for finishing to anchor pieces securely.
  • Position ears and sew onto the head: hold two ear layers right sides together, sc across edges, fold and sc across the edge to close, leave long tail and sew the completed ears onto the head at the positions shown in the photos.
  • Join the two cheese pieces by crocheting/slst around the inner ring to create the inner opening, then sew the two outer rings together, stuff the cheese as you sew and create dents by pulling a tapestry needle through both sides; finally tuck the mouse inside the cheese.
  • Sew feet and tail to the body at the bottom and back positions shown, and weave in all ends; adjust stuffing as needed before final closing.

Important Notes

  • πŸ’‘Use stitch markers to mark the beginning of each round to keep track of increases and decreases.
  • πŸ’‘Stuff gradually and test the shape often to avoid overstuffing or uneven lumps in small parts.
  • πŸ’‘Leave long yarn tails when instructed so you have enough for sewing pieces together and finishing securely.
  • πŸ’‘Weave in ends and hide tails between stitches for a neat finished amigurumi with no loose threads.

This Mochi-Mouse pattern brings a playful handmade touch to your craft table β€” a tiny friend tucked into a cheesy slide, perfect for gifting or display. The step-by-step rounds and photos make the build fun and satisfying, and you can easily customize the colors to make each mouse unique. Happy crocheting and enjoy every tiny stitch! 🧢🧡

You ask,

we answer.

FAQs

What size will the finished piece be?

The finished mochi-mouse inside the cheese measures approximately 10-12 cm tall depending on yarn tension and stuffing when using the recommended yarns and 2.5mm hook.

Can I use different yarn weights for this pattern?

Yes, you can use different yarn weights but it will change the final size; pick an appropriate hook and adjust stitch counts if needed, or use the same counts for a larger or smaller version.

Do I need prior crochet experience for this pattern?

This pattern is rated intermediate and assumes you know US terms like magic ring, single crochet, increases and decreases, and can change yarn colors while working.

How long does this project typically take to complete?

Most crocheters complete this project in 5-7 hours, though time may vary based on experience level, detail work and assembly time.