🧢 Beautiful ✨ Detailed πŸ’ Adorable

Minimals Rabbit Amigurumi Pattern

Minimals Rabbit Amigurumi Pattern
4.9β˜… Rating
5-7 Hours Time Needed
3.9K Made This
βœ‚οΈ

Intermediate Level

Ideal for those with basic crochet experience, featuring slightly more advanced stitches and techniques to expand your skills.

⏱️

Weekend Treat

Takes 5-7 hours, making it an enjoyable project to finish over a couple of days.

🐰

Cute Companion

An adorable friend to cherish, handcrafted with love to bring comfort and joy for years to come.

About This Minimals Rabbit Amigurumi Pattern

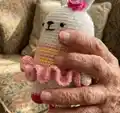
This pattern creates a sweet mini rabbit amigurumi with a frilly skirt, tiny bow, and embroidered face details. The design uses simple rounds and standard shaping to form the head, body, legs, arms and ears. Color changes create the skirt stripes and shoe tips for a playful finish.

Minimals Rabbit Amigurumi Pattern crochet pattern - detailed view of completed project

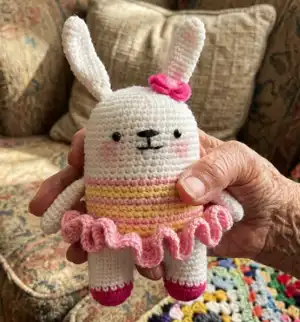
Clear round-by-round instructions guide you through each step, and photo illustrations show placement for facial features and parts. The finished toy measures about 15 cm when worked with the recommended yarn and hook.

Why You'll Love This Minimals Rabbit Amigurumi Pattern

I absolutely love this pattern because it takes a classic amigurumi silhouette and adds charming details like a ruffled skirt and tiny bow that give the rabbit so much personality. I enjoy the balance of simple rounds with a few shaping moments β€” it feels satisfying to see the toy take shape quickly. The pattern is versatile so I often change yarn colors to create different looks and gifts. Sewing the parts together and placing the eyes feels like the most rewarding part β€” the little face always brings a smile.

Minimals Rabbit Amigurumi Pattern step 1 - construction progress Minimals Rabbit Amigurumi Pattern step 2 - assembly progress Minimals Rabbit Amigurumi Pattern step 3 - details and accessories Minimals Rabbit Amigurumi Pattern step 4 - final assembly and finishing

Switch Things Up

I love how easy it is to personalize this rabbit: swap the stripe colors or make the skirt a single color for a different mood.

Change the yarn weight and hook to make a tiny keychain version or a larger cuddle buddy; a fingering yarn and smaller hook makes a pocket-sized rabbit.

I sometimes embroider freckles, change the eye style to embroidered French knots, or use larger safety eyes for a more expressive face.

Try adding tiny crocheted accessories like a scarf, little purse, or a hat to give the rabbit seasonal looks and more personality.

For a gender-neutral or minimalist look, use neutral tones and skip the skirt, making a simple body with contrasting shoe tips instead.

Make a set of rabbits using different pastel palettes and display them as a nursery mobile or shelf collection.

I like to replace the bow with a crocheted flower or a felt star for varietyβ€”sew it securely to the ear base so it stays in place.

Consider making the limbs posable by slipping a small piece of craft wire inside the arms before sewing them closed for gentle posing.

If you want more durability for a child, embroider the eyes and secure the nose well with multiple wraps of yarn instead of using plastic eyes.

I often gift these with a small crocheted blanket or matching mini toy to create a themed present that feels handmade and thoughtful.

Common Mistakes & How to Fix Them

βœ— Skipping stitch markers during rounds with many stitches causes you to lose the start of round; use a marker at the first stitch of each round to stay aligned. βœ— Forgetting to change yarn color on the specified rounds will make stripes misalign; check the symbol chart and change colors exactly where noted to match the illustrated stripes. βœ— Overstuffing limbs and head leads to distorted shaping and lumps; stuff gradually with small amounts of fiberfill while shaping to keep smooth contours. βœ— Not flattening arms and ears before sewing can make them bulky and misshapen; flatten the finished arm and ear pieces and do not stuff them unless instructed. βœ— Using a much larger or smaller hook than recommended changes finished size and stitch gauge; swatch and adjust hook size to maintain the intended 15 cm height.

Minimals Rabbit Amigurumi Pattern

Create an adorable 15 cm Mini Rabbit amigurumi with this complete crochet pattern. You will find clear round-by-round instructions, material lists, and assembly tips so you can make a charming handmade rabbit with ruffled skirt and bow. Perfect for gift-giving or adding to your amigurumi collection, this design combines simple shapes with sweet details.

Intermediate 5-7 Hours

Materials Needed for Minimals Rabbit Amigurumi Pattern

β€” Main Fabric

  • 01
    Worsted weight yarn (#4) - Light pink yarn (for skirt and ruffle)
  • 02
    Worsted weight yarn (#4) - Hot pink yarn (for bow, shoe tips and ribbon)
  • 03
    Worsted weight yarn (#4) - White yarn (main body, head, arms, ears, legs)
  • 04
    Worsted weight yarn (#4) - Light yellow yarn (stripe color for body skirt area)
  • 05
    Worsted weight yarn (#4) - Black yarn (for nose and embroidered mouth)

β€” Tools Required

  • 01
    Crochet hook 5/0 (3mm)
  • 02
    Yarn needle (weave in the ends and sew parts)
  • 03
    Fiberfill stuffing
  • 04
    Glue (for gluing eyes on the face)
  • 05
    5mm Black plastic eyes x2
  • 06
    Scissors
  • 07
    Stitch markers (optional, helpful for marking rounds)
  • 08
    Wooden pin (optional, to straighten doll by plugging in back of feet)

Progress Tracker

0% Complete

β€” Head / Body / Legs :

Round 1 :

scx6 in the yarn loop, tighten the loop [6 sts]

Round 2 :

(2-sc inc) x 6 [12]

Round 3 :

(scx1, 2-sc inc) x 6 [18]

Round 4 :

(scx2, 2-sc inc) x 6 [24]

Round 5 :

(scx3, 2-sc inc) x 6 [30]

Round 6 :

(scx4, 2-sc inc) x 6 [36]

Round 7 :

(scx5, 2-sc inc) x 6 [42]

Round 8 :

(scx6, 2-sc inc) x 6 [48]

Round 9~28 :

sc in all 48 st [48]

Round 29 :

sctbl in all 48 st [48]

Round 30~36 :

sc in all 48 st [48]

Info :

Do not forget to change the color as shown in the illustration. Follow symbol patterns on page 1 for color placement.

Infos :

Head rounds 1-19 are worked in White yarn. Body rounds 20-36 include Light pink and Light yellow stripes as shown in the symbol chart. Legs are formed after dividing the rounds as described below.

Divide the legs :

To make a leg, identify the center space between the legs by the 6 stitches, and each leg identifies the other by 18. (Use stitch markers to help.) Sc at the 31th st of the Rnd 36. This sc is the first st of the first leg (left leg). Continue working on the first leg (left leg).

Round 37~40 :

sc in all 18 st [18]

Round 41 :

(scx1, sc2tog) x 6 [12]

Round 42 :

(sc2tog) x 6 [6]

Info :

Fasten off, leaving a long tail. Stuff the leg. Using a yarn needle, weave the yarn tail through the front loop of each remaining st and pull tight to close.

Second Leg (Right leg) :

Rejoin the White yarn to 7th back unworked st of Rnd 36. This sc is the first st for the second leg (right leg). Continue working the second leg (right leg) the same way as the first leg (left leg) from Rnd 37-42. Using a yarn needle, sew the 6 sts between the legs.

β€” Arms :

Round 1 :

scx5 in the yarn loop, tighten the loop [5 sts]

Round 2 :

(2-sc inc) x 5 [10]

Round 3~11 :

sc in all 10 st [10]

Info :

Fasten off, leaving a long tail for sewing. Flatten the ARM, do not stuff.

β€” Skirt :

Info :

Use Light pink yarn to combine skirt and body at the first stitch of Rnd 29. Place the rabbit head towards your body and start making skirt leftward.

Round 1 :

(ch3, dcx1) in first st, (2-dc inc) x 47, slst [96 sts] *ch 3 = dcx1

Round 2 :

(ch3, dcx1) in first st, (2-dc inc) x 95, slst [192]

Info :

Fasten off and weave in the yarn end. Repeat (2-dc inc) until the last stitch when following the skirt diagram and symbol pattern.

β€” Ribbon :

Round 1 :

Use the Hot pink yarn to make 14 chains, slst in the first ch [14 sts]

Round 2 :

ch1, (sc, hdc, dcx3, hdc, sc) x 2, slst [14]

Round 3 :

make 6 chains, wind around and slst in the first ch

Info :

Fasten off, leaving a long tail for sewing. Wind the 6 chains to form the ribbon loops as shown in ribbon symbol pattern and photo.

β€” Ear x2 :

Round 1 :

scx6 in the yarn loop, tighten the loop [6 sts]

Round 2 :

(scx2, 2-sc inc) x 2 [8]

Round 3 :

(scx3, 2-sc inc) x 2 [10]

Round 4~14 :

sc in all 10 st [10]

Info :

Fasten off, leaving a long tail for sewing. Flatten the EAR, do not stuff. (Fold the ears when attaching.)

Info :

Eyes location: place 5mm safety eyes between rounds 13 and 14 as shown in the illustration. Ribbon location: place the ribbon on the bottom of the left ear. Arms location: attach arms between Rnd 20 and 21. Cheeks: position as shown in photos.

β€” Face & Finishing :

Info :

Glue the 5mm black plastic eyes on the face or secure with safety eye washers before stuffing. Use black yarn to embroider a small oval nose (2 sts width) and a short vertical stitch for nose depth (2 rnds down), then embroider the mouth across 3 sts as illustrated. Add blush to cheeks if desired.

Info :

How to close legs: after stuffing, weave tail through front loops of remaining sts and pull tight to close. Use a wooden pin in back of feet if you need to straighten the doll as described in the tip illustration.

Assembly Instructions

  • Attach the head and body as one continuous piece was worked; position ears on top of the head and sew the ears on with a yarn needle, folding each ear and securing the base.
  • Glue or attach the 5mm eyes between rounds 13 and 14, spacing them as shown in the diagram; secure with washers if using safety eyes or add a dot of glue if using plastic eyes.
  • Sew arms to the sides of the body between rounds 20 and 21, flattening the arm pieces and aligning them so the hands sit just below the top of the skirt.
  • After making both legs, sew the 6 stitches between the legs together using a yarn needle to close and secure the crotch area for stability.
  • Position and sew the ribbon to the bottom of the left ear, and sew the small bow to the chosen ear location; weave in all ends and trim excess yarn.

Important Notes

  • πŸ’‘Use stitch markers to mark the beginning of each round to keep track of where to start, especially during the long 48-st rounds.
  • πŸ’‘Change yarn colors exactly where the symbol pattern indicates to create even stripes on the skirt and body area.
  • πŸ’‘Flatten arms and ears before sewing them in place; do not stuff these small pieces unless you prefer a different look.
  • πŸ’‘Stuff the head and body firmly but not so tight that stitches stretch and distort; add stuffing gradually for smooth shaping.
  • πŸ’‘Weave in ends as you go and leave long sewing tails for easier assembly and neater finishing.

This sweet Minimals Rabbit pattern is perfect for making a tiny friend to treasure or gift to someone special. The combination of simple rounds and delightful details like the ruffled skirt and bow make it an instant favorite for collectors and crafters alike. Give it a try and enjoy every stitch! 🧢🐰

You ask,

we answer.

FAQs

What size will the finished piece be?

The finished amigurumi measures approximately 15 cm (5.9 inches) tall when using the recommended worsted weight yarn and 3mm hook.

Can I use different yarn weights for this pattern?

Yes, you can use different yarn weights, but the final size will change; use a suitable hook for your yarn and adjust stuffing and eye size accordingly.

Do I need prior crochet experience for this pattern?

This pattern is rated intermediate, so basic knowledge of single crochet, increases, decreases, and working in the round is recommended.

How long does this project typically take to complete?

Most crocheters finish this project in about 5-7 hours, depending on experience, color changes, and assembly time.