🧢 Beautiful ✨ Detailed πŸ’ Adorable

Manatee friend Amigurumi Pattern

Manatee friend Amigurumi Pattern
4.8β˜… Rating
2-3 Hours Time Needed
2.0K Made This
βœ‚οΈ

Beginner Friendly Level

Perfect for those just starting their crochet journey, with clear instructions and simple techniques

⏱️

Bite-Sized Project

Finishes in 2-4 hoursβ€”perfect for an afternoon of creative relaxation.

πŸ₯

Charming Critter

Delightful animal designs with sweet details that capture the essence of your favorite woodland and farmyard friends.

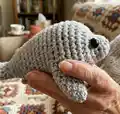
About This Manatee friend Amigurumi Pattern

This pattern creates a small, cuddly manatee amigurumi with a rounded body, flattened tail and two side fins. It uses single crochet shaping with simple increases and decreases to form the body and tail. The design is compact and friendly, making it an ideal handmade gift or portable companion.

Manatee friend Amigurumi Pattern crochet pattern - detailed view of completed project

Worked mainly in continuous rounds, the manatee is constructed as one main body piece with separately crocheted fins to sew on. The pattern includes clear round-by-round instructions and placement notes for eyes and stuffing.

Why You'll Love This Manatee friend Amigurumi Pattern

I absolutely love this pattern because it turns simple stitches into a charming little creature you can finish quickly. I enjoy how the shaping gives the manatee personality without complicated techniques. I also love that it is versatile β€” you can make tiny keychain versions or larger squishy pals by changing yarn and hook sizes. I find it relaxing to stitch the rounds and see the shape emerge, and it makes a sweet, handmade gift every time.

Manatee friend Amigurumi Pattern step 1 - construction progress Manatee friend Amigurumi Pattern step 2 - assembly progress Manatee friend Amigurumi Pattern step 3 - details and accessories Manatee friend Amigurumi Pattern step 4 - final assembly and finishing

Switch Things Up

I love adapting this pattern to make unique versions, so try switching the yarn colour for a playful or pastel look.

I often change yarn weight and use a smaller hook for tiny keychain-sized manatees or a bulkier yarn for plush versions.

I sometimes embroider a tiny smile or freckles to give each manatee a different personality.

Try swapping safety eyes for embroidered eyes if you are making toys for very young children to keep them safe.

Make a family of manatees by varying eye sizes and fin placement to create character differences.

I add tiny crocheted accessories like scarves, little flowers, or a hat for seasonal flair or gifting themes.

For a posable version, I insert thin wire into the fins before sewing them on, which helps create expressive poses.

Experiment with textured stitches (like V-stitches or surface slip stitch) on the back to create a patterned shell or skin look.

I love using novelty yarn for a whimsical textured effect, but I always size up my hook and adjust stuffing accordingly.

When I want a sturdier toy, I use tighter tension and a slightly smaller hook, and I always weave in ends and reinforce seams carefully.

Common Mistakes & How to Fix Them

βœ— Skipping the stitch count in each round can quickly lead to uneven shaping; count your stitches at the end of every round to stay on track. βœ— Not stuffing gradually from the stated round can result in lumps and poor shape; stuff firmly but in small amounts as you go to maintain a smooth body. βœ— Using a hook that is too large for the yarn will create loose stitches and visible stuffing; size down your hook 0.5-1.0mm from the recommended size for tighter stitches.
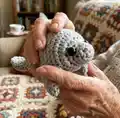
 βœ— Placing safety eyes without checking spacing may produce an odd facial expression; follow the placement note (between rounds 3 and 4, about 3 stitches apart) and pin them before locking in.

Manatee friend Amigurumi Pattern

Create a chubby, happy manatee pal with this easy-to-follow crochet pattern. Perfect for gifting or keeping as a cute desk companion, this pattern focuses on simple shaping and charming details. You will enjoy how quickly the manatee comes together and how satisfying the finishing touches are. Friendly directions and helpful notes make this a fun project for crocheters.

Beginner Friendly 2-3 Hours

Materials Needed for Manatee friend Amigurumi Pattern

β€” Main Fabric

  • 01
    Grey yarn - DK weight recommended (designer used cotton DK yarn)
  • 02
    Chunky yarn (optional) for a larger, squishier manatee (use larger hook as suggested)
  • 03
    Small amounts of yarn for finishing and sewing (same grey or coordinating colour)

β€” Tools Required

  • 01
    Crochet hook size 4.0mm (used by designer)
  • 02
    Smaller hook suggestion: 3.0mm for a tighter, smaller manatee (optional)
  • 03
    Larger hook suggestion: 5.0mm if using chunky yarn (optional)
  • 04
    2 x safety eyes
  • 05
    Stuffing (polyester fiberfill)
  • 06
    Scissors
  • 07
    Yarn needle for sewing and weaving in ends
  • 08
    Stitch markers (optional) for marking rounds

Progress Tracker

0% Complete

Info :

Pattern notes. The number in brackets at the end of each round indicates the total number of stitches. You can use whatever method you like to start your amigurumi, I prefer to chain 2 and work into the first stitch but if you like a magic circle you go right ahead. I used cotton DK yarn and a 4mm hook for this manatee, but I've also made them using chunky yarn for an extra squishy pal. You can use whatever yarn you have to hand, I'd suggest sizing down your hook 0.5mm - 1.0mm from the recommended size to ensure your stitches are tight. DK yarn and a 3mm hook will result in a smaller item and chunky yarn and a 5mm hook will obviously be larger. But remember, all manatees are beautiful.

Infos :

Supplies. Grey yarn. 2 x safety eyes. Stuffing.

Infos :

Abbreviations. This pattern is written in US crochet terms. CH: Chain. DEC: SC the next 2 ST together. FO: Fasten off. INC: 2SC in the next ST. SC: Single crochet. SS: Slip stitch. ST: Stitch/es. *__*: Repeat instructions from * to * as many times as stated.

β€” Body :

Round 1 :

CH2, 6SC in second chain from hook. (6)

Round 2 :

*SC, INC* x 3 (9)

Round 3 :

*SC* x 9 (9)

Round 4 :

*2SC, INC* x 3 (12)

Round 5 :

3SC, *INC* x 6, 3SC (18)

Round 6 :

3SC, *INC* x 12, 3SC (30)

Round 7-8 :

*SC* x 30 (30)

Info :

Insert eyes between rounds 3 and 4, approx. 3 stitches apart and centred within the increases.

Round 9 :

*13SC, DEC* x 2 (28)

Round 10 :

6SC, DEC, 12SC, DEC, 6SC (26)

Round 11 :

*11SC, DEC* x 2 (24)

Round 12 :

5SC, DEC, 10SC, DEC, 5SC (22)

Round 13 :

*9SC, DEC* x 2 (20)

Round 14 :

4SC, DEC, 8SC, DEC, 4SC (18)

Round 15-16 :

*SC* x 18 (18)

Round 17 :

*7SC, DEC* x 2 (16)

Round 18 :

*SC* x 16 (16)

Info :

Stuff firmly from here onwards.

Round 19 :

3SC, DEC, 6SC, DEC, 3SC (14)

Round 20 :

*SC* x 14 (14)

Round 21 :

*5SC, DEC* x 2 (12)

Round 22 :

12SC + 1 additional stitch to bring you to the edge of your manatee.

Info :

Stuff firmly and flatten the tail.

Round 23 :

SS closed (6) CH1, turn

Round 24 :

INC, 4SC, INC (8) CH1, turn

Round 25 :

8SC (8) CH1, turn

Round 26 :

INC, 6SC, INC (10) CH1, turn

Round 27-28 :

10SC (10) CH1, turn

Round 29 :

1SC, DEC, 4SC, DEC, 1SC (8) CH1, turn

Round 30 :

1SC, DEC, 2SC, DEC, 1SC (6) CH1, turn

Round 31 :

1SC, *DEC* x 2, 1SC (4)

Round 32 :

4SC. Fasten off and weave in your end.

β€” Fin :

Info :

Make two.

Round 1 :

CH2, 6SC in second chain from hook. (6)

Round 2 :

*INC* x 6 (12)

Round 3-5 :

*SC* x 12 (12)

Round 6 :

Hold your fin flat and SS closed (6). Fasten off and sew to the side of your manatee using the photo as a guide.

Info :

And you're done! Feel free to sell your finished items but please credit the designer and tag @manatee_squares on social media. Please do not recreate this pattern in any way.

Assembly Instructions

  • Insert safety eyes between rounds 3 and 4, approximately 3 stitches apart and centred within the increases before closing the head section.
  • Stuff the body firmly from round 18 onwards, then flatten and shape the tail at round 22 to create the manatee silhouette.
  • Sew each fin to the side of the manatee using the photo as a guide, positioning the fins along the body sides near the head.
  • Weave in all ends and secure the tail closure after round 32, ensuring a neat finish and no loose stuffing.
  • Pin parts in place before sewing to check symmetry and even spacing, then sew firmly with a yarn needle.

Important Notes

  • πŸ’‘The numbers in brackets show total stitches at the end of each roundβ€”always count to confirm your stitch total.
  • πŸ’‘You can start with chain 2 and work into the first stitch or use a magic circle; both methods will work.
  • πŸ’‘Designer used cotton DK yarn and a 4mm hook; sizing down the hook 0.5-1.0mm helps keep stuffing from showing.
  • πŸ’‘Stuff gradually from round 18 onward to maintain smooth shaping; overstuffing too early will distort the body.
  • πŸ’‘Secure safety eyes before final stuffing and closing, and weave in ends as you go for a tidy finish.

This little manatee was designed to be quick, cuddly, and endlessly lovable. 🧢 Make a whole pod in different yarns and sizes to create a playful collection. πŸ₯ Share your makes and tag @manatee_squares β€” I love seeing them pop up in the wild! ✨

You ask,

we answer.

FAQs

What size will the finished piece be?

The finished amigurumi size depends on yarn and hook choice; with DK yarn and a 4mm hook it will be a small palm-sized manatee ideal for display or gifting.

Can I use different yarn weights for this pattern?

Yes, you can substitute yarn weights but it will change the final size; use a smaller hook (about 0.5-1.0mm smaller) for tighter stitches and adjust eye size accordingly.

Do I need prior crochet experience for this pattern?

This pattern is rated Beginner Friendly and primarily uses single crochet, increases and decreases, so basic crochet skills are sufficient to complete it.

How long does this project typically take to complete?

Most crocheters finish this small manatee in 2-3 hours, though time may vary based on experience and finishing details.