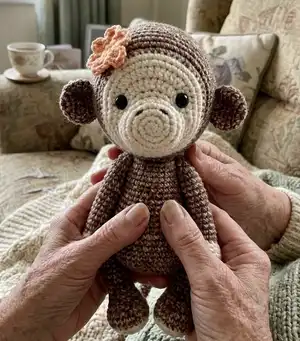
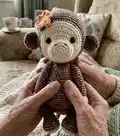
Make an adorable crocheted monkey with this complete pattern designed for intermediate crocheters. You will create a sweet, poseable amigurumi with clear step-by-step rounds, assembly instructions and helpful tips. The pattern includes all materials, stitch abbreviations and finishing techniques so you can bring Lucy to life with confidence. Perfect as a gift or a charming addition to your handmade toy collection.
Progress Tracker
0% Complete
— Head :
Round 3 :
sc 2, dbl-inc x 2, sc 4, dbl-inc x 2, sc 2 (20)
Round 4 :
sc 4, inc x 3, sc 7, inc x 3, sc 3 (26)
Round 5-6 :
sc in each st (26)
Info :
On round 7, place a stitch marker between the 17th and 18th stitch (around the loops of the 18th stitch) to mark the center of the face.
Round 7 :
sc 10, hdc-inc x 7, sc 9 (33)
Round 8 :
sc 8, inc, sc, hdc 2, (hdc-inc, hdc) x 5, hdc-inc, hdc 2, sc, inc, sc 6 (41)
Round 9 :
sc 7, inc, sc 8, inc, (sc 4, inc) x 2, sc 8, inc, sc 5 (46)
Round 10 :
sc, inc, sc 13, inc, (sc 6, inc) x 3, sc 9 (51)
Info :
With brown yarn: change colour after finishing round 10.
Round 11 :
sc 21, inc, sc 12, inc, sc 16 (53)
Round 12 :
sc 2, inc, sc 24, inc, sc 2, inc, sc 22 (56)
Info :
Attach safety eyes to either side of the stitch marker, between rows 7 and 8, leaving 12 stitches (count 11 holes) between them.
Round 13-21 :
sc in each st (56)
Round 22 :
(sc 12, dec) x 4 (52)
Round 23 :
sc 5, dec, (sc 11, dec) x 3, sc 6 (48)
Info :
Start stuffing the head. Keep adding a bit of fiberfill after every few rounds, stuffing the head firmly.
Round 24 :
(sc 10, dec) x 4 (44)
Round 25 :
sc 4, dec, (sc 9, dec) x 3, sc 5 (40)
Round 26 :
(sc 8, dec) x 4 (36)
Round 27 :
sc, dec, (sc 4, dec) x 5, sc 3 (30)
Round 28 :
(sc 3, dec) x 6 (24)
Round 29 :
(dec, sc 2) x 6 (18)
Round 30 :
(sc, dec) x 6 (12)
Info :
Finish stuffing. Cut the yarn, leaving a long yarn tail for sewing, and fasten off. Thread the tail onto a needle and use it to pick up all the remaining stitches and close the opening. Use yarn to shape the head and embroider the nostrils as instructed later.
— Ears (make 2) :
Round 3 :
(sc, inc) x 6 (18)
Round 4-6 :
sc in each st (18)
Round 7 :
(dec x 4, sc) x 2 (10)
Info :
Cut the yarn, leaving a long yarn tail for sewing, and fasten off. Do not stuff the ears.
— Flower :
With yellow yarn Round 1 :
mr, sc 6, sl st in 1st sc (6)
With peach yarn Round 2 :
(ch 3, tr-inc, ch 3, sl st in the same st) x 6
Info :
Cut the yarn, leaving a long yarn tail for sewing, and fasten off.
— Right arm :
Round 2 :
(dbl-inc x 2, sc) x 2 (14)
Round 3 :
sc 3, inc, sc 6, inc, sc 3 (16)
Round 4-5 :
sc in each st (16)
Round 6 :
sc 2, dec x 2, sc 6, inc, sc 3 (15)
Round 7 :
sc 2, dec, sc 6, inc, sc 4 (15)
Info :
Stuff the hand firmly. Keep adding a bit of fiberfill after every few rounds, stuffing the arm firmly.
With brown yarn Round 8 :
sc, dec x 2, sc 10 (13)
Round 9 :
sc, dec, sc 10 (12)
Round 10-11 :
sc in each st (12)
Round 12 :
sc, dec, sc 9 (11)
Round 13-22 :
sc in each st (11)
Info :
Attach the smaller joint between rounds 21 and 22, placing it so the post is facing straight towards the body (see page 9).
Round 23 :
sc, dec x 5 (6)
Info :
Finish stuffing the arm. Cut the yarn, leaving a long yarn tail, and fasten off. Thread the tail onto a needle and use it to pick up all the remaining stitches and close the opening.
— Left arm :
Round 2 :
(dbl-inc x 2, sc) x 2 (14)
Round 3 :
sc 3, inc, sc 6, inc, sc 3 (16)
Round 4-5 :
sc in each st (16)
Round 6 :
sc 4, inc, sc 6, dec x 2, sc (15)
Round 7 :
sc 5, inc, sc 6, dec, sc (15)
Info :
Crochet one sc in next five stitches. Count the last sc as the end of the round from now on. Stuff the hand firmly.
With brown yarn Round 8 :
sc 7, dec x 2, sc 4 (13)
Round 9 :
sc 7, dec, sc 4 (12)
Round 10-11 :
sc in each st (12)
Round 12 :
sc 7, dec, sc 3 (11)
Round 13-22 :
sc in each st (11)
Info :
Attach the smaller joint between rounds 21 and 22, placing it so the post is facing straight towards the body (see page 9).
Round 23 :
sc, dec x 5 (6)
Info :
Finish stuffing the arm. Cut the yarn, leaving a long yarn tail, and fasten off. Thread the tail onto a needle and use it to pick up all the remaining stitches and close the opening.
— Legs (make 2) :
Round 1 :
ch 7, 2 sc in second ch from hook, sc 4, 4 sc in first ch. Rotate and work into the chain from the other side: sc 3, 2 sc in last ch (16)
Info :
Rotate and work on other side of beginning chain. Continue as instructed for shaping and stuffing the feet, stuffing firmly as you go.
— Body :
Round 3 :
(sc, inc) x 6 (18)
Round 4 :
(inc, sc 2) x 6 (24)
Round 5 :
(sc 3, inc) x 6 (30)
Round 6 :
sc, inc, (sc 4, inc) x 5, sc 3 (36)
Round 7 :
(sc 5, inc) x 6 (42)
Round 8-13 :
sc in each st (42)
Info :
Turn the body so the first stitch of round 13 is at the center of the back. Attach the legs to either side of the body, between rounds 8 and 9 (see page 2-3).
Round 14 :
(dec, sc 9, dec, sc 8) x 2 (38)
Round 15 :
sc 14, dec, sc 7, dec, sc 13 (36)
Round 16 :
sc 6, dec, (sc 10, dec) x 2, sc 4 (33)
Round 17 :
sc in each st (33)
Round 18 :
(dec, sc 9) x 3 (30)
Round 19 :
sc in each st (30)
Round 20 :
sc 5, dec, (sc 8, dec) x 2, sc 3 (27)
Round 21 :
sc in each st (27)
Round 22 :
(dec, sc 7) x 3 (24)
Round 23 :
sc in each st (24)
Round 24 :
sc 4, dec, (sc 6, dec) x 2, sc 2 (21)
Round 25 :
sc in each st (21)
Round 26 :
(dec, sc 5) x 3 (18)
Round 27 :
sc in each st (18)
Info :
Sl st in next stitch. Cut the yarn, leaving a long yarn tail for sewing, and fasten off. Attach the arms to the sides of the body, between rounds 23 and 24 (see page 10). Finish stuffing the body.
— Tail :
Round 2 :
(inc, sc) x 3 (9)
Round 3-4 :
sc in each st (9)
Info :
Start stuffing the tail. Keep adding a bit of fiberfill after every few rounds, stuffing the tail lightly.
Round 5-38 :
sc in each st (9)
Info :
Cut the yarn, leaving a long yarn tail for sewing, and fasten off. Finish stuffing the tail.
— Assembly & Finishing :
Info :
Attach safety eyes after finishing round 12 of the head and embroider nostrils between rounds 3 and 4 with dark brown embroidery floss as shown in photos. Shape the head by inserting needle between rounds and tugging yarn tails as demonstrated.
Item - Head finishing :
Place eyes between rows 7 and 8 leaving 12 stitches (count 11 holes) between them. Finish the head by cutting yarn, threading the tail onto a needle, pick up remaining stitches and close the opening. Use yarn to shape the head and embroider nostrils.
Item - Ears & Flower :
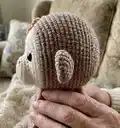
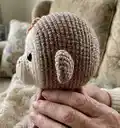
Sew the ears to the sides of the head just behind round 15. Sew the flower to the head making a few stitches around the center.
Item - Attaching limbs :
Attach legs between rounds 8 and 9 of the body and attach arms between rounds 23 and 24. Use plastic doll joints, buttons and thread or sew directly as preferred. Place joints so the post faces towards the body.
Item - Head & Tail :
Sew the head to the body with whip stitch placing it so the front edge is just behind round 12 of the head. Sew the tail to the body with whip or mattress stitch placing it above round 5.
Info :
Weave in all yarn tails and hide them inside the piece. Use stitch markers to keep track of rounds during assembly and finishing.
Lucy the Monkey is a sweet, poseable amigurumi that makes a perfect handmade gift or nursery companion. With clear step-by-step rounds, neat finishing techniques, and optional posable joints, this pattern helps you craft a charming keepsake. Happy crocheting and enjoy making your own Lucy! 🧶🧵