๐Ÿงถ Beautiful โœจ Detailed ๐Ÿ’ Adorable

Llama No Sew Amigurumi Pattern

Llama No Sew Amigurumi Pattern
4.9โ˜… Rating
2-3 Hours Time Needed
2.5K Made This
โœ‚๏ธ

Intermediate Level

Ideal for those with basic crochet experience, featuring slightly more advanced stitches and techniques to expand your skills.

โฑ๏ธ

Bite-Sized Project

Finishes in 2-4 hoursโ€”perfect for an afternoon of creative relaxation.

๐Ÿงธ

Cute Companion

An adorable friend to cherish, handcrafted with love to bring comfort and joy for years to come.

About This Llama No Sew Amigurumi Pattern

This pattern creates a charming no-sew llama amigurumi worked mostly in the round with super bulky yarn for a plush finish. It features a continuous head-to-body construction, separate nose and ears, and a colorful saddle that you glue in place. The pattern includes photo references, simple shaping, and small finishing details for a lovable result.

Llama No Sew Amigurumi Pattern crochet pattern - detailed view of completed project

Perfect for crocheters who enjoy quick amigurumi projects, the design uses basic stitches with a few shaping techniques. You will finish a compact, gift-ready llama with minimal sewing required.

Why You'll Love This Llama No Sew Amigurumi Pattern

I absolutely love this pattern because it turns simple stitches into a characterful friend quickly and cleanly. The no-sew construction keeps finishing easy and fast, so you spend more time enjoying the cute result than sewing pieces together. I enjoy the colorful saddle detail โ€” it adds personality without complicated technique. The pattern photographs make each step easy to follow, and I love that the finished llama is both tactile and sturdy.

Llama No Sew Amigurumi Pattern step 1 - construction progress Llama No Sew Amigurumi Pattern step 2 - assembly progress Llama No Sew Amigurumi Pattern step 3 - details and accessories Llama No Sew Amigurumi Pattern step 4 - final assembly and finishing

Switch Things Up

I love how versatile this pattern is for customization; you can easily change the saddle colors or use variegated yarn for a playful look.

I often swap the super bulky yarn for a slightly lighter bulky yarn to create a smaller, more detailed version of the llama.

I like adding tiny embroidered patterns to the saddle or body to make each llama unique and personalized as gifts.

For a keychain version, make the head smaller by using a thinner yarn and a smaller hook and add a keyring loop before finishing.

I sometimes replace the plastic safety eyes with embroidered eyes for a baby-safe toy or to achieve a softer expression.

Try adding a tiny scarf or crocheted blanket with fringe to give the llama more personality and texture.

If you want a floppy look, use a looser tension and less stuffing; for a firm plush, tighten stitches and add more stuffing gradually.

I also enjoy creating a whole setโ€”matching mini-saddle patterns in different colors make a charming collection of llamas.

Try mixing yarn textures for the mane or saddleโ€”a fuzzy yarn for the mane gives an extra cute, tactile effect.

Don't be afraid to experiment with scale: larger hooks and thicker yarn make a chunky, cuddly toy while thinner yarn creates a delicate miniature version.

Common Mistakes & How to Fix Them

โœ— Skipping stitch markers when working continuous rounds can cause you to lose track of the start of each round; place a marker at the first stitch of every round and move it up as you go. โœ— Forgetting to stuff at the indicated stuffing points leads to odd shaping and gaps; stuff gradually at the starred stuffing rounds to maintain an even shape and avoid overstuffing. โœ— Not switching colors exactly where instructed makes the saddle or color-blocked sections look uneven; change yarns at the specified rows and weave in ends neatly for a tidy finish. โœ— Pulling chains or slip stitches too tight when creating the chain-based saddle or nose will make joining difficult; keep these foundation loops relaxed and use the specified second chain from the hook for correct stitch count. โœ— Skipping back loop only (BLO) or front loop only (FLO) instructions can alter texture and fit; follow BLO/FLO calls exactly to get the intended shaping and to prepare attachment points correctly.

Llama No Sew Amigurumi Pattern

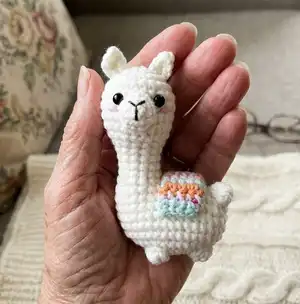
Create an adorable no-sew llama amigurumi using super bulky yarn and simple crochet techniques. This pattern walks you through a seamless head-to-body construction, small accessories like the saddle and ears, and finishing touches like embroidered features. You will enjoy a quick, satisfying make that results in a cuddly toy perfect for gifts or shelf decor. Clear photos and step-by-step rounds are included to guide you.

Intermediate 2-3 Hours

Materials Needed for Llama No Sew Amigurumi Pattern

โ€” Main Fabric

  • 01
    Super Bulky weight yarn (Category 6) - White (main color) for Llama - approx 50-100g
  • 02
    Super Bulky weight yarn (Category 6) - Blue, Purple, Orange for Llama saddle accent colors - small amounts each (10-25g)
  • 03
    Super Bulky weight yarn (Category 6) - Brown, White, Yellow, skin color for Owl - small amounts each (10-50g)
  • 04
    Super Bulky weight yarn (Category 6) - Brown, Light brown, Beige, White for Horse - small amounts each (10-50g)
  • 05
    Assorted contrast colors (yellow) for small parts such as owl beak and feet - small amounts (approx 5-20g)

โ€” Tools Required

  • 01
    Crochet hook size 3.5mm (E)
  • 02
    Stitch markers
  • 03
    Sewing needle for weaving ends
  • 04
    Scissors
  • 05
    Plastic safety eyes 8mm (llama) and 10mm (owl/horse) as specified
  • 06
    Hot glue or adhesive glue for attaching small pieces (saddle, eyes/nose where indicated)
  • 07
    Polyester stuffing (fiberfill)
  • 08
    Optional: pins for positioning pieces before gluing

Progress Tracker

0% Complete

โ€” Llama: Crochet from the head up to the body (No sew) :

Row 1 :

6SC in an MR (6)

Row 2 :

6INC (12)

Row 3 :

(SC, INC) 6 times (18)

Row 4 :

(2SC, INC) 6 times (24)

Row 5-8 :

24SC (24)

Row 9 :

(SC, DEC) 8 times (16)

Row 10 :

(6SC, DEC) 2 times (14)

Info :

*Stuffing*

Row 11-14 :

14SC (14)

Row 15 :

5SC, (SC, INC) 2 times, 5SC (16)

Row 16 :

make 8CH, crochet with the second chain from the hook: INC, 6 SC(of the chains), 16SC(of the body), 6SC, (SC, BO in one st) (of the chains)(32)

Row 17 :

2INC, 28SC, INC, INC into the stitch's BO (36)

Row 18-21 :

36SC (36)

Row 22 :

SC, DEC, 9SC, (SC, DEC) 3 times, 9SC, (SC, DEC) 2 times (30)

Row 23 :

DEC, SC, BO, 6SC, BO, SC, 4DEC, BO, 6SC, BO, DEC (24)

Info :

*Stuffing*

Row 24 :

12 DEC (12)

Row 25 :

6DEC (6)

Info :

Cut the yarn.

โ€” Llama: Nose :

Row 1 :

Crochet 10SLst from rows 5-7 in a circular shape as photo

Row 2 :

Crochet 10 single crochets (SC) into the 10 slip stitches of row 1.

Row 3 :

5DEC

Info :

*Stuffing*

Info :

Cut the yarn.

Info :

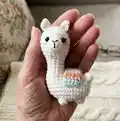
Embroider the mouth, attach the eyes, and embroider the pink cheeks.

โ€” Llama: Ears :

Info :

Begin with White yarn

Info :

Pick up the yarn from row 2: 2CH, DC-picot, 2CH, Slst in one stitch.

โ€” Llama: Llama Saddle :

Info :

Change colors sequentially in the following order: blue, purple, orange, until you complete row 10.

Info :

Begin with Blue yarn

Row 1 :

5Ch, turn: 4SC, turn (4)

Row 2-10 :

Ch, 4SC, turn (4)

Info :

Cut the yarn

Info :

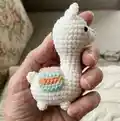
Secure the saddle on the back with adhesive glue.

โ€” Owl: Wings (MAKE 2) :

Info :

Use Brown yarn.

Row 1 :

Make 7 CH. Start in the second stitch from the hook: 2SC, HDC, DC, HDC 4SC in one stitch, HDC, DC, HDC, 2SC.

โ€” Owl: Crochet from the body up to the head (No sew) :

Info :

Use Skin yarn

Row 1 :

6 SC in an MR (6)

Row 2 :

6 INC (12)

Row 3 :

(SC, INC) 6 times (18)

Row 4 :

(2 SC, INC) 6 times (24)

Row 5 :

(3 SC, INC) 6 times (30)

Row 6-9 :

30 SC (30)

Row 10 :

(SC, DEC) 10 times (20)

Row 11 :

2SC, DEC, attach the wings to the body by crocheting them together. 2SC, DEC, 2SC, 2DEC, attach the wings to the body by crocheting them together.: 2SC, 2SC, DEC (15)

โ€” Owl: Change to Brown yarn :

Row 12 :

FLO, 15DEC (30)

Row 13 :

(4SC, INC) 6 times (36)

Row 14-19 :

36SC (36)

Row 20 :

(2SC, DEC) 9 times (27)

Info :

*Stuffing*

Row 21 :

(SC, DEC) 9 times (18)

Row 22 :

9 DEC (9)

Row 23 :

4DEC, SC (5)

Info :

Weave in the yarn end and cut

โ€” Owl: Eyes (MAKE 2) :

Info :

Use white yarn

Row 1 :

6SC in an MR (6)

Row 2 :

6INC (12)

Row 3 :

(SC, INC) 6 times (18)

Info :

Cut the yarn.

โ€” Owl: Nose :

Info :

Use yellow yarn

Row 1 :

6SC in an MR (6)

Info :

Cut the yarn.

Info :

Secure the eyes and nose on the head using adhesive glue.

Info :

Attach plastic eyes.

โ€” Owl: Ears (MAKE 2) :

Info :

Begin with brown yarn

Row 1 :

Pick up the yarn from rows 19-21: 3Slst

Row 1b :

Ch, FLO 3SC, BLO: 3SC (Crochet into both sides of the nose with slip stitches) (6)

Row 2 :

3DEC (3)

Info :

Cut the yarn.

Info :

Use brown yarn to embroider the belly.

Info :

Use yellow yarn to embroider the feet.

Info :

Complete the product.

โ€” Horse: Crochet from the body up to the head (No sew) :

Info :

Begin with Beige yarn

Info :

Join the new round with a slip stitch and chain 1.

Row 1 :

6 SC in an MR (6)

Row 2 :

6 INC (12)

Row 3 :

(SC, INC) 6 times (18)

Row 4 :

(2 SC, INC) 6 times (24)

Row 5 :

8 SC, BO, 6 SC, BO, 8 SC (24)

Info :

*When the text is BROWN color, switch to brown yarn color*

Row 6-7 :

24 SC (24)

Row 8 :

6 SC, BO, 10 SC, BO, 6 SC (24)

Row 9 :

24 SC (24)

Row 10 :

(SC, DEC) 8 times (16)

Row 11 :

FLO, (SC, INC) 8 times (24)

Row 12 :

(SC, INC) 12 times (36)

Row 13-15 :

36 SC (36)

Row 16 :

(2 SC, DEC) 4 times, 2SC, DEC, (2SC, DEC) 4 times (27)

Info :

*When the text is bold and underlined, switch to WHITE yarn*

Row 17-19 :

12SC, 3SC, 12SC (27)

Info :

*Stuffing*

Row 20 :

(SC, DEC) 4 times, SC, DEC, (SC, DEC) 4 times (18)

Row 21 :

(SC, DEC) 6 times (12)

Row 22 :

6 DEC (6)

Info :

Weave in the yarn end and cut

โ€” Horse: Nose :

Info :

Use White yarn

Row 1 :

Make 6 chains, crochet into the second chain from the hook, and work on both sides of the loop: INC, 3SC, 4SC in the last stitch, 3SC, INC (14)

Row 2 :

SC, INC, 3SC, (SC, INC) 2 times, 3SC, SC, INC (18)

Row 3 :

18SC (18)

Info :

Connect the nose to the head at R13-16 with 18SLST

Info :

Cut the yarn

โ€” Horse: Ears (MAKE 2) :

Info :

Use Beige yarn

Row 1 :

Make 5 chains start with the second chain from the hook: 3SC, 3SC in the last stitch, 2SC, INC

Info :

Attach the ear point straight from the arm going up with 2 SLST at R20-21

โ€” Horse: Mane Horse :

Info :

Use Light brown yarn

Info :

Pick up the yarn from R21-R22: Make 1 Chain, SLST in the next stitch, and repeat 18 times

Info :

Continue crocheting the mane in a straight down line from R22-11: SLST in the next row, and repeat to the end

Info :

Repeat from R11 to R22

Info :

Cut the yarn

Info :

Make two lines to create nose holes with brown yarn

Info :

Attach the eyes to the head at R16-17, 6st apart.

Assembly Instructions

  • Embroider the mouth on the Llama, attach the plastic safety eyes, and embroider the pink cheeks for facial expression.
  • Attach the Llama saddle to the back with adhesive glue, centering the saddle between the back rows for a balanced look.
  • Secure owl eyes and nose using adhesive glue and then attach plastic eyes; embroider belly and feet details as directed.
  • Connect the horse nose to the head at rounds 13-16 with 18 slip stitches (18SLST) and weave in ends.
  • Attach ears at the specified rounds (for horse attach ear point with 2 SLST at R20-21) and position wings/ears before securing.

Important Notes

  • ๐Ÿ’กUse stitch markers to mark the first stitch of each round to keep track of rounds and repeats.
  • ๐Ÿ’กStuff gradually at the indicated stuffing points to maintain even shaping and avoid lumps or overstuffing.
  • ๐Ÿ’กWeave in yarn ends and cut after finishing each piece; secure small decorative pieces with adhesive glue and pin into position first.

This sweet no-sew Llama amigurumi is designed to be quick, cute, and easy to finish โ€” perfect for handmade gifts or shelf decor. The plush super bulky yarn gives a cozy, tactile feel, and the colorful saddle adds character and charm. Enjoy making this delightful little friend and have fun personalizing colors and features. ๐Ÿงถ๐Ÿงต

You ask,

we answer.

FAQs

What size will the finished piece be?

The finished Llama measures approximately 10-15 cm tall when using super bulky yarn and a 3.5mm hook; size will vary with yarn weight and tension.

Can I use different yarn weights for this pattern?

Yes, you can use different yarn weights, but the final size and texture will change; switch hook sizes accordingly and adjust stuffing amounts for best results.

Do I need prior crochet experience for this pattern?

This pattern is rated intermediate and uses basic amigurumi techniques, bobble/BO stitches, and color changesโ€”some experience with SC, INC, and DEC is recommended.

How long does this project typically take to complete?

Most crocheters complete the Llama in 2-3 hours following the pattern with the recommended yarn and hook size, though time may vary by experience and detail work.

How should I attach the saddle and small parts?

The saddle and some small details are attached with adhesive glue as indicated; position pieces with pins or clips first to ensure correct placement before gluing.