Make a cozy, textured baby blanket with playful puff-stitch lettering and heart motifs. This pattern combines simple single crochet rows with puff stitch detailing to create a sweet, tactile design perfect for newborn photos or a special gift. Clear instructions and a full stitch chart are included so you can follow along row by row. Ideal if you enjoy a mix of rhythm and small texture work.
Progress Tracker
0% Complete
— Materials :
Info :
Needles : I used a 4mm hook for the blanket in the photo, my tension is on the looser side. If your tension is tight I would suggest going up in size with your hook. With a light worsted yarn a 4mm to 5mm will be fine, with a worsted yarn ( aran ) a 5mm to 5.5mm will also work perfectly.
Info :
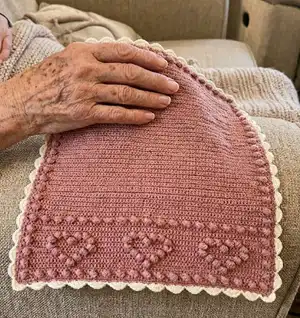
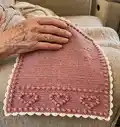
Yarn : I used Stylecraft 100% premium acrylic dk ( light worsted yarn ) in shades of Pale Rose 1080 and edged in a Cream shade 1005 100g balls. Approximately 1 & 1/2 balls was used for the main colour.
Info :
Finished blanket size : Approximately 21 x 20 inches
Info :
Gauge : 17 stitches x 18 rows = 4 inch square. Adjust hook size if wanting the same size blanket in the photo.
— Terminology ( US & UK ) :
Info :
Ch(s) ~ Chain(s). Sc ~ Single crochet ( UK double crochet ). Ps ~ Puff stitch. St(s) ~ Stitch(es). ( ) ~ Work instructions within brackets as many times as directed. Yo ~ Yarn over ( uk Yoh ~ Yarn over hook ).
— Pattern notes :
Info :
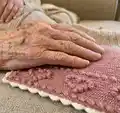
Pattern is in US terminology. Gauge is not important for this pattern. Beginning chain is not included in the total stitch count. Every row ends with 75 stitches with a Ch 1 and turn. Always start the first Sc of each row into the first ch that the ch1 came from. For best results it is best to use a plain solid colour. If you're reading the pattern from the chart, it is worked from the bottom of the chart upwards, and left to right. Add a stitch at the end of the chain row and start the 1st row from the 2nd chain from the hook, ch 1 at the end of each row. Puff stitches are created on the wrong side of the blanket and will pop out into the front of the blanket. If your puff stitch is not popping forward try a tighter than normal sc into the next stitch ( this sc will be part of the pattern, not an extra stitch added ). For pattern support please contact me via the website you purchased this pattern from.
— How to create a Puff stitch :
Info :
Yarn over and pull up a loop, 6 times ( 13 loops on the hook) yarn over and pull through 12 loops leaving 2 loops on the hook ( if you're finding it hard to pull through the 12 loops you may need to pull up a little higher when you yarn over, making them looser ) then yarn over and pull through the remaining 2 loops, sc into the next stitch to lock down the puff stitch ( this sc will be part of the pattern, not an extra stitch added ), the puff stitch will naturally pop out on the right side of the blanket creating the puff stitch.
— Pattern :
Round 1 :
Row 1 ~ Sc into 2nd loop from the hook. ( the back bump of the Ch to create a nice edge to add your border to). Ch1 and turn.
Info :
All even rows throughout this pattern are Sc into all sts.
Round 3 :
Row 3 ~ Sc 1 st, ( ps, sc 3 sts ) x 18 times, ps, sc 1 st, ch 1, turn.
Round 5 :
Row 5 ~ Sc all sts, ch1, turn.
Round 7 :
Row 7 ~ Sc 1 st, ps, sc 12 sts, ( ps, sc 22 sts ) repeat once more, ps, sc 12 sts, ps, sc 1 st, ch1, turn.
Round 9 :
Row 9 ~ Sc 12 sts, ps, sc 3 sts, ps, sc 18 sts, ps, sc 3 sts, ps, sc 18 sts, ps, sc 3 sts, ps, sc 12 sts, ch1, turn.
Round 11 :
Row 11~ Sc 1 st, ps, sc 8 sts, ( ps, sc 7 sts, ps, sc 14 sts ) repeat once more, ps, sc 7 sts, ps, sc 8 sts, ps, sc 1 st, ch1, turn.
Round 13 :
Row 13 ~ Sc 8 sts, ps, sc 11 sts, ( ps, sc 10 sts, ps, sc 11 sts ) repeat once more, ps, sc 8 sts, ch1, turn.
Round 15 :
Row 15~ Sc 1 st, ps, sc 6 sts, *(( ps, sc 5 sts ) x 2, ps, sc 10 sts ) ) repeat once more, ( ps, sc 5 sts )* x 2, ps, sc 6 sts, ps, sc1 st, ch1, turn.
Info :
*(( ))*means repeat this whole section again.
Round 17 :
Row 17~ Sc 10 sts, ( ps, sc 1 st, ps, sc 3 sts, ps, sc 1 st, ps, sc 14 sts ) repeat once more, ps, sc 1 st, ps, sc 3 sts, ps, sc 1 st, ps, sc 10 sts, ch1, turn.
Round 19 :
Row 19~ Sc 1 st, ps, sc 71 sts, ps, sc 1 st, ch1, turn.
Round 21 :
Row 21~ Sc into all sts, ch1, turn.
Round 23 :
Row 23~ Sc 1 st, ( ps, sc 3 sts ) x 18 times, ps, sc 1 st, ch 1, turn.
Round 25 :
Row 25~ Sc into all sts, ch1, turn.
Round 27 :
Row 27~ Sc 1 st, ps, sc 71 sts, ps, sc 1 st, ch1, turn.
Round 29 :
Row 29~ Sc into all sts, ch1, turn.
Round 31 :
Row 31~ Sc 1 st, ps, sc 3 sts, ps ,sc 11 sts, ps, sc 3 sts, ( ps, sc 7 sts ) x 3, ps, sc 8 sts, ( ps, sc 1st ) x 2, ps, sc 5 sts, ( ps, sc 1st ) x 2, ps, sc 4 sts, ps, sc 1, ch1, turn.
Round 33 :
Row 33~ Sc 6 sts, ps, sc 9 sts, ps, sc 4 sts, ( ps, sc 7 sts ) x 2, ps, sc 6 sts, ps, sc 1 st, ps, sc 9 sts, ps, sc 4 sts, ps, sc 6 sts, ch1, turn.
Round 35 :
Row 35~ Sc 1 st, ps, sc 5 sts, ( ps, sc 1 st ) x 4, ps, sc 5 sts, ( ps, sc 7 sts ) x 2, ps, sc 5 sts, ps, sc 3 sts, ps, sc 5 sts, ( ps, sc 1 st ) x 3, ps, sc 3 sts, ( ps, sc 4 sts ) x 2, ps, sc 1 st, ch1, turn.
Round 37 :
Row 37~ Sc 8 sts, ps, sc 5 sts, ps, sc 6 sts, ( ps, sc 7 sts ) x 2, ps, sc 4 sts, ps, sc 5 sts, ps, sc 4 sts, ps, sc 5 sts, ps,sc 3 sts, ps, sc 4 sts, ps, sc 6 sts, ch1, turn.
Round 39 :
Row 39~ Sc 1 st, ps, sc 7 sts, ps, sc 3 sts, ps, sc 7 sts, ( ps, sc 1 st ) x 2, ps, sc 3 sts, ( ps, sc 1 st ) x 2, ps, sc 3 sts, ps, sc 3 sts, ps, sc 7 sts, ps, sc 4 sts, ( ps, sc 1 st ) x 2, ps, sc 5 sts, ( ps, sc 1 st ) x 2, ps, sc 4 sts, ps, sc 1, ch1, turn.
Round 41 :
Row 41~ Sc 10 sts, ps, sc 1 st, ps, sc 55 sts, ps, sc 6 sts, ch1, turn.
Round 43 :
Row 43~ Sc 1 st, ps, sc 9 sts, ps, sc 25 sts, ps, sc 30 sts, ps, sc 4 sts, ps, sc 1 st, ch1, turn.
Round 45 :
Row 45~ Sc into all sts, ch1, turn.
Round 47 :
Row 47~ Sc 1 st, ps, sc 71 sts, ps, sc 1 st, ch1, turn.
Round 49 :
Row 49~ Sc into all sts, ch1, turn.
Round 51 :
Row 51~ Sc 1 st, ps, sc 15 sts, ps, sc 3 sts, ps, sc 5 sts, ( ps, sc 4 sts ) x 2, ( ps, sc 1 st ) x 2, ps, sc 11 sts, ( ps, sc 1 st ) x 2, ps, sc 15 sts, ps, sc 1 st, ch1, turn.
Round 53 :
Row 53~ Sc 15 sts, ( ps, sc 3 sts ) x 3, ps, sc 4 sts, ps, sc 3 sts, ps, sc 5 sts, ps, sc 16 sts, ps, sc 15 sts, ch1, turn.
Round 55 :
Row 55~ Sc 1 st, ps, sc 13 sts, ( ps, sc 3 sts ) x 3, ps, sc 4 sts, ps, sc 3 sts, ps, sc 5 sts, ps, sc 10 sts, ( ps, sc 1 st ) x 2, ps, sc 15 sts, ps, sc 1 st, ch1, turn.
Round 57 :
Row 57~ Sc 15 sts, ps, sc 7 sts, ps, sc 3 sts, ps, sc 4 sts, ps, sc 3 sts, ps, sc 5 sts, ps, sc 8 sts, ps, sc 23 sts, ch1, turn.
Round 59 :
Row 59~ Sc 1 st, ps, sc 13 sts, ps, sc 7 sts, ps, sc 3 sts, ( ps, sc 1 st ) x 2, ps, sc 5 sts, ( ps, sc 1 st ) x 2, ps, sc 11 sts, ( ps, sc 1 st ) x 2, ps, sc 15 sts, ps, sc 1 st, ch1, turn.
Round 61 :
Row 61~ Sc 15 sts, ps, sc 7 sts, ps, sc 3 sts, ps, sc 18 sts, ps, sc 28 sts, ch1, turn.
Round 63 :
Row 63~ Sc 1 st, ps, sc 13 sts, ps, sc 7 sts, ps, sc 3 sts, ps, sc 19 sts, ps, sc 25 sts, ps, sc 1 st, ch1, turn.
Round 65 :
Row 65~ Sc 48 sts, ps, sc 26 sts, ch1, turn.
Round 67 :
Row 67~ Sc 1 st, ps, sc 71 sts, ps, sc 1 st, ch1, turn.
Round 69 :
Row 69~ Sc into all sts, ch1, turn.
Round 71 :
Row 71~ Sc 1 st, ps, sc 18 sts, ( ps, sc 1 st ) x 3, ps, sc 4 sts, ( ps, sc 1 st ) x 2, ps, sc 5 sts, ( ps, sc 1 st ) x 2, ( ps, sc 4 sts ) x 2, ps, sc 17 sts, ps, sc 1 st, ch1, turn.
Round 73 :
Row 73~ Sc 19 sts, ps, sc 10 sts, ps, sc 5 sts, ps, sc 3 sts, ps, sc 5 sts, ( ps, sc 3 sts ) x 2, ps, sc 20 sts, ch1, turn.
Round 75 :
Row 75~ Sc 1 st, ps, sc 17 sts, ps, sc 10 sts, ps, sc 5 sts, ps, sc 3 sts, ps, sc 5 sts, ps, sc 3 sts, ps, sc 2 sts, ps, sc 19 sts, ps, sc 1 st, ch1, turn.
Round 77 :
Row 77~ Sc 19 sts, ps, sc 10 sts, ps, sc 5 sts, ps, sc 3 sts, ps, sc 5 sts, ps, sc 3 sts, ps, sc 1 st, ps, sc 22 sts, ch1, turn.
Round 79 :
Row 79~ Sc 1 st, ps, sc 17 sts, ps, sc 11 sts, ( ps, sc 1 st ) x 2, ps, sc 5 sts, ( ps, sc 1 st ) x 2, ps, sc 4 sts, ps, sc 2 sts, ps, sc 19 sts, ps, sc 1 st, ch1, turn.
Round 81 :
Row 81~ Sc 19 sts, ps, sc 30 sts, ps, sc 3 sts, ps, sc 20 sts, ch1, turn.
Round 83 :
Row 83~ Sc 1 st, ps, sc 17 sts, ps, sc 30 sts, ps, sc 4 sts, ps, sc 17 sts, ps, sc 1 st, ch1, turn.
Round 85 :
Row 85~ Sc into all sts, ch1, turn.
Round 87 :
Row 87~ Sc 1 st, ps, sc 71 sts, ps, sc 1 st, ch1, turn.
Round 89 :
Row 89~ Sc into all sts, ch1, turn.
Round 91 :
Row 91~ Sc 1 st, ( ps, sc 3 sts ) x 18 times, ps, sc 1 st, ch 1, turn.
Round 93 :
Row 93~ Sc into all st and tie off, sew in both ends
— Border :
Info :
To prepare for the border I like to do a row of sc along the front left and right edge in the same shade as the main blanket colour, to give a nice edge for the border. For this blanket I did a shell edge border in cream to give it a nice finish, but I'm sure any border of your choice would look fantastic.
— Chart :
Info :
Full chart of the "Look who's Arrived" lettering and hearts is provided in the PDF. Read chart from bottom upwards and left to right to match written rows.
This sweet "Look Who's Arrived" blanket pattern makes a heartfelt gift that celebrates a new arrival with texture and charm. The puff-stitch lettering and heart motifs add delightful depth and personality to a classic single crochet ground. Perfect for a baby shower present or a keepsake to treasure, this blanket is designed to be cozy, tactile and lovingly handmade. 🧶💖