๐Ÿงถ Beautiful โœจ Detailed ๐Ÿ’ Adorable

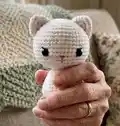
Kitty The little white kitten Amigurumi Pattern

Kitty The little white kitten Amigurumi Pattern
4.6โ˜… Rating
5-7 Hours Time Needed
1.8K Made This
โœ‚๏ธ

Intermediate Level

Ideal for those with basic crochet experience, featuring slightly more advanced stitches and techniques to expand your skills.

โฑ๏ธ

Weekend Treat

Takes 5-7 hours, making it an enjoyable project to finish over a couple of days.

๐Ÿงธ

Cute Companion

An adorable friend to cherish, handcrafted with love to bring comfort and joy for years to come.

About This Kitty The little white kitten Amigurumi Pattern

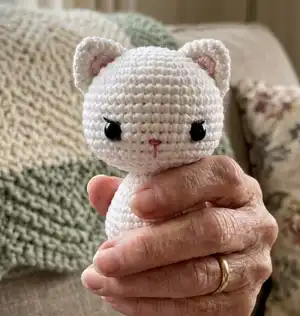
This pattern creates Kitty, a little white kitten amigurumi worked in continuous rounds for a neat finish. You will make a head, body, legs, ears, a lace collar and a bendable tail, then assemble and embroider the details. The instructions include stitch counts, finishing tips, and photo references for assembly.

Kitty The little white kitten Amigurumi Pattern crochet pattern - detailed view of completed project

The pattern uses fingering weight cotton yarn and small hooks to make a compact, cuddly toy. Embroidery steps and placement guides are included so your Kitty has sweet facial expressions.

Why You'll Love This Kitty The little white kitten Amigurumi Pattern

I absolutely love this pattern because it brings a classic, sweet character to life with minimal materials and thoughtful shaping. I enjoy how the continuous-round construction creates a smooth, round head and body that look professional. The small lace collar and embroidered details let me add personality without complicated techniques. It is satisfying to see how simple rounds transform into a chubby kitten that stands on its own. I also love that the pattern is versatile โ€” you can easily change colors or expressions to make many unique kitties.

Kitty The little white kitten Amigurumi Pattern step 1 - construction progress Kitty The little white kitten Amigurumi Pattern step 2 - assembly progress Kitty The little white kitten Amigurumi Pattern step 3 - details and accessories Kitty The little white kitten Amigurumi Pattern step 4 - final assembly and finishing

Switch Things Up

I love to change colors to create different personalities for this kitten; try a soft gray or pastel beige instead of white for a vintage look.

You can make a mini keychain version by using thinner yarn and a 1.75 mm hook, or go chunkier with bulky yarn and a larger hook for a plush toy.

I often embroider different mouth shapes or add tiny felt whiskers to change the expression and mood of the kitten.

Swap the lace collar color to match seasons โ€” red for holidays, yellow for spring โ€” or make a tiny bow instead of the collar for a different accessory.

If you want poseable tails, use stiffer wire or add thicker gauge wire and wrap it in yarn before inserting it into the tail for stronger shaping.

Try different eye options: sew-on beads, safety eyes or embroidered eyes for a softer face; each option changes the final look significantly.

I sometimes add small clothes or hats by adjusting the body rounds to create a removable outfit for play or display.

To create a family, change facial features and ear sizes slightly; a larger head or longer legs makes an instant sibling set.

I like to experiment with blush placement and color intensity โ€” a softer blush gives a more delicate look, stronger blush makes the cheeks pop on photos.

For gifting, personalize with a tiny embroidered initial on the collar or a tiny crochet heart pinned to the body for a custom touch.

Common Mistakes & How to Fix Them

โœ— Skipping a stitch marker while working in continuous rounds causes you to lose track of the beginning; place a marker in the last stitch of each round to stay oriented. โœ— Not stuffing gradually leads to lumps and poor shaping; stuff small amounts as you go and shape the piece as you fill it to maintain smooth curves. โœ— Working with loose tension creates visible holes between stitches; maintain a firm, consistent tension when using fingering weight yarn to hide gaps. โœ— Rushing decreases can make the doll misshapen; use an invisible decrease and count stitches after each decrease round to ensure correct shaping. โœ— Forgetting to leave long sewing tails makes assembly harder; always fasten off leaving a long tail on ears, legs and the body for secure sewing.

Kitty The little white kitten Amigurumi Pattern

Make an adorable Kitty โ€” a tiny white kitten amigurumi perfect for gifts and decor. This pattern gives you clear, step-by-step rounds, assembly photos, and embroidery tips so you can create a charming, chubby kitten. Follow the instructions to stitch, stuff and assemble a sweet handmade companion you will love to give or keep.

Intermediate 5-7 Hours

Materials Needed for Kitty The little white kitten Amigurumi Pattern

โ€” Main Fabric

  • 01
    Cotton fingering weight yarn (main): White (enough for head, body, legs, tail)
  • 02
    Cotton fingering weight yarn (accent): Light blue (for lace collar)
  • 03
    Cotton fingering weight yarn (accent): Blue (for eye color detailing)
  • 04
    Cotton fingering weight yarn (accent): Light pink (for inner ears)
  • 05
    Embroider thread: Pink and dark brown for nose and eyelashes
  • 06
    Polyester fiberfill for stuffing
  • 07
    Pink blush for cheeks

โ€” Tools Required

  • 01
    Crochet hook size 2.25 mm
  • 02
    Crochet hook size 2.5 mm
  • 03
    Embroidery needle and yarn needle for sewing
  • 04
    7 mm two black half bead eyes (2 pieces)
  • 05
    Scissors
  • 06
    Glue (for inner ears and tail wire)
  • 07
    Soft wire for tail
  • 08
    Stitch markers
  • 09
    Polyester stuffing (fiberfill)
  • 10
    Needle for sewing

Progress Tracker

0% Complete

โ€” Head :

Info :

Begin with white yarn. Use 2.5 mm crochet hook.

Round 1 :

Make magic ring 6 sc (6)

Round 2 :

Sc 2 in each st around (12)

Round 3 :

(Sc 1, inc) x 6 (18)

Round 4 :

Sc 1, inc, (sc 2, inc) x 5, sc 1 (24)

Round 5 :

(Sc 3, inc) x 6 (30)

Round 6 :

Sc 2, inc, (sc 4, inc) x 5, sc 2 (36)

Round 7 :

(Sc 5, inc) x 6 (42)

Round 8 :

Sc 3, inc, (sc 6, inc) x 5, sc 3 (48)

Round 9-15 :

Sc in each st around (48)

Round 16 :

Sc 3, inv dec, (sc 6, inv dec) x 5, sc 3 (42)

Round 17 :

(Sc 5, inv dec) x 6 (36)

Round 18 :

Sc 2, inv dec, (sc 4, inv dec) x 5, sc 2 (30)

Round 19 :

(Sc 3, inv dec) x 6 (24)

Info :

Stuff the head with fiberfill.

Round 20 :

Sc 1, inv dec, (sc 2, inv dec) x 5, sc 1 (18)

Round 21 :

(Sc 1, inv dec) x 6 (12)

Round 22 :

Inv dec x 6 (6)

Info :

Finish stuffing the head firmly. Fasten off and leaving a long tail for sewing. Using a yarn needle weave the yarn tail through the front loop of each remaining st and pull tight to close.

Info :

Horizontal circumference is 18.5 cm. Vertical circumference is 18 cm. (If you use weight yarn and crochet hook size as my recommended)

โ€” Ear :

Info :

Make 2 ears, begin with white yarn. Use 2.5 mm crochet hook.

Round 1 :

Make magic ring 6 sc (6)

Round 2 :

(Sc 1, inc) x 3 (9)

Round 3 :

Sc 1, inc, (sc 2, inc) x 2, sc 1 (12)

Round 4 :

(Sc 3, inc) x 3 (15)

Round 5 :

Sc 2, inc, (sc 4, inc) x 2, sc 2 (18)

Info :

Fasten off and leaving a long tail for sewing.

โ€” Inner Ear :

Info :

Make 2 inner ears and use light pink yarn to make 2 chains. Use 2.25 mm crochet hook.

Round 1 :

Start in the 2nd chain from hook, then crochet [(sc 1, hdc 1, sc 1) in same st] (3)

Info :

Fasten off and weave in the yarn end.

โ€” Front Legs :

Info :

Make 2 front legs, begin with white yarn. Use 2.25 mm crochet hook.

Round 1 :

Make magic ring 4 sc (4)

Round 2 :

(Sc 1, inc) x 2 (6)

Round 3 :

Inc, sc 5 (7)

Round 4 :

Inc, inv dec, sc 4 (7)

Round 5 :

Inc, sc 6 (8)

Round 6 :

Inc, sc 7 (9)

Info :

Fasten off and leave a long tail for sewing.

โ€” Back Legs :

Info :

Make 2 back legs and use white yarn to make 2 chains. Use 2.25 mm crochet hook.

Round 1 :

Start in the 2nd chain from hook, then crochet [(sc 1, dc 2, sc 1) in same st] (4)

Info :

Fasten off and leaving a long tail for sewing. Using a yarn needle weave the yarn tail through the front loop of each remaining st and pull tight to close.

โ€” Body :

Info :

Begin with white yarn. Use 2.5 mm crochet hook.

Round 1 :

Make magic ring 6 sc (6)

Round 2 :

Sc 2 in each st around (12)

Round 3 :

(Sc 1, inc) x 6 (18)

Round 4 :

Sc 1, inc, (sc 2, inc) x 5, sc 1 (24)

Round 5 :

(Sc 3, inc) x 6 (30)

Round 6 :

Sc 2, inc, (sc 4, inc) x 5, sc 2 (36)

Round 7-8 :

Sc in each st around (36)

Info :

Join both legs onto the body.

Round 9 :

Sc 1, (inv dec, sc 5) x 2, (the 1st leg) sc 7, (skip last 2 sts on the 1st leg), (skip 2 sts on the body), (the body) sc 1, (the 2nd leg) sc 7, (skip last 2 sts on the 2nd leg), (skip 2 sts on the body), (sc 5, inv dec) x 2, sc 2 (42) (Pic 6.1-6.2)

Round 10 :

(Sc 5, inv dec) x 6 (36)

Round 11 :

Sc in each st around (36)

Round 12 :

Sc 2, inv dec, (sc 4, inv dec) x 5, sc 2 (30)

Info :

Stuff both legs slightly with fiberfill.

Round 13 :

Sc in each st around (30)

Round 14 :

(Sc 3, inv dec) x 6 (24)

Round 15 :

Sc in each st around (24)

Round 16 :

Sc 1, inv dec, (sc 2, inv dec) x 5, sc 1 (18)

Info :

Finish stuffing the body firmly. Fasten off and leaving a long tail for sewing. Sew the remaining yarn under the front legs to close the gap between the leg and the body. (Pic 6.3 - 6.4) Sew both front legs onto the body on round 6 and pull them tight together. (Pic 6.5 - 6.9)

โ€” Lace Collar :

Info :

Use light blue yarn to make 28 chains. Use 2.25 mm crochet hook.

Round 1 :

Start in the 3rd chain from hook, then crochet (dc 1, dc inc) x 13 (39)

Round 2 :

(Sc 1, inc, 3-sc inc, inc) x 9, sc 1, inc, 3-sc inc (78)

Info :

Fasten off and leaving a long tail for sewing.

โ€” Tail :

Info :

Begin with white yarn. Use 2.25 mm crochet hook.

Round 1 :

Make magic ring 6 sc (6)

Round 2-22 :

Sc in each st around (6)

Info :

Fasten off and leave a long tail for sewing.

โ€” How to Assemble & Embroidery :

Info :

1. FACE: Eyes: Mark point A, B, C, D and thread a needle with white color yarn and insert it from under the chin, bring it out at [A], push the needle back in at [B] and out at [C], push the needle back again in at [D] and bring it out at the beginning point. Pull tight the yarn to make the indentation for the eye and knot the yarn. The space between two eyes is 9 stitches.

Info :

Eyelashes: Thread a needle with dark brown thread and insert it from under the chin, bring it out at [E], push the needle back in at [F] and out at [G], push the needle back again in at [H] and bring it out at the beginning point.

Info :

Blue eye: Place 7 mm eye beads on the eye indentation and sew the blue of the eyes with blue yarn.

Info :

Nose: Sew the nose with pink thread between rounds 14 and 15 (same level as the bottom line of the eyes) and apart from each eyes 4 stitches. Embroider the nose about 5 times using a horizontal line. Additionally, make a vertical line from the middle of the nose 2 rounds down.

Info :

Ears: Sew the ears on rounds 4 to 9 (6 rnds) and apart from the eye 5 sts.

Info :

Inner ears: Glue the inner ears onto rnds 4 and 5 of each ears.

Info :

Sew the head carefully onto the body.

Info :

2. BODY: Make the bottom indentation for standing easier. Thread a needle with white color yarn and insert it from back of the body, bring it out at [A], push the needle back in at [B] and out at [C], push the needle back again in at [B] and bring it out at the beginning point. Pull tight the yarn to make the indentation for the bottom and knot the yarn.

Info :

3. BACK LEGS: Sew the back legs on round 6 (same round as the front legs) and apart from the front legs 1 stitch.

Info :

4. LACE COLLAR: Put a lace collar on the kitten's neck and sew the end of each side together. Arrange the collar in beautifully pleated.

Info :

5. TAIL: Bend the ends of the soft wire and glue it. Insert the soft wire into the tail and cut off the excess wire. Sew the tail on round 5 of the body and bend it in 'S' curve.

Info :

6. CHEEKS: Blush both cheeks with pink blush.

Assembly Instructions

  • Attach head to body by sewing carefully around the neck opening, aligning the bottom of the head with round 6 of the body and securing with a yarn needle.
  • Sew both front legs onto the body on round 6, positioning them close together and pulling them tight to create a standing pose.
  • Sew the back legs onto round 6 of the body (same round as the front legs) and place them one stitch apart from the front legs.
  • Glue the light pink inner ear pieces onto rounds 4 and 5 of each outer ear, then sew the ears to the head between rounds 4 and 9, spacing them 5 stitches from the eyes.
  • Insert a bent piece of soft wire into the tail (glue and trim excess), then sew the tail onto round 5 of the body and shape it into an 'S' curve.
  • Place the lace collar around the kitten's neck, sew the ends of the collar together, and arrange the pleats before securing the collar to the neck.

Important Notes

  • ๐Ÿ’กEvery part of the pattern is crocheted in continuous rounds; place a stitch marker in the last stitch of each round or use a different color yarn to mark rounds.
  • ๐Ÿ’กCrochet every stitch tightly to avoid small holes; maintain consistent tension throughout to keep the amigurumi neat.
  • ๐Ÿ’กUse invisible decrease instead of normal decrease to make seams and shaping look neater on your doll.
  • ๐Ÿ’กStuff the head and body firmly but gradually to achieve a cute chubby shape; overstuffing can distort proportions.
  • ๐Ÿ’กThe space between two eyes when shaping indentation is 9 stitches; mark points A-D before embroidering or inserting beads.

Thank you for making Kitty, the little white kitten โ€” I hope she brings you as much joy as she did me when I designed her! ๐Ÿงถ This pattern is perfect for small gifts and to practice shaping and embroidery on amigurumi. ๐Ÿฑ Have fun stitching, customizing and gifting your handmade companion โ€” happy crocheting! โœ‚๏ธ

You ask,

we answer.

FAQs

What size will the finished piece be?

The finished amigurumi measures approximately 3.5 inches / 9 cm tall when using the recommended fingering weight cotton yarn and the specified hook sizes.

Can I use different yarn weights for this pattern?

Yes, you can use different yarn weights but this will change the final size; choose an appropriate hook for your yarn and expect a larger or smaller Kitty depending on yarn weight.

Do I need prior crochet experience for this pattern?

This pattern is rated Intermediate; basic knowledge of single crochet, increases, invisible decreases, and working in rounds is recommended for best results.

How long does this project typically take to complete?

Most crocheters complete this project in 5-7 hours, though time can vary based on experience level, finishing details and assembly care.