🧢 Beautiful ✨ Detailed πŸ’ Adorable

Iris Doll Amigurumi Pattern

Iris Doll Amigurumi Pattern
4.0β˜… Rating
8-10 Hours Time Needed
1.2K Made This
βœ‚οΈ

Intermediate Level

Ideal for those with basic crochet experience, featuring slightly more advanced stitches and techniques to expand your skills.

⏱️

All-Day Adventure

Requires 8-10 hours, ideal for a full day of immersive crocheting.

🧸

Cute Companion

An adorable friend to cherish, handcrafted with love to bring comfort and joy for years to come.

About This Iris Doll Amigurumi Pattern

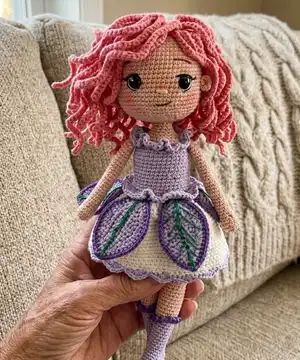
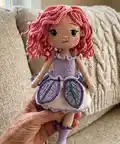
This pattern teaches you how to crochet Iris Doll, a 29 cm amigurumi with a curly wig, embroidered facial details, and decorative leaf skirt. You will work the body with wire reinforcement and join limbs seamlessly for a neat finish. The design features a separate wig that is sewn onto the head and leaves that are embroidered and attached for a feminine, fairy-like look.

Iris Doll Amigurumi Pattern crochet pattern - detailed view of completed project

Detailed round-by-round instructions are provided for arms, legs, body, head, ears, wig, skirt and leaves. Photographs and assembly notes help you place eyes, sew parts and finish the doll professionally.

Why You'll Love This Iris Doll Amigurumi Pattern

I absolutely love this pattern because it blends classic amigurumi construction with whimsical decorative details that make each doll unique. I enjoy the process of adding the wig and embroidered leaves β€” these little touches bring so much personality to the finished doll. I also like that the pattern uses wire for a slightly posable body and neck, which gives more expressive posing options. Working through the step-by-step rounds is relaxing and rewarding, and the photos help me every time I make another Iris Doll.

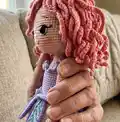
Iris Doll Amigurumi Pattern step 1 - construction progress Iris Doll Amigurumi Pattern step 2 - assembly progress Iris Doll Amigurumi Pattern step 3 - details and accessories Iris Doll Amigurumi Pattern step 4 - final assembly and finishing

Switch Things Up

I love how easy it is to customize Iris Doll by changing yarn colors β€” you can create a whole garden of dolls by swapping the wig and skirt shades.

Want a smaller doll? Use thinner yarn and a smaller hook; for a larger, cuddlier doll, choose thicker yarn and a bigger hook.

I often change the eye size for different expressions β€” 6 mm safety eyes give a sweet look, while smaller embroidered eyes look more delicate.

Try different leaf embroidery colors like gold or mint green for seasonal variations that match holidays or decor.

I like adding tiny crocheted accessories like a scarf, mini hat, or a little bag to give the doll more personality and play options.

For a more posable figure you can use a slightly thicker wire and secure it well at the neck; remove wire for a soft, child-safe version.

Experiment with hair styles β€” short wig, long wig or braided styles by changing how you attach the hair strands on the wig base.

Swap safety eyes for embroidered eyes if you want a fully soft, child-friendly amigurumi without hard parts.

I sometimes add subtle blush with textile-safe pastel chalks or sew tiny freckles for a unique face that brings the doll to life.

For gifts, personalize by embroidering initials or a small motif on the skirt inside lining β€” it makes each Iris Doll feel handmade and special.

Common Mistakes & How to Fix Them

βœ— Skipping stitch markers during joins can make limb placement inaccurate; place a marker at each join and count stitches before sewing. βœ— Stuffing too firmly or too loosely distorts the shape of the body and limbs; stuff gradually and check shape as you go to maintain even tension. βœ— Changing hook sizes mid-piece without adjusting tension can alter size and stitch counts; use the recommended 1.50 mm for body and 1.75 mm for wig and adjust yarn tension consistently. βœ— Not leaving long yarn tails when instructed will make assembly difficult later; always leave the long tail when the pattern requests it for sewing parts together. βœ— Forgetting to insert the wire while crocheting the body or legs will prevent posability; follow the notes and place wire inside body & neck while crocheting as indicated. βœ— Not counting rounds after increases or decreases leads to mis-shaped pieces; count stitches after each shaping round and correct immediately if counts differ.

Iris Doll Amigurumi Pattern

Make a charming Iris Doll amigurumi with this detailed pattern designed to guide you through every step. You will create a posable little doll with a removable wig, leafy skirt details, and embroidered features. The pattern includes clear round-by-round instructions, photos, and assembly notes so you can crochet with confidence and joy. Perfect for gifting or adding a whimsical handmade friend to your collection.

Intermediate 8-10 Hours

Materials Needed for Iris Doll Amigurumi Pattern

β€” Main Fabric

  • 01
    Etrofil Gurme nude colour 72040 (skin tone yarn)
  • 02
    Alize Diva white 62 (white yarn for underwear/skirt)
  • 03
    Alize Diva purple 622 (purple yarn for bodice and accents)
  • 04
    Alize Diva lilac 158 (lilac yarn for legs/boots/skirt accents)
  • 05
    Yarnart Jeans pink 20 (pink yarn for wig/hair)

β€” Tools Required

  • 01
    Crochet hook size 1.50 mm (for most parts)
  • 02
    Crochet hook size 1.75 mm (for wig / hair)
  • 03
    8 mm blue safety eyes (2 pieces)
  • 04
    A small amount of green yarn (for leaf embroidery)
  • 05
    A small amount of white, brown and black thread (for face embroidery)
  • 06
    Needle for sewing and embroidery
  • 07
    Scissors
  • 08
    Fiberfill stuffing
  • 09
    Wire for body & neck part (about 40 cm long)

Progress Tracker

0% Complete
β€” General Info :

Info :

Use 1.50 mm crochet hook while crocheting the doll except hair/wig. (according to the recommended yarns)

β€” Arms :

Info :

*** Stuff the arms very slightly.You can insert wire inside the arms.

Round 1 :

6 sc in mr with nude colour yarn (6)

Round 2 :

6 inc (12)

Round 3 - 5 :

12 sc (3 rows) (12)

Round 6 :

2*(4 sc, dec) (10)

Round 7 - 33 :

10 sc (27 rows) (10)

Info :

*** Cut your yarn and fasten off.

β€” Legs :

Info :

*** You can insert wire inside the legs. Stuff the legs firmly as you go. The places of increases and decreases are indicated.

Round 1 :

6 sc in mr with lilac colour yarn (6)

Round 2 :

6 inc (12)

Round 3 - 7 :

12 sc (5 rows) (12)

Round 8 :

For the heel ch 1 and turn, only crochet 5 sc

Round 9 :

Ch 1 and turn, 5 sc

Round 10 :

12 sc (heel 5 sc + foot 7 sc) (12)

Round 11 - 12 :

12 sc (2 rows) (12)

Round 13 :

1 dec (side), 4 sc, 1 dec (side), 4 sc (10)

Round 14 :

10 sc (10)

Round 15 :

2 sc, inc (back/middle), 7 sc (11)

Round 16 :

11 sc (11)

Round 17 :

3 sc, inc (back/middle), 7 sc (12)

Round 18 :

12 sc (12)

Round 19 :

4 sc, inc (back/middle), 7 sc (13)

Round 20 :

13 sc (13)

Round 21 :

5 sc, inc (back/middle), 7 sc (14)

Round 22 :

14 sc (14)

Round 23 :

6 sc, inc (back/middle), 7 sc (15)

Round 24 :

BLO 15 sc with nude colour yarn (15)

Round 25 :

7 sc, inc (back/middle), 7 sc (16)

Round 26 - 34 :

16 sc (9 rows) (16)

Round 35 :

4 inc (front/knee), 12 sc (20)

Round 36 :

20 sc (20)

Round 37 :

12 sc, 2 dec (back/middle), 4 sc (18)

Round 38 - 54 :

18 sc (17 rows) (18)

Round 55 :

Crochet only 5 sc and finish the first leg (inside/middle)

Info :

*** You've finished the first leg. Cut your yarn and fasten off. Crochet the second leg in the same way and continue to body.

Info :

*** Attach your purple yarn to the 24th row of the legs and crochet 15*(ch 4, slst to the next st). Complete the row.

β€” Body :

Info :

*** Stuff the body firmly while crocheting. Place the wire inside body & neck part.

Round 1 :

Ch 3 and join two legs with white yarn. (Your joining stitch should be on the back side of the doll) 18 sc from lef leg, 3 sc on ch 3, 18 sc from right leg, 3 sc on ch 3 (42)

Round 2 :

42 sc (42)

Round 3 :

BLO 6*(6 sc, inc) (48)

Round 4 - 9 :

48 sc (6 rows) (48)

Round 10 :

6*(6 sc, dec) (42)

Round 11 - 12 :

42 sc (2 rows) (42)

Round 13 :

BLO 42 sc (42)

Round 14 :

6*(5 sc, dec) with lilac yarn (36)

Round 15 :

BLO 36 sc (36)

Round 16 - 25 :

36 sc (10 rows) (36)

Info :

*** After this row, continue crocheting by joining arms to the body.

Round 26 :

10 sc from body, 5 sc arm+body (together), 13 sc body, 5 sc arm+body (together), 3 sc body (36)

Round 27 :

10 sc body, 5 sc only arm, 13 sc body, 5 sc only arm, 3 sc body (36)

Round 28 :

BLO 6*(4 sc, dec) with nude colour yarn (30)

Round 29 :

6*(3 sc, dec) (24)

Round 30 :

6*(2 sc, dec) (18)

Round 31 :

3*(4 sc, dec) (15)

Round 32 - 34 :

15 sc (3 rows) (15)

Info :

*** You've finished the body. Leave enough long yarn tail to sew and fasten off.

Info :

*** Attach your white yarn to the 3rd row of the body and crochet 48*(ch 4, 1 slst to the next st). Complete underwear details.

β€” Head :

Info :

*** Insert the safety eyes between round 19 and 20 leaving a space of 10 sc between them. Stuff the head firmly as you go.

Round 1 :

6 sc in mr with nude colour yarn (6)

Round 2 :

6 inc (12)

Round 3 :

6*(sc, inc) (18)

Round 4 :

6*(2 sc, inc) (24)

Round 5 :

6*(3 sc, inc) (30)

Round 6 :

6*(4 sc, inc) (36)

Round 7 :

6*(5 sc, inc) (42)

Round 8 :

6*(6 sc, inc) (48)

Round 9 :

6*(7 sc, inc) (54)

Round 10 :

6*(8 sc, inc) (60)

Round 11 - 21 :

60 sc (11 rows) (60)

Round 22 :

4*(14 sc, inc) (64)

Round 23 - 26 :

64 sc (4 rows) (64)

Round 27 :

8*(6 sc, dec) (56)

Round 28 :

8*(5 sc, dec) (48)

Round 29 :

8*(4 sc, dec) (40)

Round 30 :

8*(3 sc, dec) (32)

Round 31 :

8*(2 sc, dec) (24)

Round 32 :

6*(2 sc, dec) (18)

Round 33 :

3*(4 sc, dec) (15)

Info :

*** Leave enough long yarn tail to sew.

Info :

*** Embroider the eyebrows and eyelash with brown and black embroidery thread. Embroider nose in the middle of the eyes with nude colour yarn.

β€” Ears :

Round 1 :

7 hdc, slst in mr with nude colour yarn

Info :

*** Leave enough long yarn tail to sew. After placing the wig on the head, sew the ears. Leave 6 sc between ears and eyes.

β€” Hair / Wig :

Info :

*** Use 1.75 mm crochet hook for the wig. Crochet all the rows in BLO stitches.

Round 1 :

6 sc in mr with pink yarn (6)

Round 2 :

BLO 6 inc (12)

Round 3 :

BLO 6*(sc, inc) (18)

Round 4 :

BLO 6*(2 sc, inc) (24)

Round 5 :

BLO 6*(3 sc, inc) (30)

Round 6 :

BLO 6*(4 sc, inc) (36)

Round 7 :

BLO 6*(5 sc, inc) (42)

Round 8 :

BLO 6*(6 sc, inc) (48)

Info :

*** You've finished the wig. Continue to crochet hair strands without cutting your pink yarn.

Info :

*** For the first row; (8th row of the wig) ch 45, from the 2nd sc 44 slst, skip 1 sc, 1 slst to the next sc. You've made the first hair strand. Complete the row in the same way. (24 hair strands in total)

Info :

*** Skip 1 row and continue to crocheting hair strands to the 6th row of the wig. Ch 47, from the 2nd sc 46 slst, skip 1 sc, 1 slst to the next sc. Complete the row in the same way. (18 hair strands in total)

Info :

*** Skip 1 row and continue to crocheting hair strands to the 4th row of the wig. Ch 49, from the 2nd sc 48 slst, skip 1 sc, 1 slst to the next sc. Complete the row in the same way. (12 hair strands in total)

Info :

*** Skip 1 row and continue to crocheting hair strands to the 2nd row of the wig. Ch 51, from the 2nd sc 50 slst, skip 1 sc, 1 slst to the next sc. Complete the row in the same way. (6 hair strands in total)

Info :

*** Sew the wig 11 rows above the eyes.

β€” Skirt :

Round 1 :

Attach your white yarn to the 13th row of the body and crochet 42 dc inc, slslt (84)

Round 2 - 11 :

Ch 1, 84 dc, slst (10 rows) (84)

Round 12 :

Attach your lilac yarn for the last row of skirt. 1 sc, skip 2 sc, into the same sc (3 dc, ch 1, 3 dc), ... complete the row in the same way.

β€” Leaves :

Info :

*** Crochet 6 pieces and leave enough long yarn tail to sew. Increases will be crocheted in the same st.

Round 1 :

With lilac yarn ch 15, from the 2nd sc 1 sc, 2 hdc, 3 dc, 4 trc, 2 dc, 1 hdc, inc to the last sc, on the opposite side 2 sc, 1 hdc, 2 dc, 4 trc, 2 dc, 1 hdc, 1 sc, slst

Round 2 :

Ch 1, 1 sc, inc, hdc inc, hdc, dc, dc inc, trc, trc inc, 2 trc, dc inc, hdc, hdc inc, 1 sc, inc, inc, hdc inc, hdc, 2 dc, dc inc, dc, dc inc, dc, hdc inc, hdc, inc, 1 sc, slst

Round 3 :

With purple yarn crochet 1 single crochet around the piece.

Info :

*** You may embroider the leaves with green yarn.

Info :

*** Place the leaves onto the body as shown in the picture. (just above the skirt) (2 pieces on the front, 2 pieces on the back, 2 pieces on the sides) Sew the leaves to the body only from the ends.

Info :

*** Attach your lilac yarn to the 15th row of the body to complete the skirt detail and crochet 36 dc inc, slst. (just above the leaves). Fasten off.

Info :

*** Attach your lilac yarn 28th row of the body to complete arm detail and 30 dc inc, slst. Fasten off.

Assembly Instructions

  • Sew the wig to the head 11 rows above the eyes, then place and sew the ears onto the head leaving 6 sc between ears and eyes.
  • Attach the leaves to the body just above the skirt: place 2 pieces on the front, 2 on the back and 2 on the sides, sewing the leaves only from the ends.
  • Join the two legs by chaining 3 and joining with white yarn as instructed in body round 1; ensure the joining stitch is on the back side of the doll.
  • When indicated continue crocheting by joining the arms to the body (round 26 of body); sew securely using the long tails left for assembly.
  • After finishing the body leave a long tail for sewing the head; stuff head and body firmly and sew the head on using a whipstitch or ladder stitch for a neat finish.

Important Notes

  • πŸ’‘Use 1.50 mm crochet hook while crocheting the doll except for the wig where 1.75 mm is recommended.
  • πŸ’‘The size of the toy is about 29 cm when using the recommended yarns and hook sizes.
  • πŸ’‘This pattern is for personal use only; sharing information from this pattern is prohibited without permission.
  • πŸ’‘Stuff the parts gradually and evenly; overstuffing can distort the shape and make sewing difficult.
  • πŸ’‘Place wire inside the body and neck as you crochet to create a slightly posable structure; follow the wire length recommendation.

You did it β€” Iris Doll is complete and full of personality. This pattern brings together delicate embroidery, a curly wig, and leafy skirt details for a charming handmade friend. Crocheting Iris is a delightful project for a cozy day of crafting. 🧢🌸

You ask,

we answer.

FAQs

What size will the finished piece be?

The finished amigurumi measures approximately 29 cm tall when using the recommended yarns and hook sizes.

Can I use different yarn weights for this pattern?

Yes, you can change yarn weight but the finished size and stitch counts will change; use an appropriate hook for your yarn and expect differences in proportions.

Do I need prior crochet experience for this pattern?

This pattern is rated intermediate, so familiarity with magic ring, single crochet, increases/decreases and working in rounds is recommended.

How long does this project typically take to complete?

Most crocheters complete this project in 8-10 hours, though time may vary based on experience and how much detailing you add.