🧢 Beautiful ✨ Detailed πŸ’ Adorable

Granny Square Pocket Bottle Holder Pattern

Granny Square Pocket Bottle Holder Pattern
4.0β˜… Rating
2-4 Hours Time Needed
2.0K Made This
βœ‚οΈ

Intermediate Level

Ideal for those with basic crochet experience, featuring slightly more advanced stitches and techniques to expand your skills.

⏱️

Bite-Sized Project

Finishes in 2-4 hoursβ€”perfect for an afternoon of creative relaxation.

✨

Stylish Touch

An elegant detail to elevate any look, combining traditional techniques with contemporary design sensibilities.

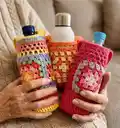
About This Granny Square Pocket Bottle Holder Pattern

This pattern creates a fitted bottle holder with a long strap and an optional phone pocket made as either a granny square or a plain solid pocket. It includes step-by-step photo-supported instructions for the base, the netting body and two strap methods. You can use cotton DK yarn for a durable, washable cover that stretches slightly for a snug fit.

Granny Square Pocket Bottle Holder Pattern crochet pattern - detailed view of completed project

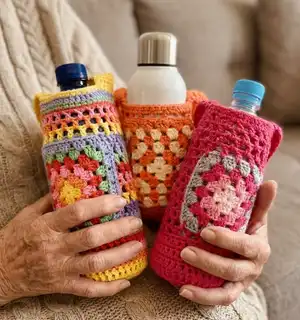
The pattern is adaptable: make rainbow stripes, a plain colour or add a granny square pocket for extra charm. Instructions include the netting body, finishing rows and two strap methods to suit how much stretch you want.

Why You'll Love This Granny Square Pocket Bottle Holder Pattern

I absolutely love this pattern because it transforms simple stitches into a practical everyday accessory that feels handmade and personal. I enjoy how quick it is to make a complete holder and how easily you can customise colours or add a pocket. The netting body is airy but secure, and I love that the cotton stretches slightly to hug the bottle. Making one of these makes a great gift and is perfect for festival season or everyday hands-free convenience.

Granny Square Pocket Bottle Holder Pattern step 1 - construction progress Granny Square Pocket Bottle Holder Pattern step 2 - assembly progress Granny Square Pocket Bottle Holder Pattern step 3 - details and accessories Granny Square Pocket Bottle Holder Pattern step 4 - final assembly and finishing

Switch Things Up

I love how easy it is to customise the colours of this bottle holder; try stripes, ombre or a single bold hue to change the whole look.

I often swap the cotton for a cotton-acrylic blend for more durability; just check the gauge and adjust the hook if needed.

To make a keyring-sized mini version, use finer yarn and a smaller hook to create a tiny holder perfect for charms.

I add a metal snap to the pocket top when giving these as gifts to keep phones secure while still allowing easy access.

Try changing the strap method: use the horizontal handle for less stretch, or braid multiple chains for a decorative strap.

I sometimes reinforce the strap by sewing a ribbon to the underside to prevent stretching over time.

If you want a wider opening, add an extra DC row at the top before finishing the body section for easier bottle insertion.

I like to embroider initials or add small appliques to personalise each holder for the recipient.

Swap DC netting for a more open lace motif if you want a more decorative holder rather than a snug fitting one.

For a waterproof inner lining, cut fabric to size and hand-sew it inside before sewing in ends; this gives extra protection for rainy days.

Common Mistakes & How to Fix Them

βœ— Not checking gauge before starting; measure 5 DC per 3cm and adjust hook size to match the pattern gauge. βœ— Using a non-stretchy yarn and skipping the note about increases; with cotton blends you may need to add 2-3 stitches after the 3rd round. βœ— Sewing the pocket on without pinning or checking alignment; fold and pin the holder on the bottle to ensure the pocket sits straight before sewing. βœ— Making the strap too short without measuring across your body; measure the strap length on yourself or the wearer before finishing and leave a long tail to sew in place.

Granny Square Pocket Bottle Holder Pattern

Make a stylish, hands-free bottle holder with an optional granny square phone pocket. This easy-to-follow pattern lets you crochet a snug fitted cover and choose between a solid pocket or a granny square pocket. You can customise colours, strap length and finishing details to suit your style. Perfect for festivals, walks or everyday hands-free hydration.

Intermediate 2-4 Hours

Materials Needed for Granny Square Pocket Bottle Holder Pattern

β€” Main Fabric

  • 01
    8 ply (DK) cotton such as Paintbox (recommended) - 2 x 50 g balls for main colour
  • 02
    3-4 different colours, 1 ball each for stripes (optional)
  • 03
    Stash scraps of cotton for the granny square pocket (small amounts)
  • 04
    Cotton blend or acrylic (optional) - note: cotton blend stretches less so add 2-3 stitches after 3rd round if used

β€” Tools Required

  • 01
    Crochet hook 3.00 mm (I used 3.00 mm) - you may also use 3.5 mm or 4.0 mm depending on gauge
  • 02
    Needle for sewing on pocket and strap
  • 03
    Scissors
  • 04
    Measuring tape to check fit on your water bottle
  • 05
    Pins to position pocket and strap while sewing

Progress Tracker

0% Complete

β€” Bottom Solid Section :

Round 1 :

Make a magic loop (there are many instructions online if unsure how to do this)

Round 2 :

Ch 3, DC into magic loop 11 times, sl st into 3rd chain of initial 3ch to make a circle

Info :

You should now have a small circle of 11 DC and 3ch counting as one DC, total 12 DC

Round 3 :

Ch 3, 2DC into each stitch till end, slst into 3rd chain to close circle (24 DC)

Round 4 :

Ch 3, *1DC in next stitch, 2DC in next stitch*, repeat from * till end, slst into 3rd chain to close circle (36 DC)

Round 5 :

Complete 4 more rows of 3ch then 1DC in each stitch and slst into 3rd chain. As there are no increases, the crochet will begin to form a cylinder shape. You can measure it on a water bottle to check fit. It should fit tightly as it will stretch if cotton. For cotton blend or acrylic refer to note above.

Info :

When you have completed 4-6 rows depending on how large the water bottle is you are now ready to make the netting part of the pattern.

β€” Netting Section :

Round 1 :

Ch 3 and 1DC into second stitch, ch 1, sk 1 stitch and 1DC into next stitch. Continue 1DC, ch1, sk1 to end. At the end of the round there should be 18 DC and 18 chains (unless you increased stitches earlier then add accordingly). Continue completing this same round until nearly to the top of the water bottle leaving some space for the final dc or sc rows. I usually do 14 rows.

β€” Body :

Round 1 :

BODY: Finish body section by completing 1-2 rows of 1DC or 3 rows of sc, depending on the length of your bottle and your preference

β€” Bag Strap :

Method 1 (P1) :

Ch 3 from where you are and complete 5DC into the top of the last dc round. Measure how long the strap needs to be across your body. Continue in rows of 3ch, 5DC and turn, back and forth until you reach your desired length. Fasten off yarn leaving approximately 20 cm tail to sew other end of strap onto body. Fold bottle holder in half and sew end of strap on the opposite side.

Method 2 (P1) :

Alternatively, crochet the handle horizontally, as it stretches less than the first method. Make a 200-240 ch depending on the person's height and work 3 rows of HDC then sew on tightly to opposite sides.

β€” Granny Square Pocket :

Info :

Measure the phone size and crochet enough rounds to leave approximately 2cm on either side of the phone. For a longer pocket, add an extra row or two at top, bottom or both to achieve the correct size, leaving a long tail for sewing onto bottle.

β€” Plain Solid Colour Pocket :

Round 1 :

Plain Solid Colour Pocket: Ch 22, work into 3rd st in hdc (20 sts in each row) for approx 24 rows of hdc until the pocket measures from the bottom of the mesh to the top just below the final DC row (or to your own desired length) leaving a long tail for sewing onto bottle.

Info :

When making the pocket try to make it longer than a phone and put a metal snap to keep it closed so the phone can't fall out; generally it is in the pocket quite tightly, however the cotton does stretch over time.

β€” Assembly :

Step 1 :

Your finished body section should look like the picture in the pattern when completed

Step 2 :

Place the granny square pocket between the straps and make sure it is straight as you sew around the three sides to form a pocket. I found it easier to sew the pocket on while the cover was on the bottle.

Step 3 :

Sew in any ends inside the bottle holder, taking particular care to secure the magic loop end tightly.

Step 4 :

Also the cotton strap will stretch so if you want to prevent stretching sew a ribbon or fabric on the underside to prevent stretching.

Drawstring :

To make the drawstring make a chain of 100 ch and thread it through every second stitch in the top final round above the netting starting from the middle back (the pocket is on the front and the drawstring ends meet at the back).

Assembly Instructions

  • Fold bottle holder in half and sew one end of the strap to the opposite side, using the 20 cm tail left when fastening off to secure it firmly.
  • Place the granny square pocket between the straps, ensure it is straight and sew around three sides to form the pocket, using the bottle as a guide if desired.
  • Sew in any loose ends inside the bottle holder, taking particular care to secure the magic ring tail tightly to prevent unraveling.
  • If you want to prevent the cotton strap from stretching, sew ribbon or fabric to the underside of the strap before final attachment.
  • Thread a 100 ch drawstring through every second stitch in the top final round above the netting starting at the middle back so the drawstring ends meet at the back.

Important Notes

  • πŸ’‘Check your gauge before starting: 5 DC per 3cm and 4 rows DC per 4cm to ensure correct fit.
  • πŸ’‘Measure the holder on your bottle as you work, especially before finishing the netting and body rows to ensure a snug fit.
  • πŸ’‘Cotton stretches with use; if using a cotton blend or acrylic you may need to add 2-3 stitches after the 3rd round.

Make this handy and stylish bottle holder your new festival essential or everyday companion. Add a granny square pocket or colour stripes for a personalised touch that sparks compliments. Whether you keep it simple or go rainbow, it makes a thoughtful handmade gift. 🧢✨

You ask,

we answer.

FAQs

What size will the finished piece be?

The finished holder is designed to fit a standard water bottle snugly; the exact size depends on your yarn and hook. Measure on your bottle as you work and stop netting when nearly to the top.

Can I use different yarn weights for this pattern?

Yes, but changing yarn weight will change the final size. Adjust hook size and check gauge (5 DC per 3cm) to maintain fit; cotton blends may require adding 2-3 stitches after round 3.

Do I need prior crochet experience for this pattern?

This pattern is rated intermediate because it uses DC, HDC and working in the round; basic knowledge of these stitches and working in rounds is recommended.

How long does this project typically take to complete?

Most crocheters complete this project in 2-4 hours, depending on whether you add a pocket or extensive colour changes.

How do I stop the strap from stretching?

Crochet the strap horizontally for less stretch or sew ribbon/fabric to the underside of the strap to stabilise it after attaching.