🧶 Beautiful ✨ Detailed 💝 Adorable

Granny Claus Amigurumi Pattern

Granny Claus Amigurumi Pattern
4.8★ Rating
12-15 Hours Time Needed
1.4K Made This
✂️

Intermediate Level

Ideal for those with basic crochet experience, featuring slightly more advanced stitches and techniques to expand your skills.

⏱️

Multi-Day Project

A rewarding 12+ hour journey—perfect for dedicated crafters who love detailed work.

🧸

Cute Companion

An adorable friend to cherish, handcrafted with love to bring comfort and joy for years to come.

About This Granny Claus Amigurumi Pattern

This pattern creates a sweet Granny Claus amigurumi with a full set of pieces: boots, legs, body, head, arms, skirt, apron and accessories. You will work in spiral rounds and use simple shaping techniques to form a classic doll silhouette. The pattern includes color-change instructions and step-by-step assembly notes to help you finish a polished toy.

Granny Claus Amigurumi Pattern crochet pattern - detailed view of completed project

Designed with clear rounds and helpful photos, it guides you through each stage. Ideal for crafters who enjoy a structured, photo-supported project.

Why You'll Love This Granny Claus Amigurumi Pattern

I absolutely love this pattern because it captures so much personality in a small handmade doll. I enjoy the way the shaping and color changes create a cozy, characterful Granny Claus. I love sharing patterns that teach versatile techniques like joining legs to a middle connector and attaching details in-process. I hope you enjoy making her as much as I enjoyed designing and testing each step to ensure a satisfying result.

Granny Claus Amigurumi Pattern step 1 - construction progress Granny Claus Amigurumi Pattern step 2 - assembly progress Granny Claus Amigurumi Pattern step 3 - details and accessories Granny Claus Amigurumi Pattern step 4 - final assembly and finishing

Switch Things Up

I love how easy it is to customize this Granny Claus by changing yarn colors — try pastel shades for a softer, vintage look or bold reds and greens for a festive classic.

If you want a bigger Granny, use a bulkier yarn and a larger hook; conversely, switch to thinner thread and a finer hook for a tiny keychain version.

I often swap the puff stitch for small bobbles or surface embroidery to add different textures on the apron and sleeves — it creates a unique look every time.

For more personality, adjust the eye placement or use small safety eyes versus embroidered eyes; embroidered eyes give a softer expression while beads add sparkle.

I sometimes add wire in the arms for poseability; remember to wrap wire ends in tape or band-aid and avoid wired toys for small children unless fully protected.

Try making sets of Grannies with different hair and accessory colors to create a festive family or holiday collection — each needs only minor color tweaks.

I like to add tiny crocheted props like a pocket-handkerchief, small berries or a miniature scarf for seasonal flair.

For a modern twist, crochet Granny in non-traditional colors — teal, mustard or plum — to match home decor or a themed gift set.

I recommend testing a small sample of the stitch pattern before committing to color sequences; it helps ensure consistent striping and alignment with the body rounds.

To personalize, embroider initials on the apron or create different facial expressions with simple stitch changes — a small mouth curve changes her whole mood.

Common Mistakes & How to Fix Them

✗ Skipping stitch markers during leg and body joining leads to misaligned parts; place markers at connection points before joining to ensure accurate placement. ✗ Overstuffing limbs makes seams and joins bulky and uneven; stuff gradually, shape as you go and leave softer stuffing near joins for easier sewing. ✗ Changing thread colors without securing ends can cause unraveling later; fasten off, weave ends in securely or leave tidy tails to hide between rounds. ✗ Forgetting to count after increases or decreases results in incorrect stitch counts; count your stitches every round and mark rounds where counts change to stay on track.

Granny Claus Amigurumi Pattern

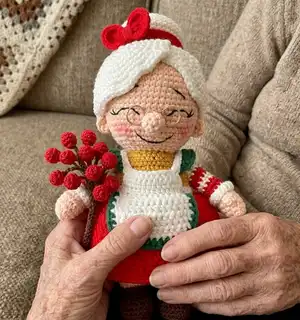
Create a warm and charming Granny Claus with this detailed crochet pattern. You will make each part step-by-step — arms, legs, body, head, apron and skirt — with photos and helpful notes. The pattern includes materials, abbreviations, and thorough assembly instructions so you can finish a delightful holiday amigurumi. Perfect for gifting or display, this pattern guides you through shaping and attaching every piece.

Intermediate 12-15 Hours

Materials Needed for Granny Claus Amigurumi Pattern

— Main Fabric

  • 01
    Semi-cotton yarn (YarnArt Jeans / Alize Cotton Gold) 360 yds / 3.5 Oz - assorted colors: White/Ivory (hairstyle, apron, sleeves) - small amounts (<1.8 Oz each shade)
  • 02
    YarnArt Jeans colors and approximate usage: YA Jeans 17 (mustard) - main body clothing; YA Jeans 01/62 (white) - trims and apron; YA Jeans 73 (cream) - skin/head/arms; YA Jeans 90 (red) - clothes and headband; YA Jeans 69 (green) - apron ruffles; YA Jeans 40 (brown) - shoes
  • 03
    Himalaya Dolphin Baby / YarnArt Dolce 131 yds / 3.5 Oz - option for larger version; red and white shades consumption ~1 skein, others less than a skein
  • 04
    Use small amounts of accent colors for details: facial blush, ruffle trims and apron edging

— Tools Required

  • 01
    Crochet hook size 2.2 mm (recommended for YarnArt Jeans version)
  • 02
    Crochet hook size 3.5 mm (recommended for Himalaya Dolphin Baby / YarnArt Dolce larger version)
  • 03
    Thin black thread for embroidering facial features
  • 04
    (optional) pink artistic pastel or blush for cheeks
  • 05
    (optional) aluminum/copper wire ~2 mm diameter for the arms (use caution)
  • 06
    Band-aid or tape to wrap wire ends if using wire inside toy
  • 07
    Metal wire D=1.5 mm for small glasses, D=2 mm for large glasses
  • 08
    Wire cutters
  • 09
    Sewing needle to sew body parts
  • 10
    Stitch markers
  • 11
    Pins with large head for positioning
  • 12
    Scissors
  • 13
    Polyester fiber filling
  • 14
    Pins for assembly and positioning
  • 15
    Love (small heart)

Progress Tracker

0% Complete

— Arms :

Info :

*cream yarn. *stuff well the palm, don't stuff the rest of the arm for now. *make 2 details

Round 0 :

Chain 5 - work in spiral (without a turning CH and SS) as in all amigurumi toys (oval-shape detail)

Round 1 :

start in the 2nd chain from the hook: 3 SC, 3 SC into the last chain from the hook, on the other side: 2 SC, INC (10)

Round 2 :

(4 SC, INC)*2 (12)

Round 3-4 :

2 rounds of 12 SC

Round 5 :

5 SC, PS, 6 SC (12)

Round 6 :

12 SC - change thread color to white

Round 7 :

12 SC

Round 8 :

BLO: 12 SC - change thread color to red

Round 9-10 :

2 rounds of 12 SC - change thread color to white

Round 11-12 :

2 rounds of 12 SC - change thread color to red

Round 13-14 :

2 rounds of 12 SC - change thread color to white, fix and cut the red thread

Round 15-16 :

2 rounds of 12 SC - work several additional SC to the side edge of the detail (when folding) - fix and cut the thread

Info :

Sleeve edge: go back to Round 7 of the arm; attach the white thread to the free front loop of the round and work 2 rounds according to the pattern: 1. FLO: (3 SC, INC)*3 (15); 2. 15 SC

Info :

fix and cut the thread, hide the thread end inside the arm

— Apron :

Info :

*white yarn. *make a turn and work a turning CH at the end of each row

Round 0 :

Chain 15

Round 1 :

start in the 2nd chain from the hook: 14 SC

Round 2-5 :

4 rows 14 SC

Round 6 :

Skip a St, 11 SC, DEC (12)

Round 7 :

Skip a St, 9 SC, DEC (10)

Info :

fix the thread and leave a long end

Info :

attach a green thread to the side upper corner of the apron and work the side and bottom edges with a crab stitch (in the reverse direction) with a CH between stitches

Info :

when working with green thread, attach the left white thread end from the base of the apron between the stitches - fix and cut the thread

— Legs :

Info :

*start with brown yarn. *make 2 details. *stuff in process

Round 0 :

Chain 7 - work in spiral (without a turning CH and SS)

Round 1 :

start in the 2nd chain from the hook: 5 SC, 3 SC into the last chain from the hook, on the other side: 4 SC, INC (14)

Round 2 :

INC, 4 SC, 3 INC, 4 SC, 2 INC (20)

Round 3 :

20 SC - align the stitch marker exactly in the middle of the heel (if needed)

Round 4 :

5 SC, 5 DEC, 5 SC (15)

Round 5 :

5 SC, 3 DEC, 4 SC (12)

Round 6 :

(3 SC, INC)*3 (15) - change thread color to cream, don't cut the brown thread and leave it on the outside

Round 7 :

BLO: 15 SC

Round 8 :

(4 SC, INC)*3 (18)

Round 9 :

18 SC

Round 10 :

(5 SC, INC)*3 (21) - fix and cut the thread

Info :

go back to Round 6 of the leg to the left brown thread; attach the thread to the free front loop of the round and work BLO 15 SC; join with SS the first and the last stitches of the round, bring the thread inside the leg and fix it

— Body-Head :

Info :

Leg connector (middle part): *mustard yarn. *make sure to leave a long end of the thread at the beginning, with the help of which we connect the legs in the middle with the middle part

Round 1 :

10 SC in MR - don't fasten off - mark 3 SC on the sides of the leg connector at a distance of 2 SC

Info :

mark 3 SC on the side inner parts of the legs

Instruction :

now join the middle part and the legs: place them on the sides of the middle part, so that the continuation of crocheting is behind the side of the left leg; the middle part is upwards; continue crocheting on the left leg behind using the thread from the middle part; stuff in process; rounds numbering starts with Round 11, from the left leg

Round 11 :

on the left leg: 18 SC, on the middle part: 2 SC, on the right leg: 18 SC, on the middle part: 2 SC (40)

Round 12 :

(SC, INC)*2, 8 SC, (SC, INC)*6, 8 SC, (SC, INC)*4 (52)

Round 13 :

(2 SC, INC)*2, 8 SC, (2 SC, INC)*6, 8 SC, (2 SC, INC)*4 (64)

Round 14-24 :

11 rounds of 64 SC - place the stitch marker exactly in the middle of the back (if needed)

Round 25 :

(3 SC, DEC)*3, 34 SC, (DEC, 3 SC)*3 (58) - change thread color to red, don't cut the mustard thread

Round 26 :

58 SC - change thread color to white, fix and cut the red thread

Round 27 :

BLO: (2 SC, DEC)*3, 34 SC, (DEC, 2 SC)*3 (52)

Round 28 :

in Round 28 we are going to attach the apron; mark 16 St in the middle of the belly (place of attachment); if required, adjust the place of attachment in Round 28; 18 SC, 16 SC with the apron, 18 SC (52)

Round 29 :

BLO: (SC, DEC)*3, 34 SC, (DEC, SC)*3 (46) - change thread color to mustard, fix and cut the white thread

Round 30 :

in Round 30 we are going to attach the arms; place the stitch marker exactly in the middle of the back (if required); mark 6 SC on each arm (place of attachment); thumbs forward; for accuracy of attachment mark 6 SC on the sides on the body at a distance of 18 SC on the chest and 16 SC on the back; 8 SC, 6 SC with the arm, 18 SC, 6 SC with the arm, 8 SC (46)

Round 31 :

8 SC, 6 SC on the outer edge of the arm, 18 SC, 6 SC on the outer edge of the arm, 8 SC (46)

Round 32 :

(14 SC, DEC)*2, 14 SC (44)

Round 33 :

(9 SC, DEC)*4 (40)

Round 34 :

(8 SC, DEC)*4 (36)

Round 35 :

(4 SC, DEC)*6 (30)

Round 36 :

(3 SC, DEC)*6 (24) - change thread color to cream, fix and cut the mustard yarn

Round 37 :

BLO: 24 SC

Info :

continue crocheting the head

Round 38 :

(SC, INC)*12 (36)

Round 39 :

(2 SC, INC)*12 (48)

Round 40 :

(7 SC, INC)*6 (54)

Round 41-52 :

12 rounds of 54 SC

Round 53 :

(7 SC, DEC)*6 (48)

Round 54 :

(6 SC, DEC)*6 (42)

Round 55 :

(5 SC, DEC)*6 (36)

Round 56 :

(4 SC, DEC)*6 (30)

Round 57 :

(3 SC, DEC)*6 (24)

Round 58 :

(2 SC, DEC)*6 (18)

Round 59 :

(SC, DEC)*6 (12)

Round 60 :

6 DEC (6) - tighten the hole, fix the thread and hide it inside

— Skirt :

Info :

go back to Round 26 of the body; turn the body upside down, attach the red thread at the back to the front free loop in Round 26; work in spiral according to the pattern

Round 1 :

FLO: 7 SC, INC, (6 SC, INC)*6, 7 SC, INC (66)

Round 2 :

66 SC

Round 3 :

(10 SC, INC)*6 (72)

Round 4-15 :

12 rounds of 72 SC

Round 16 :

crab stitch (in reverse direction): 72 SC

Info :

finish with a straight line, hide the thread end between the loops on the wrong side

— Apron top :

Info :

go back to Round 28 of the body; mark 14 front loops in the middle on the belly; (pattern continues on next pages)

Assembly Instructions

  • Attach the legs to the leg connector: align the marked 3 SC on each leg with the marked sections of the middle part and join by crocheting the middle part into the legs, continuing from the left leg (rounds 1 then continuing at round 11).
  • Attach the apron to the body in Round 28: place the apron in the marked 16 stitches in the middle of the belly and work 16 SC with the apron into the body as instructed in Round 28.
  • Attach the arms in Round 30: mark the places of attachment (6 SC on each arm), align with the body (18 SC apart on the chest and 16 SC on the back) and crochet the arm into the body following Round 30-31 instructions.
  • Join the head to the body by continuing rounds through Round 60, tighten the hole, fix and hide the thread ends inside the head to secure the stuffing and seam.
  • Edge and finish the apron: work the crab stitch edging with green thread around the apron and attach the left white thread end from the base between stitches, then fix and cut the thread.
  • Position and sew sleeves, ruffles and details: pin the sleeve edges and ruffle trims before sewing, then whipstitch or sew into place securely for symmetry.
  • Weave and hide all ends: weave in ends between rounds and inside the toy, and use pins to position facial features before embroidering and final gluing or sewing of glasses if used.

Important Notes

  • 💡Use stitch markers to keep track of rounds and marked attachment points for legs, arms and apron to ensure accurate placement.
  • 💡Stuff gradually and shape as you go; do not overstuff joints to allow parts to join smoothly and evenly.
  • 💡When using metal wire for posability, wrap sharp ends with tape or a band-aid and avoid giving wired toys to small children unless fully protected.
  • 💡Choose your hook size based on yarn and tension; adjust if your gauge differs to ensure the finished size and proportions match the pattern.
  • 💡Change colors neatly by fastening off or carrying yarn inside where instructed to avoid loose ends and messy joins.

This Granny Claus amigurumi pattern brings a classic holiday character to life with charming details and colorwork. Make a cozy keepsake or a handmade gift with a heartwarming personality. The pattern guides you step-by-step from parts to assembly so you can enjoy a satisfying finish. 🧶🎁

You ask,

we answer.

FAQs

What size will the finished piece be?

The finished amigurumi measures approximately 33 cm (13") tall when using the recommended Himalaya Dolphin Baby / YarnArt Dolce yarn and 3.5 mm hook; the YarnArt Jeans version using 2.2 mm hook will be smaller (about 17 cm/6.7" for the mini sample).

Can I use different yarn weights for this pattern?

Yes, you can use different yarn weights, but this will affect final size and requires adjusting hook size and stuffing amounts; test a small gauge swatch to match proportions before proceeding.

Do I need prior crochet experience for this pattern?

This pattern is rated intermediate; basic knowledge of amigurumi techniques (magic ring, SC, increases, decreases, BLO/FLO) and joining parts is recommended for best results.

How long does this project typically take to complete?

Most crafters complete this project over multiple sessions; expect a multi-day project of roughly 12-15 hours depending on experience, yarn choice and finishing details.